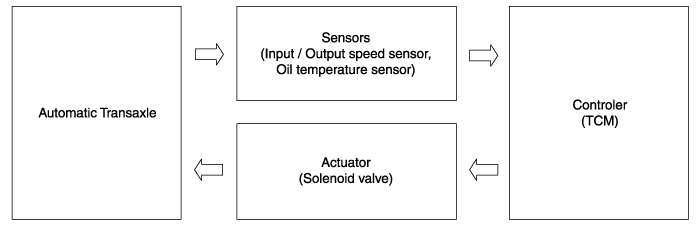
Description and operation
| • |
Automatic transaxle system relies on various measurement data to determine
the current control status and extrapolate the necessary compensation
values.extrapolate the necessary compensation values.
|
| • |
These values are used to control the actuators and achieve the desired
control output.
|
| • |
If a problem with the drivetrain, including the transaxle, has been
identified, perform self-diagnosis and basic transaxle inspection (oil
and fluid inspection) and then check the control system's components
using the diagnosis tool.
▶ Control System Composition
|
Repair procedures
|
1. |
Overview and purpose of learning
| 1) |
The purpose is to ensure the initial operation safety by correcting
the oil pressure differences between transmissions.
|
| 2) |
For relearning of TCM, process relearning by deleting existing
contents using diagnostic tool when there is shift shock at
gears 1-2-3-4-5-6.
|
|
|
2. |
In the following case, TCM learning is required.
| 1) |
Automatic transaxle assembly replacement
|
|
|
3. |
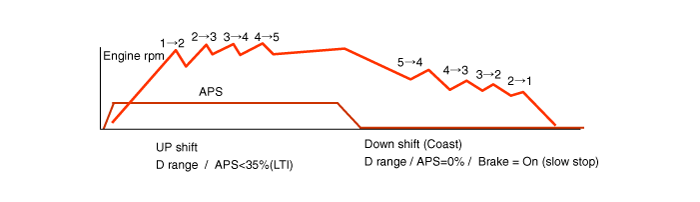
TCM learning procedure
| 1) |
Condition : ATF temperature 35 - 95°C (95 - 203°F)
|
| 2) |
Stop learning
- Repeat the shift pattern shown below five times or more with
the brake stepped on.

|
| 3) |
Driving relearn
- Maintain the throttle open to a constant level with the gear
in D position and increment from 1st to 5th gear within 1500
~ 2500 RPM of engine and decelerate slowly.
With (ON, throttle opening: 0%), decrement from 6th to 1st gear.
- Upshift throttle opening : 15 - 35% (a proper value for making
upshift within 1500 - 2500RPM of engine)
|
|
Transaxle Control Module (TCM). Description and operation
| • |
Monitoring the vehicle's operating conditions to determine the optimal
gear setting.
|
| • |
Performing a gear change if the current gear setting differs from the
identified optimal gear setting.
|
| • |
Determining the need for damper clutch (D/C) activation and engages
the clutch accordingly.
|
| • |
Calculating the optimal line pressure level by constantly monitoring
the torque level and adjusts the pressure accordingly.
|
| • |
Diagnosing the automatic transaxle for faults and failures.
|
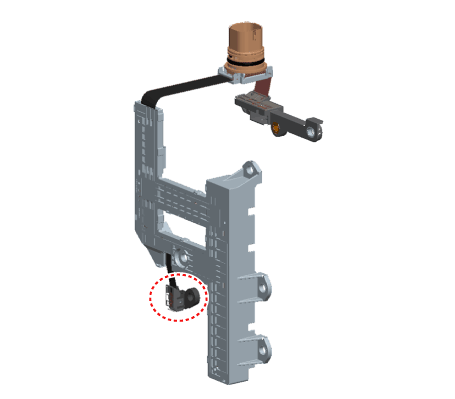
Transaxle Control Module (TCM). Schematic diagrams
| TCM Connector and Terminal
Function |

Connector [A]
Pin No
|
Description
|
Connected to
|
1
|
Power ground
|
Chassis Ground
|
2
|
-
|
-
|
3
|
-
|
-
|
4
|
-
|
-
|
5
|
-
|
-
|
6
|
Fuel Sender Signal
|
Fuel Sender
|
7
|
-
|
-
|
8
|
-
|
-
|
9
|
-
|
-
|
10
|
-
|
-
|
11
|
-
|
-
|
12
|
-
|
-
|
13
|
-
|
-
|
14
|
-
|
-
|
15
|
Stop Lamp Signal
|
Stop Lamp
|
16
|
Brake Test Switch
|
Brake Switch
|
17
|
|
|
18
|
-
|
|
19
|
-
|
|
20
|
Output Speed (Supply)
|
ATM Solenoid Valve (Otput Speed)
|
21
|
Input Speed (Supply)
|
ATM Solenoid Valve (Input Speed)
|
22
|
-
|
-
|
23
|
-
|
-
|
24
|
-
|
-
|
25
|
-
|
-
|
26
|
-
|
-
|
27
|
[A/T] SOL. (PWR1)
|
ATM Solenoid Valve
|
28
|
-
|
-
|
29
|
-
|
-
|
30
|
-
|
-
|
31
|
-
|
-
|
-
|
-
|
32
|
-
|
-
|
33
|
-
|
-
|
34
|
-
|
-
|
35
|
-
|
-
|
36
|
-
|
-
|
37
|
-
|
-
|
38
|
APT (Signal)
|
A/C Pressure Transducer (APT)
|
39
|
-
|
-
|
40
|
-
|
-
|
41
|
-
|
-
|
42
|
-
|
-
|
43
|
[A/T] Output Speed (Signal)
|
Engine Control Relay
|
44
|
[A/T] Input Speed (Signal)
|
ATM Solenoid Valve
|
45
|
-
|
-
|
46
|
-
|
-
|
47
|
-
|
-
|
48
|
[A/T] SOL. (VFS_26B)
|
ATM Solenoid Valve
|
49
|
[A/T] SOL. (VFS_OD)
|
ATM Solenoid Valve
|
50
|
[A/T] SOL. (VFS_PWR2)
|
ATM Solenoid Valve
|
51
|
-
|
-
|
52
|
-
|
-
|
53
|
-
|
-
|
54
|
-
|
-
|
55
|
-
|
-
|
56
|
APS (APS. 2 Ground)
|
Accelerator Position Sensor (APS)
|
57
|
APS (APS. 1 Ground)
|
Accelerator Position Sensor (APS)
|
58
|
-
|
-
|
59
|
-
|
-
|
60
|
-
|
-
|
61
|
APT (Ground)
|
A/C Pressure Transducer (APT)
|
62
|
-
|
-
|
63
|
-
|
-
|
64
|
-
|
-
|
65
|
-
|
-
|
66
|
-
|
-
|
67
|
-
|
-
|
68
|
-
|
-
|
69
|
[A/T] SOL. (OTS (-))
|
ATM Solenoid Valve
|
70
|
[A/T] SOL. (OTS (+))
|
ATM Solenoid Valve
|
71
|
-
|
-
|
72
|
[A/T] SOL. (VFS_LINE)
|
ATM Solenoid Valve
|
73
|
[A/T] SOL. (VFS_UD)
|
ATM Solenoid Valve
|
74
|
Start Relay Control
|
B/Alarm Relay
|
75
|
-
|
-
|
76
|
Vehicle Speed Signal
|
IBU & ESP Control Module
|
77
|
-
|
-
|
78
|
-
|
-
|
79
|
APS (APS. 2 Ground)
|
Accelerator Position Sensor (APS)
|
80
|
APS (APS. 1 Ground)
|
Accelerator Position Sensor (APS)
|
81
|
-
|
-
|
82
|
O2 Sensor (Up) (V_N)
|
Oxygen Sensor (Up)
|
83
|
O2 Sensor (Down) (Ground)
|
Oxygen Sensor (Down)
|
84
|
O2 Sensor (Up) (V_RC)
|
Oxygen Sensor (Up)
|
85
|
-
|
-
|
86
|
-
|
-
|
87
|
-
|
-
|
88
|
-
|
-
|
89
|
-
|
-
|
90
|
-
|
-
|
91
|
-
|
-
|
92
|
-
|
-
|
93
|
-
|
-
|
94
|
[A/T] SOL. Power (SS-B)
|
ATM Solenoid Valve
|
95
|
[A/T] SOL. (VFS_35R)
|
ATM Solenoid Valve
|
96
|
Memory Power
|
PCB Block
|
97
|
Wiper 'P' Input
|
PCB Block
|
98
|
-
|
-
|
99
|
-
|
-
|
100
|
-
|
-
|
101
|
-
|
-
|
102
|
APS (APS. 2 Supply)
|
Accelerator Position Sensor (APS)
|
103
|
APS (APS. 1 Supply)
|
Accelerator Position Sensor (APS)
|
104
|
APT (Supply)
|
A/C Pressure Transducer (APT)
|
105
|
O2 Sensor (Up) (V_G)
|
Oxygen Sensor (Up)
|
106
|
O2 Sensor (Down) (Signal)
|
Oxygen Sensor (Down)
|
107
|
O2 Sensor (Up) (V_IP)
|
Oxygen Sensor (Up)
|
108
|
-
|
-
|
109
|
Knock Sensor (Ground)
|
Knock Sensor (KS)
|
110
|
Knock Sensor (Signal)
|
Knock Sensor (KS)
|
111
|
-
|
-
|
112
|
-
|
-
|
113
|
-
|
-
|
114
|
-
|
-
|
115
|
-
|
-
|
116
|
-
|
-
|
117
|
[A/T] SOL. (SS-A)
|
ATM Solenoid Valve
|
118
|
[A/T] SOL. (VFS_T/CON)
|
ATM Solenoid Valve
|
119
|
Memory Power
|
PCB Block
|
Connector [B]
Pin No
|
Description
|
Connected to
|
1
|
Engine Control Relay 'ON' Input
|
Engine Control Relay
|
2
|
Engine Control Relay 'ON' Input
|
Engine Control Relay
|
3
|
Ground
|
Ground
|
4
|
Ground
|
Ground
|
5
|
Engine Control Relay 'ON' Input
|
PCB Block
|
6
|
P-CAN (High)
|
P-CAN (High)
|
7
|
P-CAN (Low)
|
P-CAN (Low)
|
8
|
-
|
-
|
9
|
-
|
-
|
10
|
-
|
-
|
11
|
-
|
-
|
12
|
-
|
-
|
13
|
OPTS (Signal)
|
Oil Pressure Switch
|
14
|
CMP (IN) (Signal)
|
Camshaft Position Sensor (Intake)
|
15
|
CMP (EX) (Signal)
|
Camshaft Position Sensor (Exhaust)
|
16
|
ETC Motor & Throttle Position Sensor.1 Signal
|
ETC Motor & Throttle Position Sensor
|
17
|
ETC Motor & Throttle Position Sensor Supply
|
ETC Motor & Throttle Position Sensor
|
18
|
-
|
-
|
19
|
-
|
-
|
20
|
-
|
-
|
21
|
-
|
-
|
22
|
-
|
-
|
23
|
-
|
-
|
24
|
Ignition Coil #1 (Control)
|
Ignition Coil #1
|
25
|
O2 Sensor (Up) (Heater)
|
Oxygen Sensor (Up)
|
26
|
O2 Sensor (Down) (Heater)
|
Oxygen Sensor (Down)
|
27
|
-
|
-
|
28
|
-
|
-
|
29
|
Local-CAN (High)
|
Electronic ATM Shift Lever, SCU (High)
|
30
|
Local-CAN (Low)
|
Electronic ATM Shift Lever, SCU (Low)
|
31
|
-
|
-
|
32
|
-
|
-
|
33
|
-
|
-
|
34
|
WTS #1 (Signal)
|
Engine Coolant Temperature Sensor
|
35
|
Sensor Power : Map, CMP (In), CKP
|
Sensor Power : Map, CMP (In), CKP
|
36
|
-
|
-
|
37
|
CMP (In) (Ground)
|
Camshaft Position Sensor (Intake)
|
38
|
CMP (EX) (Ground)
|
Camshaft Position Sensor (Exhaust)
|
39
|
ETC Motor & Throttle Position Sensor.2 Signal
|
ETC Motor & Throttle Position Sensor
|
40
|
-
|
-
|
41
|
-
|
-
|
42
|
Fuel Pump Relay Control
|
Fuel Pump Relay
|
43
|
Engine Control Relay Control
|
Engine Control Relay
|
44
|
-
|
-
|
45
|
-
|
-
|
46
|
A/C Relay Control
|
A/C Relay
|
47
|
Ignition Coil #3 (Control)
|
Ignition Coil #3
|
48
|
ETC DC Motor (+)
|
ETC Motor
|
49
|
ETC DC Motor (-)
|
ETC Motor
|
50
|
-
|
-
|
51
|
ON/Start (Input)
|
ON/Start (Input)
|
52
|
-
|
-
|
53
|
-
|
-
|
54
|
-
|
-
|
55
|
-
|
-
|
56
|
-
|
-
|
57
|
WTS #1 (Ground)
|
Engine Coolant Temperature Sensor
|
58
|
MAP & IAT Ground
|
MAP Sensor
|
59
|
-
|
-
|
60
|
-
|
-
|
61
|
-
|
-
|
62
|
ETC (TPS Groud)
|
ETC Motor & Throttle Position Sensor
|
63
|
-
|
-
|
64
|
-
|
-
|
65
|
Start Relay (Low Side)
|
Start Relay
|
66
|
-
|
-
|
67
|
-
|
-
|
68
|
-
|
-
|
69
|
-
|
-
|
70
|
OCV Control (EX)
|
CVVT Oil Control Valve (OCV)
|
71
|
OCV Control (IN)
|
CVVT Oil Control Valve (OCV)
|
72
|
-
|
-
|
73
|
-
|
-
|
74
|
-
|
-
|
75
|
Local-CAN2 (High)
|
Can Check
|
76
|
Local-CAN2 (Low)
|
Can Check
|
77
|
Alternator (IN)
|
Alternator
|
78
|
-
|
-
|
79
|
-
|
-
|
80
|
CKP (Ground)
|
Crankshaft Position Sensor (CKPS)
|
81
|
MAP Sensor (Signal)
|
MAP Sensor
|
82
|
Ignition Coil #1/#4 (Feedback)
|
Ignition Coil #1 / #4 (Feedback)
|
83
|
-
|
-
|
84
|
-
|
-
|
85
|
-
|
-
|
86
|
-
|
-
|
87
|
-
|
-
|
88
|
C/FAN Motor (PWM Signal)
|
C/FAN Motor
|
89
|
PCSV Control
|
Purge Control Solanoid Valve
|
90
|
CCV Control (Not Used)
|
Canister Close Valve
|
91
|
-
|
-
|
92
|
VIS Control
|
Variable Intake Solenoid Valve (VIS)
|
93
|
Ignition Coil #4 Control
|
Ignition Coil #4
|
94
|
Injector Coil #4 Control
|
Injector Coil #4
|
95
|
-
|
-
|
96
|
-
|
-
|
97
|
-
|
-
|
98
|
-
|
-
|
99
|
IMMO. Data Line
|
Immobilizer
|
100
|
-
|
-
|
101
|
-
|
-
|
102
|
-
|
-
|
103
|
Crankshaft Position Sensor (CKPS) signal input
|
Crankshaft Position Sensor (CKPS)
|
104
|
IAT Sensor
|
MAP Sensor
|
105
|
Ignition Coil #2 / #3 (Feedback)
|
Ignition Coil #2 / #3 (Feedback)
|
106
|
-
|
-
|
107
|
-
|
-
|
108
|
CMP (EX) (Supply)
|
Camshaft Position Sensor (CMPS)
|
109
|
FTPS (Not Used)
|
Fuel Tank Pressure Sensor (FTPS)
|
110
|
Engine RPM Signal
|
Engine RPM Signal
|
111
|
-
|
-
|
112
|
-
|
-
|
113
|
-
|
-
|
114
|
-
|
-
|
115
|
Thermostat PWM
|
Electronic Thermostat
|
116
|
Ignition Coil #2 Control
|
Ignition Coil #2
|
117
|
Injector Coil #1 Control
|
Injector Coil #1
|
118
|
Injector Coil #3 Control
|
Injector Coil #3
|
119
|
Injector Coil #2 Control
|
Injector Coil #2
|
Transaxle Control Module (TCM). Repair procedures
|
1. |
TCM ground circuit test : Measure the resistance between TCM and chassis
ground.
(Inspect the terminal connected to the chassis ground with the back
of harness connector as the inspection point of TCM side.)
|
|
2. |
TCM connector test : Disconnect the TCM connector and visually check
the ground terminals on TCM side and harness side for bent pins or poor
contact pressure.
|
|
3. |
If problem is not found in Steps 1 and 2, the TCM could be faulty.
If so, replace the TCM with a new one, and then check the vehicle again.
If the vehicle operates normally then the problem was likely with the
TCM.
|
|
4. |
Reinspection of original TCM : Install the original TCM (probably broken)
into a known-good vehicle and check the vehicle. If the problem occurs
again, replace the original TCM with a new one.
If the problem does not reoccur, this is an intermittent problem and
other part may be faulty.
|
|
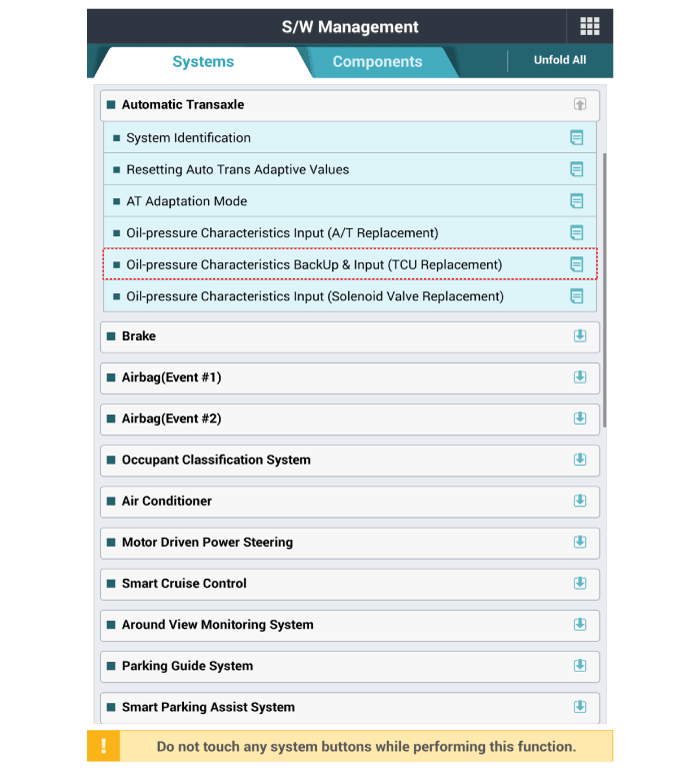
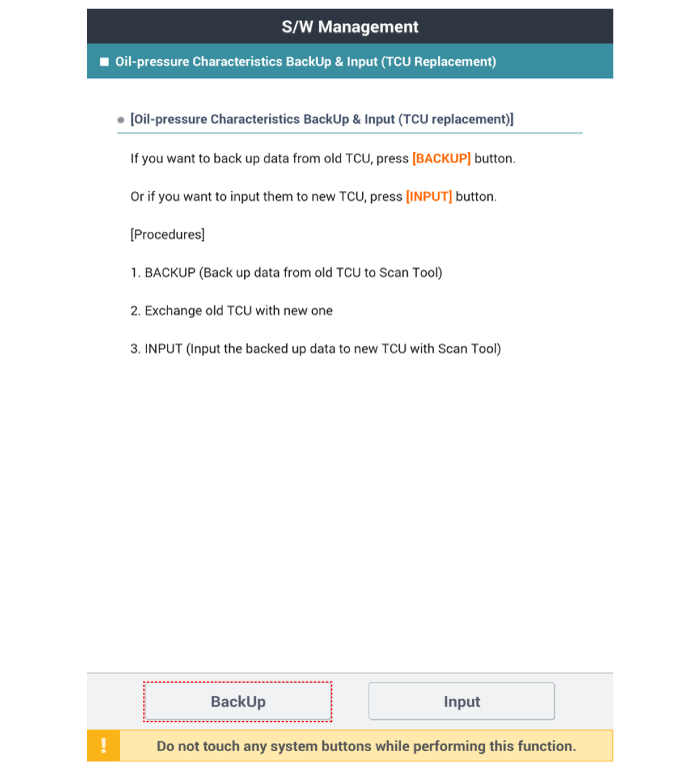
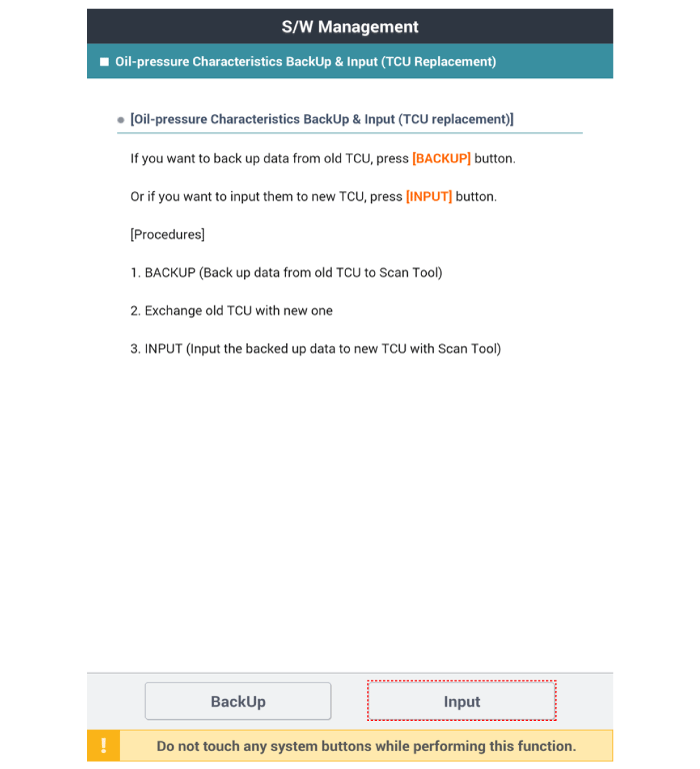
1. |
Perform the oil pressure characteristics backup procedure using the
diagnostic tool when replacing with a new TCM.
|
|
2. |
Turn ignition switch OFF and disconnect the negative (-) battery cable.
|
|
3. |
Remove the air cleaner assembly.
(Refer to Engine Mechanical System - "Air Cleaner")
|
|
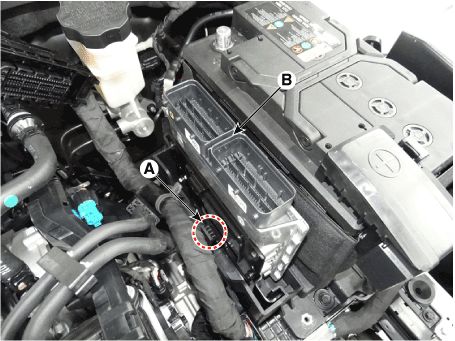
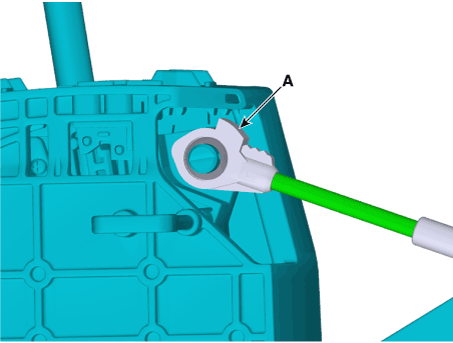
4. |
Remove the TCM.
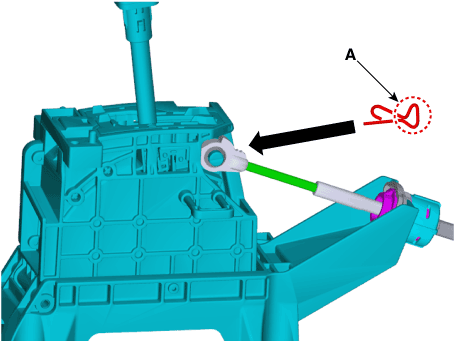
| 1) |
Disconnect the TCM connector (A).

|
| 2) |
Pull the clip (A) and then removing the TCM (B).
|
|
|
1. |
To install, reverse the removal procedure.
|
|
2. |
Oil-pressure characteristics input (TCM exchange)
|
• |
In order to avoid any problem including sense of starting
delay of the transaxle and shock at acceleration and
vehicle start, make sure to process learning for TCM
after replacing the transaxle / TCM.
(Refer to Automatic Transaxle Control System - "Repair
Procedures")
|
|
• |
Since TCM and ECM are integrated, perform the procedures
related in the ECM after replacing the TCM.
(Refer to Engine Control / Fuel System - "Engine Control
Module (ECM)")
|
|
|
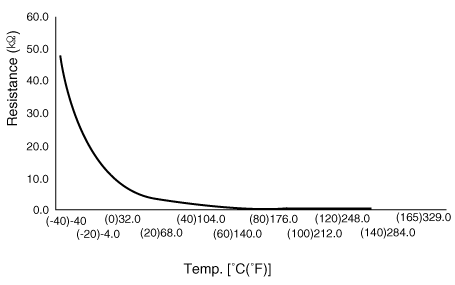
Transaxle Oil Temperature Sensor. Description and operation
| • |
Transaxle oil temperature sensor monitors the automatic transaxle fluid's
temperature and conveys the readings to TCM.
|
| • |
It is an NTC (Negative Thermal Coefficient) sensor whose resistance
has an inversely proportional relationship with the temperature level.
|
| • |
Data produced by this sensor is used to identify damper clutch activation
and deactivation zones within the low temperature and high temperature
range and to compensate hydraulic pressure levels during gear changes.
|
Transaxle Oil Temperature Sensor. Specifications
▷ Type : Negative Thermal Coefficient Type
Temp.[(°C)°F]
|
Resistance (Ω)
|
Min
|
Max
|
(-40) -40
|
48153
|
45301
|
51006
|
(-20) -4.0
|
15614
|
14785
|
16443
|
(0) 32.0
|
5887
|
5605
|
6168
|
(20) 68.0
|
2510.6
|
2401.9
|
2619.3
|
(40) 104.0
|
1199.6
|
1152.4
|
1246.7
|
(60) 140.0
|
612.3
|
590.3
|
634.2
|
(80) 176.0
|
329.5
|
318.7
|
340.3
|
(100) 212.0
|
186
|
180.4
|
191.6
|
(120) 248.0
|
109.7
|
106.1
|
113.2
|
(140) 284.0
|
67.16
|
64.82
|
69.5
|
(150) 302.0
|
53.24
|
51.32
|
55.16
|
Transaxle Oil Temperature Sensor. Repair procedures
| •
|
Refer to the DTC manual for the check procedure.
|
|
| •
|
Be careful not to damage the parts located under the vehicle
(floor under cover, fuel filter, fuel tank and canister) when
raising the vehicle using the lift.
(Refer to General Information - "Lift and Support Points")
|
| •
|
When Diagnostic Trouble Codes (DTC) is on, perform the following
procedure to replace it.
|
| •
|
Automatic transaxle is composed of delicate components. Be careful
not to cause any damage on the component in the course of assembly
and disassembly.
|
| •
|
Maintain clean condition so that foreign substance does not
get into the automatic transaxle.
|
| •
|
Use a coated apron, latex gloves, and stainless tray to prevent
foreign substance from getting into the transaxle.
|
| •
|
Automatic transaxle fluid (ATF) can be reused. Collect it using
a clean 10-liter beaker.
|
|
|
1. |
Turn ignition switch OFF and disconnect the negative (-) battery cable.
|
|
2. |
Remove the battery.
(Refer to Engine Electrical System - "Battery")
|
|
3. |
Remove the air cleaner assembly and air duct.
(Refer to Engine Mechanical System - "Air Cleaner")
|
|
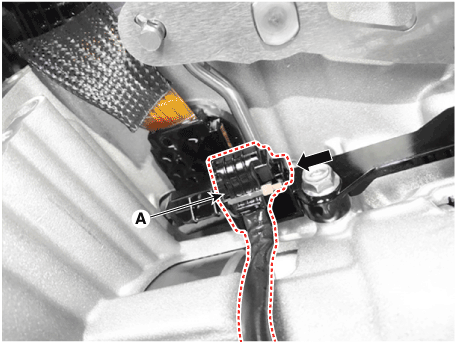
4. |
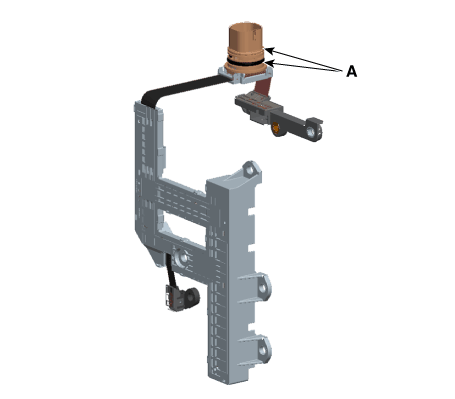
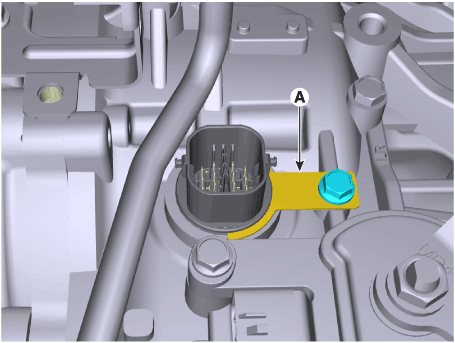
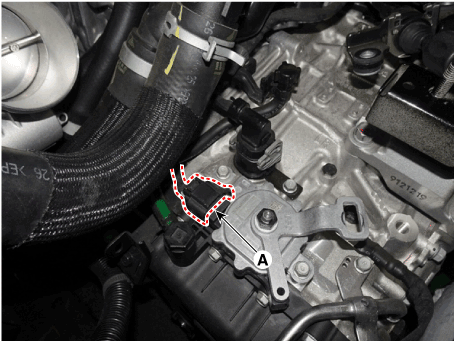
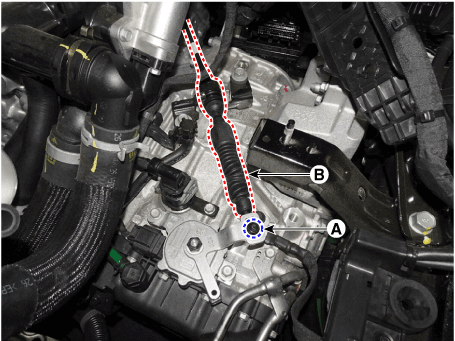
Disconnect the solenoid valve connector (A).
|
|
5. |
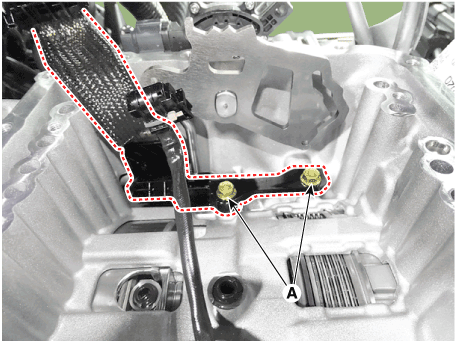
Loosen the bolt and then removing the wiring bracket (A).
|
|
6. |
Separate the air bleeder hose (B).
|
|
7. |
Remove the under cover.
(Refer to Engine Mechanical System - "Engine Room Under Cover")
|
|
8. |
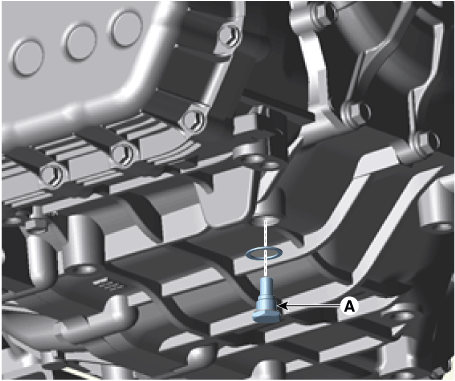
Remove the drain plug (A) and drain the ATF totally and then reinstall
the drain plug.
|
Tightening torque :
33.3 - 43.1 N.m (3.4 - 4.4 kgf.m, 24.6 - 31.8 lb-ft)
|
|
• |
Replace the gasket before reinstalling the drain plug.
|
|
|
|
9. |
Loosen the mounting bolts (A) of the valve body cover.
|
Tightening torque :
11.8 - 13.7 N.m (1.2 - 1.4 kgf.m, 8.7 - 10.1 lb-ft)
|
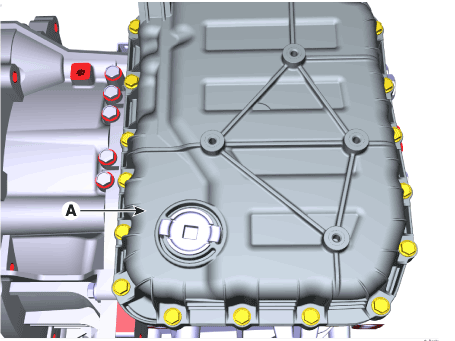
|
• |
Be careful when removing the valve body cover because
the remaining ATF remains in the valve body cover.
|
|
|
• |
Replace the gasket (A) before reinstalling the valve
body cover.
|
|
• |
After the installation, start the engine and then check
if there are any leakages from the valve body cover.
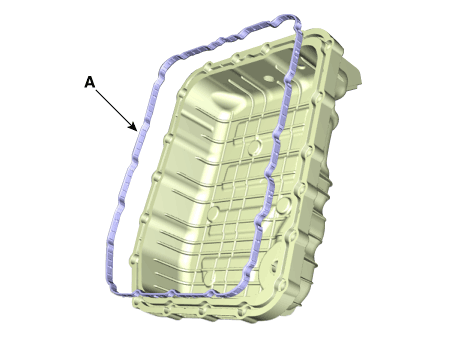
|
|
|
|
10. |
Loosen the bolts and then removing the main harness (A).
|
Tightening torque :
9.8 - 11.8 N.m (1.0 - 1.2 kgf·m, 7.2 - 8.7 lb-ft)
|

|
• |
Check for the looseness, poor connection, bending, corrosion,
contamination, deterioration, or damage before reinstalling
the solenoid valve connector.
|
|
|
|
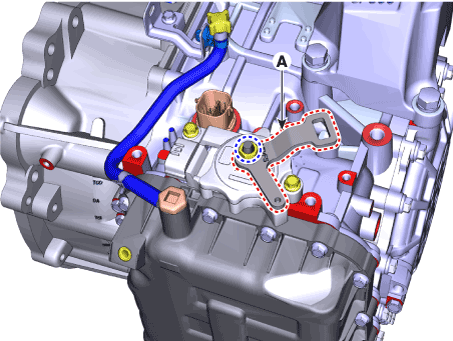
11. |
Loosen the mounting bolts and then removing the valve body assembly
(A).
|
Tightening torque :
9.8 - 11.8 N.m (1.0 - 1.2 kgf.m, 7.2 - 8.7 lb-ft)
|

|
|
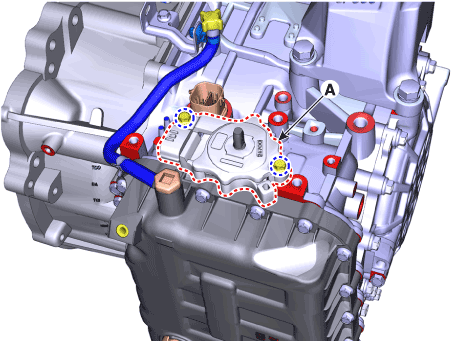
12. |
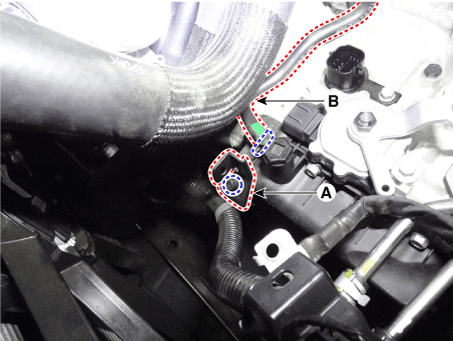
Disconnect the input & output speed sensor connector (A).
|
|
13. |
Loosen the main connector bolts (A).
|
Tightening torque :
9.8 - 11.8 N.m (1.0 - 1.2 kgf.m, 7.2 - 8.7 lb-ft)
|
|
• |
Replace the O-ring (A) before reinstalling solenoid
valve connector.
|
|
|
|
14. |
Remove the solenoid valve connector mounting clip (A).
|
|
15. |
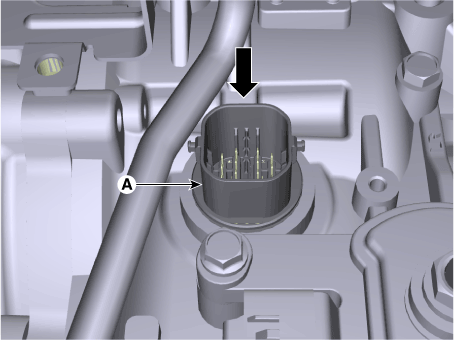
Remove the solenoid valve connector (A) by pushing down from the transaxle.
|
|
1. |
To install, reverse the removal procedure.
|
|
2. |
Check fluid level, after filling the automatic transaxle with fluid.
(Refer to Automatic Transaxle Syatem - "Automatic Transaxle Fluid(ATF)")
|
• |
After ATF level check or exchange, be sure to remove
residual ATF on transaxle case.
(Be especially sure to remove residual ATF between automatic
transaxle case and valve body cover)
|
|
• |
After installing, check for leakage of coolant or fluid
from hose connection during engine start.
|
|
|
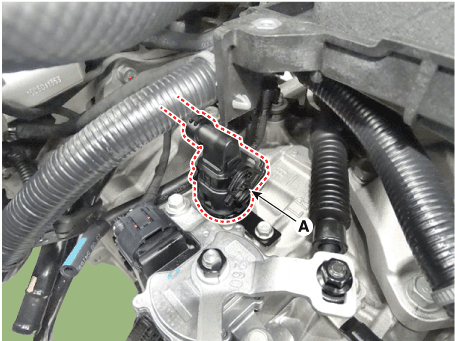
Input Speed Sensor. Description and operation
Input speed sensor is a vital unit that measures the rate of rotation of the
input shaft inside the transaxle and delivers the readings to the TCM. The sensor
provides critical input data that's used in feedback control, damper clutch
control, gear setting control, line pressure control, clutch activation pressure
control, and sensor fault analysis.

Input Speed Sensor. Specifications
▷ Type : Hall effect sensor
▷ Specifications
Items
|
Specifications
|
Operation condition [°C(°F)]
|
(-40 to 150) -40 to 302
|
Sensor length (mm)
|
35.0 - 35.2 mm
|
Air gap (mm)
|
About 1.5 mm
|
Output voltage(V)
|
High
|
1.18 - 1.68
|
Low
|
0.59 - 0.84
|
Input Speed Sensor. Repair procedures
| •
|
Refer to the DTC manual for the check procedure.
|
|
| •
|
Be careful not to damage the parts located under the vehicle
(floor under cover, fuel filter, fuel tank and canister) when
raising the vehicle using the lift.
(Refer to General Information - "Lift and Support Points")
|
| •
|
When the solenoid valve Diagnostic Trouble Codes (DTC) is on,
perform the following procedure to replace it.
|
| •
|
Automatic transaxle is composed of delicate components. Be careful
not to cause any damage on the component in the course of assembly
and disassembly.
|
| •
|
Maintain clean condition so that foreign substance does not
get into the automatic transaxle.
|
| •
|
Use a coated apron, latex gloves, and stainless tray to prevent
foreign substance from getting into the transaxle.
|
| •
|
Automatic transaxle fluid (ATF) can be reused. Collect it using
a clean 10-liter beaker.
|
|
|
1. |
Turn ignition switch OFF and disconnect the negative (-) battery cable.
|
|
2. |
Remove the air duct and the air cleaner assembly.
(Refer to Engine Mechanical System - "Air Cleaner")
|
|
3. |
Separate the air bleed hose (B) and then wiring bracket (A).
|
|
4. |
Remove the under cover.
(Refer to Engine Mechanical System - "Engine Room Under Cover")
|
|
5. |
Remove the drain plug (A) and reinstall the drain plug after draining
ATF totally.
|
Drain plug tightening torque :
33.3 - 43.1 N.m (3.4 - 4.4 kgf.m, 24.6 - 31.8 lb-ft)
|
|
• |
Replace the gasket before reinstalling the drain plug.
|
|
|
|
6. |
Loosen the mounting bolts (A) of the valve body cover.
|
Tightening torque :
11.8 - 13.7 N.m (1.2 - 1.4 kgf.m, 8.7 - 10.1 lb-ft)
|
|
• |
Be careful when removing the valve body cover because
the remaining ATF remains in the valve body cover.
|
|
|
• |
Replace the gasket (A) before reinstalling the valve
body cover.
|
|
• |
After the installation, start the engine and then check
if there are any leakages from the valve body cover.
|
|
|
|
7. |
Loosen the bolts and then removing the main harness (A).
|
Tightening torque :
9.8 - 11.8 N.m (1.0 - 1.2 kgf·m, 7.2 - 8.7 lb-ft)
|
|
• |
Check for the looseness, poor connection, bending, corrosion,
contamination, deterioration, or damage before reinstalling
the solenoid valve connector.
|
|
|
|
8. |
Loosen the mounting bolts and then removing the valve body assembly
(A).
|
Tightening torque :
9.8 - 11.8 N.m (1.0 - 1.2 kgf.m, 7.2 - 8.7 lb-ft)
|
|
|
9. |
Disconnect the input & output speed sensor connector (A).
|
|
10. |
Loosen the bolts and then removing the input / output speed sensor (A).
|
Tightening torque :
9.8 - 11.8 N.m (1.0 - 1.2 kgf·m, 7.2 - 8.7 lb-ft)
|
|
|
1. |
To install, reverse the removal procedure.
|
|
2. |
Check fluid level after filling the automatic transaxle with fluid.
(Refer to Automatic Transaxle Syatem-"Automatic Transaxle Fluid(ATF)")
|
• |
After ATF level check or exchange, be sure to remove
residual ATF on transaxle case.
(Be especially sure to remove residual ATF between automatic
transaxle case and valve body cover)
|
|
• |
After installing, check for leakage of coolant or fluid
from hose connection during engine start.
|
|
|
Output Speed Sensor. Description and operation
The output speed sensor is a vital unit that measures the rate of rotation of
the transaxle's turbine shaft and output shaft, and delivers the readings to
the TCM. The sensor provides critical input data that's used in feedback control,
damper clutch control, gear setting control, line pressure control, clutch activation
pressure control, and sensor fault analysis.
Output Speed Sensor. Specifications
▷ Type : Hall effect sensor
▷ Specifications
Items
|
Specifications
|
Operation condition [°C(°F)]
|
(-40 to 150) -40 to 302
|
Output voltage(V)
|
High
|
1.18 - 1.68
|
Low
|
0.59 - 0.84
|
Output Speed Sensor. Repair procedures
| •
|
Refer to the DTC manual for the check procedure.
|
|
| •
|
Be careful not to damage the parts located under the vehicle
(floor under cover, fuel filter, fuel tank and canister) when
raising the vehicle using the lift.
(Refer to General Information - "Lift and Support Points")
|
| •
|
When the solenoid valve Diagnostic Trouble Codes (DTC) is on,
perform the following procedure to replace it.
|
| •
|
Automatic transaxle is composed of delicate components. Be careful
not to cause any damage on the component in the course of assembly
and disassembly.
|
| •
|
Maintain clean condition so that foreign substance does not
get into the automatic transaxle.
|
| •
|
Use a coated apron, latex gloves, and stainless tray to prevent
foreign substance from getting into the transaxle.
|
| •
|
Automatic transaxle fluid (ATF) can be reused. Collect it using
a clean 10-liter beaker.
|
|
|
1. |
Turn ignition switch OFF and disconnect the negative (-) battery cable.
|
|
2. |
Remove the air cleaner assembly and air duct.
(Refer to Engine Mechanical System - "Air Cleaner")
|
|
3. |
Separate the air bleed hose (B) and then wiring bracket (A).
|
|
4. |
Remove the under cover.
(Refer to Engine Mechanical System - "Engine Room Under Cover")
|
|
5. |
Remove the drain plug (A) and reinstall the drain plug after draining
ATF totally.
|
Drain plug tightening torque :
33.3 - 43.1 N.m (3.4 - 4.4 kgf.m, 24.6 - 31.8 lb-ft)
|
|
|
6. |
Loosen the mounting bolts (A) of the valve body cover.
|
Tightening torque :
11.8 - 13.7 N.m (1.2 - 1.4 kgf.m, 8.7 - 10.1 lb-ft)
|
|
• |
Be careful when removing the valve body cover because
the remaining ATF remains in the valve body cover.
|
|
|
• |
Replace the gasket (A) before reinstalling the valve
body cover.
|
|
• |
After the installation, start the engine and then check
if there are any leakages from the valve body cover.
|
|
|
|
7. |
Loosen the bolts and then removing the main harness (A).
|
Tightening torque :
9.8 - 11.8 N.m (1.0 - 1.2 kgf·m, 7.2 - 8.7 lb-ft)
|
|
• |
Check for the looseness, poor connection, bending, corrosion,
contamination, deterioration, or damage before reinstalling
the solenoid valve connector.
|
|
|
|
8. |
Loosen the mounting bolts and then removing the valve body assembly
(A).
|
Tightening torque :
9.8 - 11.8 N.m (1.0 - 1.2 kgf.m, 7.2 - 8.7 lb-ft)
|
|
• |
Check for the looseness, poor connection, bending, corrosion,
contamination, deterioration, or damage before reinstalling
the solenoid valve connector.
|
|
|
|
9. |
Disconnect the input & output speed sensor connector (A).
|
|
10. |
Loosen the bolts and then removing the input / output speed sensor (A).
|
Tightening torque :
9.8 - 11.8 N.m (1.0 - 1.2 kgf·m, 7.2 - 8.7 lb-ft)
|
|
|
1. |
To install, reverse the removal procedure.
|
|
2. |
Check fluid level after filling the automatic transaxle with fluid.
(Refer to Automatic Transaxle Syatem-"Automatic Transaxle Fluid(ATF)")
|
• |
After ATF level check or exchange, be sure to remove
residual ATF on transaxle case.
(Be especially sure to remove residual ATF between automatic
transaxle case and valve body cover)
|
|
• |
After installing, check for leakage of coolant or fluid
from hose connection during engine start.
|
|
|
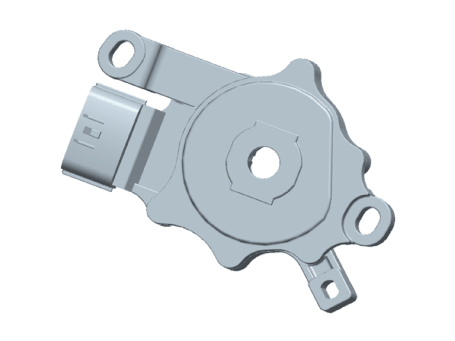
Position Switch. Description and operation
| • |
The position switch mounted on the upper of transaxle and connected
with shifter lever.
|
| • |
The position switch has four points of contact and it makes the signals(S1,
S2, S3, S4).
|
| • |
The position switch signals delivered at the TCM according to control
of the shift lever positions(P, R, N, D) and it is used to control of
the gear setting.
|
Position Switch. Troubleshooting
▶ Fault Diagnosis for Symptom
Major Symptom
|
Expected Cause
|
Items to Check and Measures
|
Shift lever inoperable
|
Faulty shift cable tension
|
Adjust shift cable tension
(refer to "Automatic Transaxle System – Position Switch")
|
Faulty shift cable assembly/connection
|
Check manual control valve assembly and re-assemble if necessary.
|
Faulty shift cable bracket installation
|
Check cable installation on the shift lever assembly and repair if necessary.
|
Shock when shifting to and from D/R
Motor run-up when shifting to and from D/R
|
Faulty inhibitor switch "N" setting
|
Use the "N" setting jig and adjust the "N" setting.
|
(refer to "Automatic Transaxle System – Position Switch")
|
Faulty oil pressure in the valve body.
|
Replace valve body assembly or inspect/replace transaxle assembly
|
Faulty engine start
Current gear not indicated in the Cluster
Warning Lamp ON
Engine stall while stopped
Creeping not possible
Auto parking release disabled
|
Faulty CAN terminating resistance/circuit
|
Check PCU/battery management system module.
|
Check PCU wiring connector conn ction.
|
Faulty power supply (IG.1) to inhibitor switch circuit
|
Check for gap on the junction box power terminal in the engine compartment
and fuse (TCU2) connection. Repair terminal or exchange junction box if
necessary.
|
Faulty inhibitor switch circuit fuse
|
Check fuse and junction box terminal, and repair.
|
Faulty inhibitor switch wiring connector
|
Check for foreign substance in the wiring connector, and check for gap on
the terminal.
|
Check sealing on unused pin, and check for corrosion on the terminal.
|
Faulty reverse lamp circuit
|
Check reverse lamp ground, and reassemble if necessary.
|
Faulty inhibitor switch wiring ground
|
Check wiring ground, and reassemble if necessary.
|
Faulty inhibitor switch circuit
(unused code)
|
Inspect in accordance with the inspection flow, then replace inhibitor switch
if necessary.
|
Faulty inhibitor switch operation
(faulty mid-range)
|
Inspect in accordance with the inspection flow, then replace inhibitor switch
if necessary.
|
Position Switch. Specifications
▷ Type : Combination of output signals from 4 terminals
▷ Specifications
Items
|
Specifications
|
Power supply (V)
|
12
|
Output type
|
Combination of output signals
|
Position Switch. Repair procedures
▶ Inspection flow of the position switch
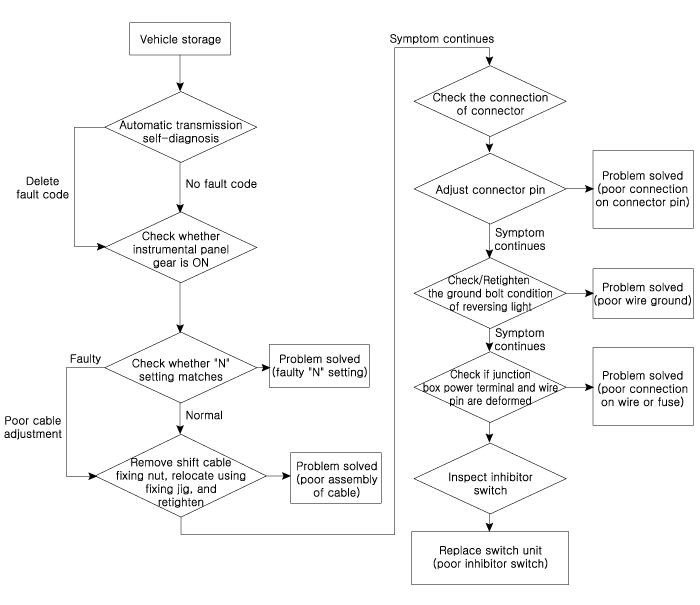
▶ Items to check
|
2. |
Inspect whether N setting matches.
| –
|
Adjust N setting
(Refer to Automatic Transaxle Control System - "Position Switch")
|
|
|
3. |
Inspect shift cable separation.
| –
|
Adjust shift cable separation
(Refer to Automatic Transaxle Control System - "Shift Cable")
|
|
|
4. |
Inspect whether connector is connected.
| –
|
Inspect connector thoroughly for looseness, poor connection,
bending, corrosion, contamination, deformation, or damage.
|
| –
|
Turn ignition key "ON" and engine "OFF" and measure the power
supplied to inhibitor switch circuit and voltage between ground.
|
Specification : approx. 12V
|
|
| –
|
Fix the pin wiring when connector pin wiring is faulty.
(Refer to ETM - "wiring repair").
|
|
|
5. |
Inspect ground condition on reversing light circuit.
| –
|
Check the ground location of reversing light
(Refer to ETM - "Harness Location Map")
|
| –
|
Reattach reversing light if ground condition is faulty.
|
|
|
6. |
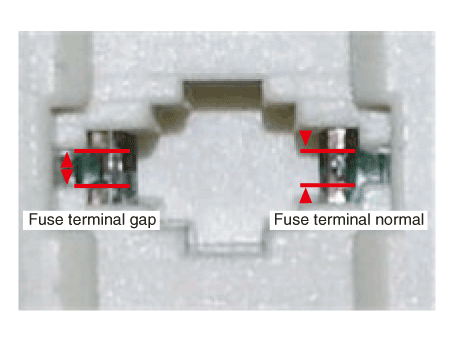
Inspect wiring connection on junction box power terminal and fuse lamp.
| –
|
Check whether fuse holder is separated and holder is holding
the fuse tight.
|
| –
|
Attach tester fuse to check if it is connected appropriately.
|
| –
|
Check whether fuse capacity is appropriate for each circuit.
|
| –
|
Check if fuse is damaged.
|
| –
|
Check pulling of fuse fixing wiring, inflow of foreign substance,
and arrangement condition of terminal.
|
| –
|
Relocate the terminal that has been pulled and inspect using
the method explained above.
|
| –
|
When problem is not solved, refer to the circuit diagram wiring
repair instructions to fix or replace the terminal.
|
|
|
7. |
Inspect inhibitor switch signal.
| –
|
Turn ignition key "ON" and engine "OFF".
|
| –
|
Measure the voltage between each terminal and chassis ground
when shifting lever to "P, R, N, D" range.
|
Specified value : Refer to specification "signal code"
table
|
|
|
|
1. |
Make sure vehicle does not roll before setting shift lever to "N" position.
|
|
2. |
Turn ignition switch OFF and disconnect the negative (-) battery cable.
|
|
3. |
Remove the air duct and air cleaner assembly.
(Refer to Engine Mechanical System - "Air Cleaner")
|
|
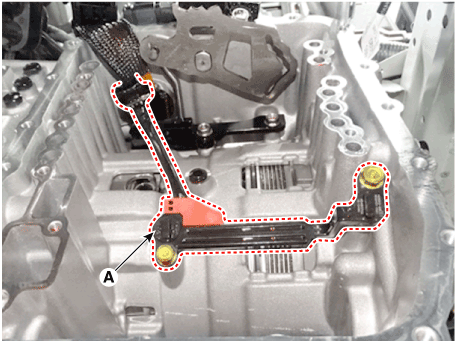
4. |
Loosen the nut and then removing the shift cable (A) from position switch.

|
|
5. |
Disconnect the position switch connector (A).
|
|
6. |
Loosen the nut and then removing the manual lever (A).
|
|
7. |
Loosen the bolts and then removing the position switch (A).
|
|
1. |
Check that the shift lever is placed in the "N" position.
|
|
2. |
Lightly tighten the bolts (B) after installing the position switch (A).

|
|
3. |
Lightly tighten the nut (B) after installing the manual control lever
(A).

|
|
4. |
Align the hole in the manual control lever with the "N" position hole
of the inhibitor switch and then insert the position switch guide pin
(SST No. : 09480 - A3800) (A).
|
|
5. |
Tighten the nut (A) and bolts (B) with the specified torque.
|
Tightening torque :
A : 17.7 - 24.5 N.m (1.8 - 2.5 kgf.m, 13.0 - 18.1 lb-ft)
B : 9.8 - 11.8 N.m (1.0 - 1.2 kgf.m, 7.2 - 8.7 lb-ft)
|
|
|
6. |
Connect the position switch connector (A).
|
|
7. |
Push nut lightly to "F" direction shown to eliminate free play of shift
cable.
|
|
8. |
Tighten the nut and then install the shift cable (A).
|
Tightening torque :
9.8 - 13.7 N.m (1.0 - 1.4 kgf.m, 7.2 - 10.1 lb-ft)
|
|
|
9. |
Remove the position switch guide pin (SST No. : 09480 - A3800) (A) from
the hole.
|
|
10. |
Install the air cleaner and air duct.
(Refer to Engine Mechanical System - "Air Cleaner")
|
|
11. |
Connect the battery negative (-) cable.
|
|
12. |
Check that operating surely at each range of the inhibitor switch corresponding
to each position of shift lever.
|
Shift Lever. Repair procedures
|
1. |
Turn ignition switch OFF and disconnect the negative (-) battery cable.
|
|
2. |
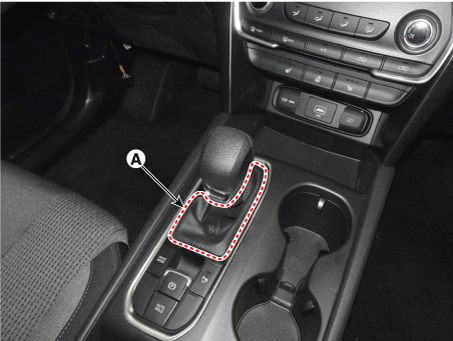
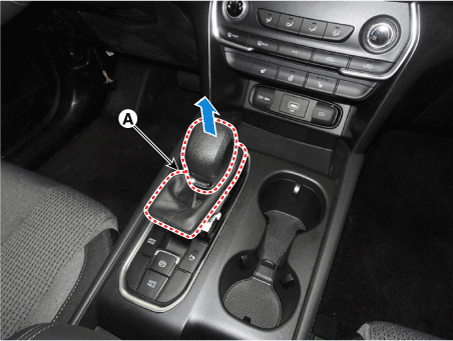
Remove the shift knob & boots.
|
(1) |
Separate the shift boots (A).
|
|
(2) |
Pull the shift knob and then removing the shift knob & boots
(A).
|
|
|
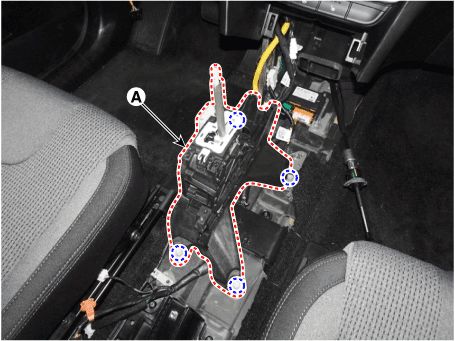
3. |
Remove the floor console assembly.
(Refer to Body - "Floor Console")
|
|
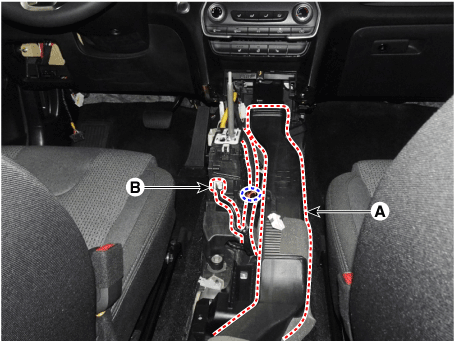
4. |
Remove the floor console air duct (A) and then disconnect the connector
(B).
|
|
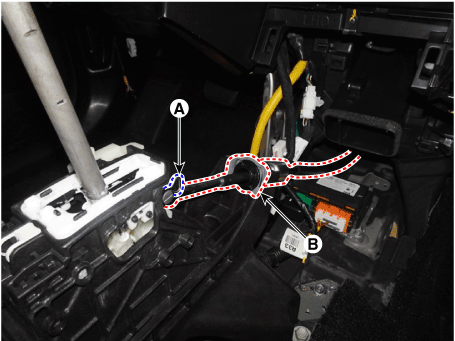
5. |
Remove the snap pin (A) and then separate the shift cable (B).
|
• |
When assembling shift cable, the projection (A) must
face upwards.
|
|
• |
When assembling the snap pin, be careful about the correct
direction.
- The band portion (A) must point to the front of the
vehicle.
- The band portion (A) must point outwards.
|
|
|
|
6. |
Remove the bolts and then shift lever assembly (A).
|
Tightening torque :
8.8 - 13.7 N.m (0.9 - 1.4 kgf.m, 6.5 - 10.1 lb-ft)
|
|
|
1. |
To install, reverse the removal procedure.
|
• |
Install the cable after placing the shift lever and
the manual control lever in the N position.
|
|
|
Shift Cable. Repair procedures
|
1. |
Make sure vehicle does not roll before setting shift lever to "N" position.
|
|
2. |
Turn ignition switch OFF and disconnect the negative (-) battery cable.
|
|
3. |
Remove the air cleaner assembly and air duct.
(Refer to Engine Mechanical System - "Air Cleaner")
|
|
4. |
Remove the battery and battery tray.
(Refer to Engine Electrical System - "Battery")
|
|
5. |
Loosen the nut (A) and then separate the shift cable (B).
|
|
6. |
Remove the shift knob & boots.
|
(1) |
Remove the shift boots (A).
|
|
(2) |
Pull the shift knob and then removing the shift knob and boots
(A).
|
|
|
7. |
Remove the floor console assembly.
(Refer to Body - "Floor Console")
|
|
8. |
Remove the floor console air duct (A).
|
|
9. |
Remove the snap pin (A) and then separate the shift cable (B).
|
|
10. |
Loosen the nuts (A) and then removing the shift cable retainer (B).
|
|
11. |
Remove the shift cable by pulling it toward the interior.
|
|
1. |
Install the cable retainer (B) and then tightening the nuts (A).
|
Tightening torque:
11.7 - 14.7 N.m(1.2 - 1.5 kgf.m, 8.6 - 10.8 lb-ft)
|
|
• |
Install the cable after placing the shift lever and
the manual control lever in the N position.
|
|
|
|
2. |
Install the shift cable (B) in the shift lever and then install the
snap pin (A).
|
• |
When assembling shift cable, the projection (A) must
face upwards.
|
|
• |
When assembling the snap pin, be careful about the correct
direction.
• The band portion (A) must point to the front of the
vehicle.
• The band portion (A) must point outwards.
|
|
|
|
3. |
Install the floor console air duct (A).
|
|
4. |
Install the shift knob & boots (A).
|
|
5. |
Insert the shift cable (B) and then lightly tighten the nut (A).
|
|
6. |
Align the hole in the manual control lever with the "N" position hole
of the position switch and then insert the position switch guide pin
(SST No.: 09480-A3800) (A).
|
|
7. |
Push shift cable (A) lightly to "F" direction shown to eliminate free
play of shift cable.
|
|
8. |
Tighten the nut (A) with the specified torque.
|
Tightening torque:
9.8 - 14.7 N.m (1.0 - 1.4 kgf.m, 7.2 - 10.8 lb-ft)
|
|
• |
Replace the cable clip, use a new one.
|
|
|
|
9. |
Remove the position switch guide pin (SST No. : 09480 - A3800) (A) from
the hole.
|
|
10. |
Install the battery and tray.
(Refer to Engine Electical System - "Battery" )
|
|
11. |
Install the air cleaner assembly and air duct.
(Refer to Engine Mechanical System - "Air Cleaner")
|
• |
Check that operating surely at each range of the position
switch corresponding to each position of shift lever.
|
|
|
Description and operation Description • Engine coolant is used for circulating heat in order to heat and cool the transaxle oil. • Prevents over heating of the transaxle oil while the vehicle is moving. ...
See also:
Fuel Pressure Regulator. Repair procedures
Removal 1. Remove the fuel pump. (Refer to Fuel Delivery System - “Fuel Pump”) 2. Release the fixing hooks, and then remove the regulator cup (A). 3. Remove the fuel pressure regulator (A). Installation ...
Owner maintenance
The following lists are vehicle checks and inspections that should be performed by the owner or an authorized HYUNDAI dealer at the frequencies indicated to help ensure safe, dependable operation of your ...
Repair procedures
Adjustment 1. After loosening the tail gate hinge (A) mounting bolt, adjust the tail gate by moving it up or down, or right or left. 2. Adjust the tail gate height by turning the tail gate overslam bumpers ...
 Hyundai Santa Fe (TM): Automatic Transaxle Control System

 Automatic Transaxle Cooling System