 Hyundai Santa Fe: Brake Pedal. Repair procedures
Removal
| 1. |
Turn ignition switch OFF and disconnect the negative (-) battery
cable.
|
| 2. |
Remove the crash pad lower panel.
|
| 3. |
Remove the shower duct (A).
|
| 4. |
Disconnect the stop lamp switch connector (A).
|
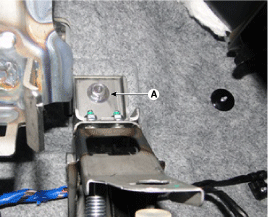
| 5. |
Remove the brake pedal member mounting nut (A).
|
| 6. |
Remove the snap pin (A) and clevis pin (B).
|
| 7. |
Remove the brake pedal member assembly mounting nuts (A) and then
remove the brake pedal assembly.
|
Inspection
| 1. |
Check the bushing for wear.
|
| 2. |
Check the brake pedal for bending or twisting.
|
| 3. |
Check the brake pedal return spring for damage.
|
| 4. |
Check the stop lamp switch.
|
Installation
| 1. |
Pre-tighten the bracket fixing bolt (A) in dash panel.
|
| 2. |
Install the brake booster and brake pedal member fixing nuts (A)
securely.
|
| 3. |
Tighten the bolt (A) securely in dash panel.
|
| 4. |
Install the snap pin (A) and clevis pin (B).
|
| 5. |
Install the stop lamp switch securely.
|
| 6. |
Connect the stop lamp switch connector (A).
|
| 7. |
Adjust the brake pedal height and free play.
|
| 8. |
Check the brake pedal operation after installing the brake pedal.
|
| 9. |
Install the shower duct (A).
|
| 10. |
Install the crash pad lower panel.
|
| 11. |
Reconnect the battery negative cable.
|
Adjustment
| Stop lamp switch clearance adjustment |
If the gap between stop lamp switch and bracket is not 1.0 ~ 2.0mm(0.04~
0.08in), perform the procedure below.
| 1. |
Disconnect the stop lamp switch connector (A).
|
| 2. |
Pull the locking plate (A) as indicated by the arrow.
|
| 3. |
Turn stop lamp switch 45° counterclockwise and remove it.
|
| 4. |
While holding the brake pedal, insert the stop lamp switch until
the plunger is fully pressed in against the stopper on the pedal assembly.
|
| 5. |
After inserting, turn the stop switch (A) 45° clockwise, and then
assemble locking plate (B) by pushing.
|
| 6. |
Confirm the gap between stop lamp switch and bracket.
|
| 7. |
Connect the stop lamp switch connector.
|
 Brake Pedal. Components and Components Location
Components 1. Cowl bracket 2. Brake pedal member assembly 3. Stop lamp switch 4. Return spring 5. Brake pedal stopper 6. Brake pedal arm 7. Brake pedal pad ...
 Front Disc Brake. Components and Components Location
Components 1. Guide rod bolt 2. Bleed screw 3. Caliper carrier 4. Caliper body 5. Inner pad shim 6. Brake pad 7. Pad retainer ...
See also:
Troubleshooting
Troubleshooting Customer Complaint Analysis Check Sheet There are six areas where a problem can occur: wiring harness, the radio, the CD player, and speaker. Troubleshooting enables you to confine the ...
Tail Gate Lift. Repair procedures
Replacement • Take care to not let the tailgate fall on you as the lifts are removed. Have a helper hold the tailgate open, or use a secure method to hold it open. 1. Using a screwdriver (A), lift up ...
Dimensions
...


