Components and components location
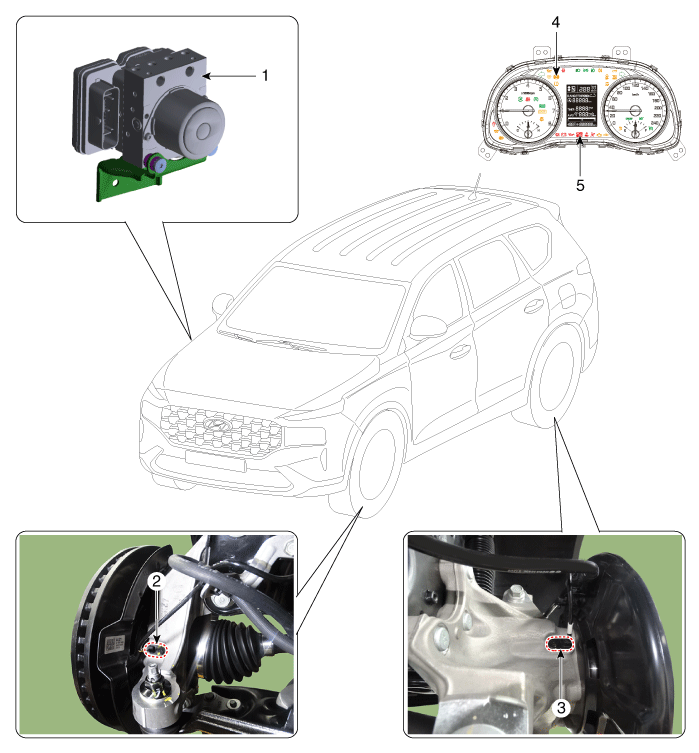
1. ABS control
module (HECU)
2. Front wheel speed sensor
3. Rear wheel speed sensor
|
4. ABS warning
lamp
5. Parking brake/ EBD
|
Description and operation
ESP recognizes critical driving conditions, such as panic reactions in dangerous
situations, and stabilizes the vehicle by wheel-individual braking and engine
control intervention.
ESP adds a further function known as Active Yaw Control (AYC) to the ABS, TCS,
EBD and ESP functions. Whereas the ABS/TCS function controls wheel slip during
braking and acceleration and, thus, mainly intervenes in the longitudinal dynamics
of the vehicle, active yaw control stabilizes the vehicle about its vertical
axis.
This is achieved by wheel individual brake intervention and adaptation of the
momentary engine torque with no need for any action to be taken by the driver.
ESP essentially consists of three assemblies : the sensors, the electronic control
unit and the actuators.
The stability control feature works under all driving and operating conditions.
Under certain driving conditions, the ABS/TCS function can be activated simultaneously
with the ESP function in response to a command by the driver.
In the event of a failure of the stability control function, the basic safety
function, ABS, is still maintained.
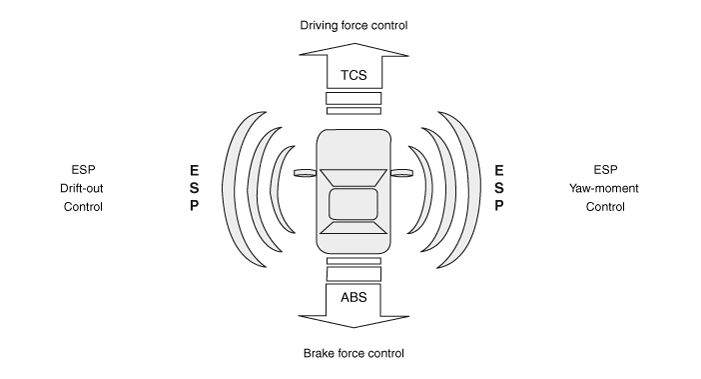
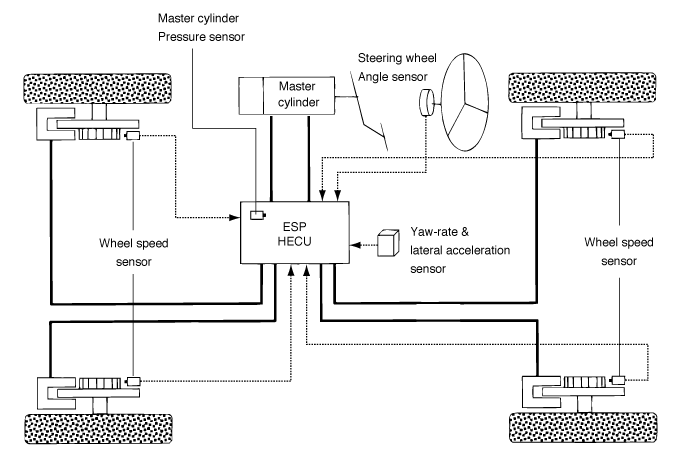
Description of ESP Control
ESP system includes ABS/EBD, TCS and AYC function.
ABS/EBD function : The ECU changes the active sensor signal (current shift)
coming from the four wheel sensors to the square wave. By using the input of
above signals, the ECU calculates the vehicle speed and the acceleration & deceleration
of the four wheels. And, the ECU judges whether the ABS/EBD should be actuated
or not.
TCS function prevents the wheel slip of drive direction by adding the brake
pressure and engine torque reduction via CAN communication. TCS function uses
the wheel speed sensor signal to determine the wheel slip as far as ABS function.
AYC function prevents unstable maneuver of the vehicle. To determine the vehicle
maneuver, AYC function uses the maneuver sensor signals(Yaw Rate Sensor, Lateral
Acceleration Sensor, Steering Wheel Angle Sensor).
If vehicle maneuver is unstable (Over Steer or Under Steer), AYC function applies
the brake pressure on certain wheel, and send engine torque reduction signal
by CAN.
After the key-on, the ECU continually diagnoses the system failure. (self-diagnosis)If
the system failure is detected, the ECU informs driver of the system failure
through the BRAKE/ABS/ESP warning lamp. (fail-safe warning)
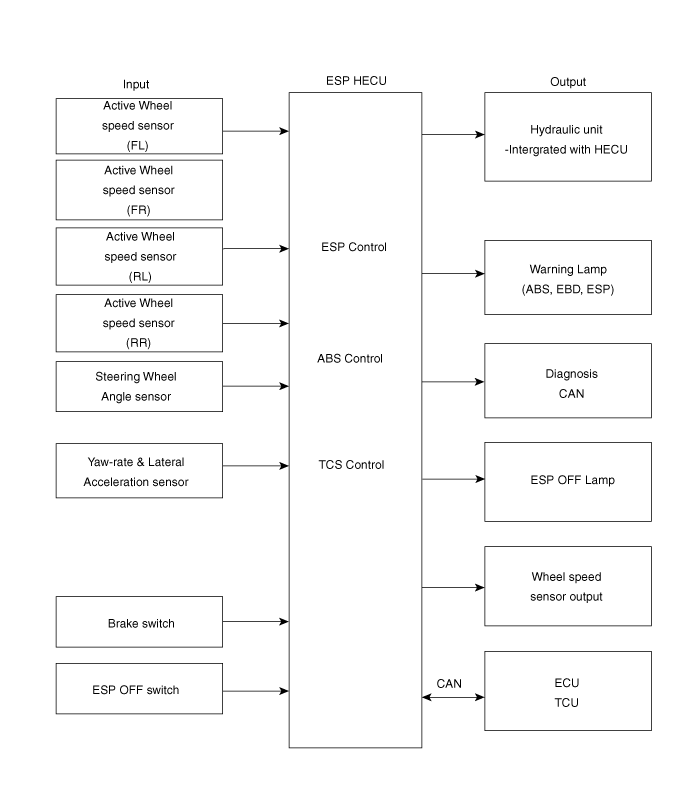
Input and Output Diagram
|
1. |
STEP 1
The ESP analyzes the intention of the driver.

|
|
2. |
STEP 2
It analyzes the movement of the ESP vehicle.

|
|
3. |
STEP 3
The HECU calculates the required strategy, then actuates the appropriate
valves and sents torque control requests via CAN to maintain vehicle
stability.
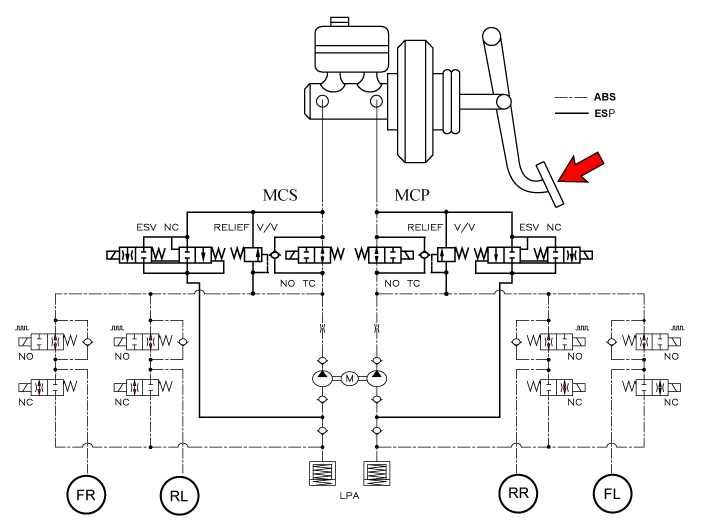
|
| ESP Hydraulic System Diagram |
|
1. |
ESP Non-operation : Normal braking.
Solenoid Valve
|
Continuity
|
Valve
|
Motor Pump
|
TC Valve
|
IN (NO)
|
OFF
|
OPEN
|
OFF
|
OFF
|
OUT (NC)
|
OFF
|
CLOSE
|
|
|
2. |
ESP operation
Solenoid Valve
|
Continuity
|
Valve
|
Motor Pump
|
TC Valve
|
Understeering
(Only inside of rear wheel)
|
IN (NO)
|
OFF
|
OPEN
|
ON
|
ON
|
OUT (NC)
|
OFF
|
CLOSE
|
Oversteering
(Only outside of front wheel)
|
IN (NO)
|
OFF
|
OPEN
|
OUT (NC)
|
OFF
|
CLOSE
|
Warning Lamp Control
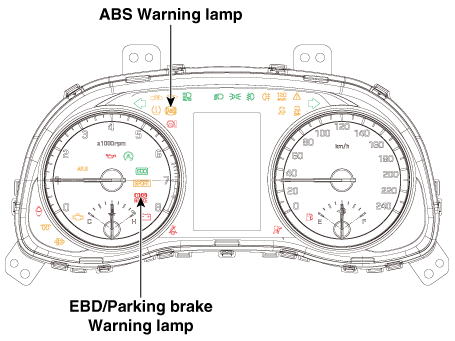
|
ABS Warning Lamp module
The active ABS warning lamp module indicates the self-test and failure status
of the ABS. The ABS warning lamp shall be on :
| – |
During the initialization phase after IGN ON. (continuously 3 seconds).
|
| – |
In the event of inhibition of ABS functions by failure.
|
| – |
During diagnostic mode.
|
| – |
When the ECU Connector is seperated from ECU.
|
| – |
Cluster lamp is ON when communication is impossible with CAN module.
|
EBD/Parking Brake Warning Lamp Module
The active EBD warning lamp module indicates the self-test and failure status
of the EBD. However, in case the Parking Brake Switch is turned on, the EBD
warning lamp is always turned on regardless of EBD functions. The EBD warning
lamp shallbe on :
| – |
During the initialization phase after IGN ON. (continuously 3 seconds).
|
| – |
When the Parking Brake Switch is ON or brake fluid level is low.
|
| – |
When the EBD function is out of order .
|
| – |
During diagnostic mode.
|
| – |
When the ECU Connector is seperated from ECU.
|
| – |
Cluster lamp is ON when communication is impossible with CAN module.
|
ESP Function / Warning Lamp (ESP System)
The ESP function/warning lamp indicates the self-test and failure status of
the ESP.
The ESP function/warning lamp is turned on under the following conditions :
| – |
During the initialization phase after IGN ON. (continuously 3 seconds).
|
| – |
When the ESP function is inhibited by system failure.
|
| – |
When the ESP control is operating. (Blinking - 2Hz)
|
| – |
During diagnostic mode.(Except standard mode)
|
| – |
Cluster lamp is ON when communication is impossible with CAN module.
|
ESP OFF Lamp (ESP System)
The ESP Off lamp indicates the self-test and operating status of the ESP.
The ESP Off lamp operates under the following conditions :
| – |
During the initialization mode after IGN ON. (continuously 3 seconds).
|
| – |
ESP Off lamp is On when driver input the ESP Off switch.
|
ESP ON / OFF Switch (ESP System)
The ESP On/Off Switch shall be used to toggle the ESP function between On/Off
states based upon driver input.
The On/Off switch shall be a normally open, momentary contact switch.Closed
contacts switch the circuit to ignition.
Initial status of the ESP function is on and switch toggle the state.
Schematic diagrams
ABS / ESC
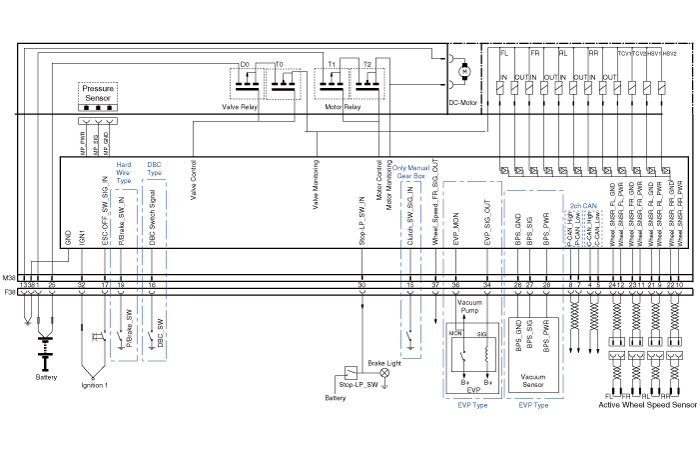
ESCi/ESCi+(EPB Integrated)
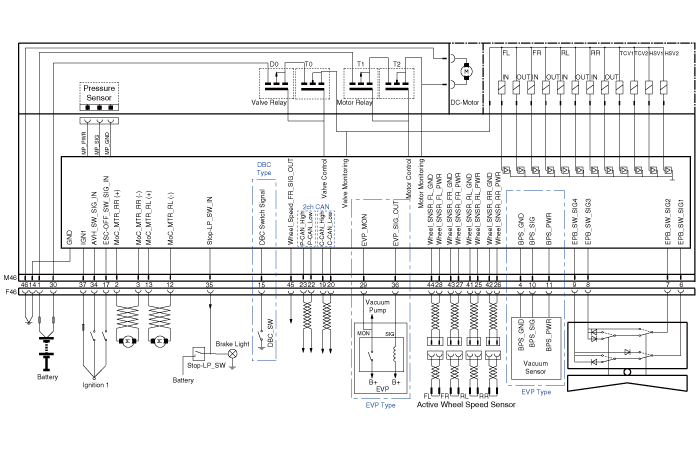
ABS / ESC
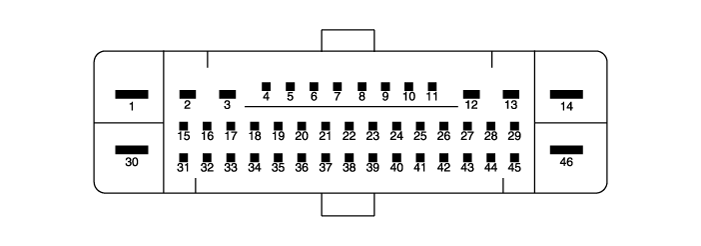
PIN No
|
Desciption
|
Current
|
Resistance
|
1
|
Pump motor supply voltage
|
60 A
|
10 mΩ
|
2
|
-
|
-
|
-
|
3
|
-
|
-
|
-
|
4
|
C-CAN High
|
100 mA
|
250 mΩ
|
5
|
C-CAN Low
|
100 mA
|
250 mΩ
|
6
|
-
|
-
|
-
|
7
|
P-CAN Low
|
100 mA
|
250 MΩ
|
8
|
P-CAN High
|
100 mA
|
250 MΩ
|
9
|
Wheel speed sensor supply voltage (Left rear)
|
100 mA
|
250 MΩ
|
10
|
Wheel speed sensor supply voltage (Right rear)
|
100 mA
|
250 MΩ
|
11
|
Wheel speed sensor supply voltage (Right front)
|
100 mA
|
250 MΩ
|
12
|
Wheel speed sensor supply voltage (Left front)
|
100 mA
|
250 MΩ
|
13
|
Recycle pump ground
|
40 A
|
10 MΩ
|
14
|
-
|
-
|
-
|
15
|
Clutch stroke sensor signal
|
1.2 mA
|
250 MΩ
|
16
|
DBC switch signal
|
1.2 mA
|
250 MΩ
|
17
|
VDC OFF switch signal
|
1.2 mA
|
250 MΩ
|
18
|
-
|
-
|
-
|
19
|
Parking brake switch signal
|
1.2 mA
|
250 MΩ
|
20
|
-
|
-
|
-
|
21
|
Wheel speed sensor ground (Left rear)
|
40 mA
|
250 MΩ
|
22
|
Wheel speed sensor ground (Right rear)
|
40 mA
|
250 MΩ
|
23
|
Wheel speed sensor ground (Right front)
|
40 mA
|
250 MΩ
|
24
|
Wheel speed sensor ground (Left front)
|
40 mA
|
250 MΩ
|
25
|
Solenoid valve voltage
|
30 A
|
10 MΩ
|
26
|
Brake pressure sensor ground
|
60 mA
|
10 MΩ
|
27
|
Brake pressure sensor signal
|
40 mA
|
250 MΩ
|
28
|
Brake pressure sensor power
|
60 mA
|
10 MΩ
|
29
|
-
|
-
|
-
|
30
|
Brake lamp switch
|
1.2 mA
|
250 MΩ
|
31
|
-
|
-
|
-
|
32
|
IGN 1
|
10 mA
|
50 MΩ
|
33
|
-
|
-
|
-
|
34
|
Electronic vacuum pump output
|
1 mA
|
50 MΩ
|
35
|
-
|
-
|
-
|
36
|
Electronic vacuum pump motor monitor
|
100 mA
|
250 MΩ
|
37
|
Wheel speed sensor output
|
50 mA
|
250 MΩ
|
38
|
Solenoid valve ground
|
30 A
|
10 MΩ
|
ESCi/ESCi+(EPB Integrated)

PIN No
|
Desciption
|
Current
|
Resistance
|
1
|
Pump motor supply voltage
|
60 A
|
10 MΩ
|
2
|
Right rear EPB motor power
|
15 A
|
10 MΩ
|
3
|
Right rear EPB motor ground
|
15 A
|
10 MΩ
|
4
|
Brake pressure sensor ground
|
60 mA
|
10 MΩ
|
5
|
-
|
-
|
-
|
6
|
Electronic parking brake signal 1 [Connect]
|
20 mA
|
250 MΩ
|
7
|
Electronic parking brake signal 2 [Connect]
|
20 mA
|
250 MΩ
|
8
|
Electronic parking brake signal 3 [Release]
|
20 mA
|
250 MΩ
|
9
|
Electronic parking brake signal 4 [Release]
|
20 mA
|
250 MΩ
|
10
|
Brake pressure sensor signal
|
40 mA
|
250 MΩ
|
11
|
Brake pressure sensor power
|
60 mA
|
10 MΩ
|
12
|
Left rear EPB motor ground
|
15 A
|
10 MΩ
|
13
|
Left rear EPB motor power
|
15 A
|
10 MΩ
|
14
|
Solenoid valve ground
|
40 A
|
10 MΩ
|
15
|
DBC switch signal
|
1.2 mA
|
250 MΩ
|
16
|
-
|
-
|
-
|
17
|
VDC OFF switch signal
|
1.2 mA
|
250 MΩ
|
18
|
-
|
-
|
-
|
19
|
C-CAN High
|
100 mA
|
250 MΩ
|
20
|
C-CAN Low
|
100 mA
|
250 MΩ
|
21
|
-
|
|
|
22
|
P-CAN LOW
|
100 mA
|
250 MΩ
|
23
|
P-CAN High
|
100 mA
|
250 MΩ
|
24
|
-
|
-
|
-
|
25
|
Wheel speed sensor supply voltage (Left rear)
|
150 mA
|
250 MΩ
|
26
|
Wheel speed sensor supply voltage (Right rear)
|
150 mA
|
250 MΩ
|
27
|
Wheel speed sensor supply voltage (Right front)
|
150 mA
|
250 MΩ
|
28
|
Wheel speed sensor supply voltage (Left front)
|
150 mA
|
250 MΩ
|
29
|
Electronic vacuum pump motor monitor
|
100 mA
|
250 MΩ
|
30
|
Solenoid valve voltage
|
40 A
|
10 MΩ
|
31
|
-
|
-
|
-
|
32
|
-
|
-
|
-
|
33
|
-
|
-
|
-
|
34
|
Auto holding ON/OFF switch signal
|
1.2 mA
|
250 MΩ
|
35
|
Brake lamp switch
|
1.2 mA
|
250 MΩ
|
36
|
Electronic vacuum pump output
|
1 A
|
60 MΩ
|
37
|
IGN 1
|
10 mA
|
50 MΩ
|
38
|
-
|
-
|
-
|
39
|
-
|
-
|
-
|
40
|
-
|
-
|
-
|
41
|
Wheel speed sensor ground (Left rear)
|
40 mA
|
250 MΩ
|
42
|
Wheel speed sensor ground (Right rear)
|
40 mA
|
250 MΩ
|
43
|
Wheel speed sensor ground (Right front)
|
40 mA
|
250 MΩ
|
44
|
Wheel speed sensor ground (Left front)
|
40 mA
|
250 MΩ
|
45
|
Wheel speed sensor output (Right front)
|
50 mA
|
250 MΩ
|
46
|
Recycle pump ground
|
60 A
|
10 MΩ
|
Troubleshooting
|
1. |
In principle, ESP and TCS controls are prohibited in case of ABS failure.
|
|
2. |
When ESP or TCS fails, only the failed system control is prohibited.
|
|
3. |
However, when the solenoid valve relay should be turned off in case
of ESP failure, refer to the ABS fail-safe.
|
|
4. |
Information on ABS fail-safe is identical to the fail-safe in systems
where ESP is not installed.
|
Memory of Fail Code
|
1. |
It keeps the code as far as the backup lamp power is connected. (O)
|
|
2. |
It keeps the code as far as the HCU power is on. (X)
|
Failure Checkup
|
1. |
Initial checkup is performed immediately after the HECU power on.
|
|
2. |
Valve relay checkup is performed immediately after the IG2 ON.
|
|
3. |
It executes the checkup all the time while the IG2 power is on.
|
Countermeasures in Fail
|
1. |
Turn the system down and perform the following actions and wait for
HECU power OFF.
|
|
2. |
Turn the valve relay off.
|
|
3. |
Stop the control during the operation and do not execute any until the
normal condition recovers.
|
Warning Lamp ON
|
1. |
ESP warning lamp turn on for 3sec after IGN ON.
|
|
2. |
ESP function lamp blinks when ESP Act.
|
|
3. |
If ESP fail occured, ESP warning turns ON.
|
|
4. |
ESP OFF lamp turn on in case of
|
Standard Flow of Diagnostic Troubleshooting
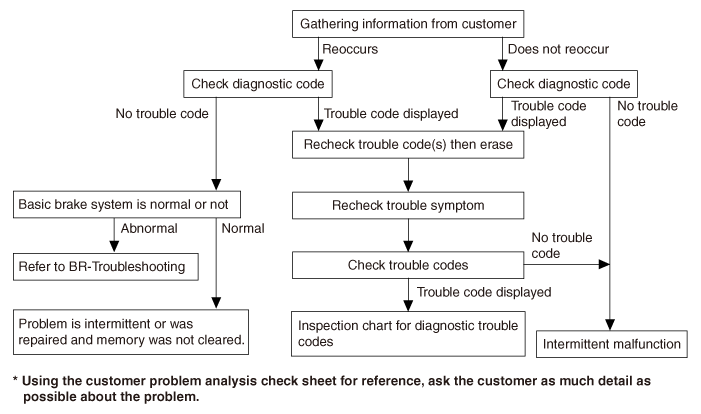
Notes With Regard to Diagnosis
The phenomena listed in the following table are not abnormal.
Condition
|
Explanation
|
System check sound
|
When starting the engine, a thudding sound can sometimes be heard coming
from inside the engine compartment. This is because the system operation
check is being performed.
|
ABS operation sound
|
| 1) |
Sound of the motor inside the ABS hydraulic unit operation (whine).
|
| 2) |
Sound is generated along with vibration of the brake pedal (scraping).
|
| 3) |
When ABS operates, sound is generated from the vehicle chassis
due to repeated brake application and release (Thump : suspension;
squeak : tires)
|
|
ABS operation (Long braking distance)
|
For road surfaces such as snow-covered and gravel roads, the braking distance
for vehicles with ABS can sometimes be longer than that for other vehicles.
Accordingly, advise the customer to drive safely on such roads by lowering
the vehicle speed.
|
Inspection method
With the IGN OFF, set the IGN to ON position : If the ABS/Brake Warning Light
illuminates and distinguishes after 3 seconds, the warning lamp and ABS system
are all normal.
|
1. |
If the Warning Light does not illuminate when IGN is set to ON position
|
(1) |
Remove the ABS ECU connecter (located in the engine room).
|
|
(2) |
Set the IGN to ON position.
|
|
(3) |
If the ABS/Brake Warning Light does not illuminate: The failure
is related to the Warning Light. Check the instrument cluster
and wiring.
|
|
(4) |
If the ABS/Brake Warning Light illuminates and stays on :
|
The Warning Light is normal and judged to be failure of the VDC system.
Inspect the VDC system using diagnostic tool.
|
|
2. |
If the Warning Light does not distinguish after its illumination when
IGN is set to ON position.
|
(1) |
Self-diagnose using diagnostic tool.
|
|
(3) |
Self-diagnose after erasing the fault code.
|
|
(4) |
If the result of self-diagnosis is normal after erasing the
fault code :
Set the IGN to OFF, then to ON position and check whether the
Warning Light operates normally.
|
|
(5) |
If the result of self-diagnosis continues to display error after
erasing the fault code :
Check according to the inspection sheet of the fault code.
|
|
|
3. |
Even if the Warning Light and VDC system are all normal, erase all the
memorized fault codes using diagnostic tool (if there is no memorized
fault code, record the fault code).
|
1) |
When removing or engaging all the connectors set the
IGN to OFF position.
|
|
2) |
During the driving test, record on the inspection sheet
when the Warning Light illuminates or every time any
event is occurred.
|
|
|
ABS Check Sheet
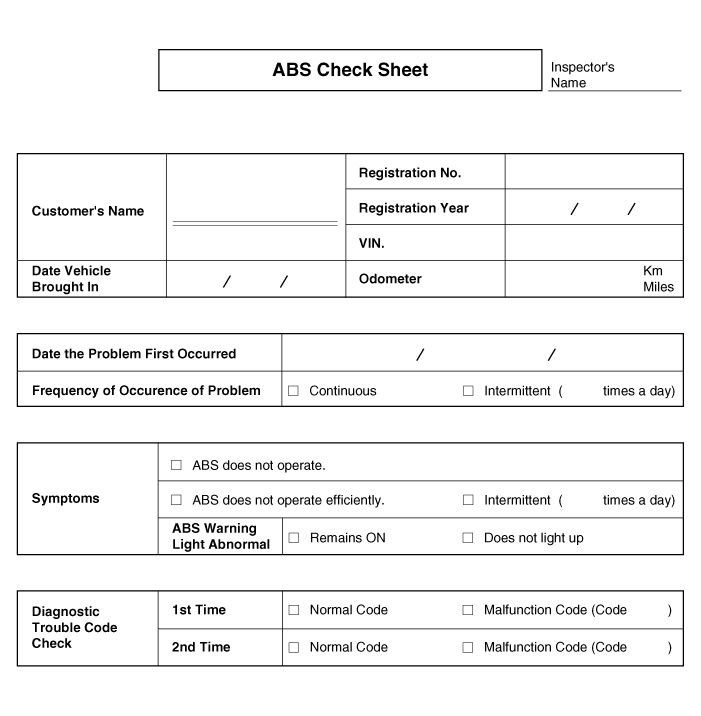
Problem Symptoms Table
Symptom
|
Suspect Area
|
ABS does not operate.
|
Only when 1 - 4 are all normal and the problem is still occurring, replace
the HECU.
| 1) |
Check the DTC reconfirming that the normal code is output.
|
| 4) |
Check the hydraulic circuit for leakage.
|
|
ABS does not operate intermittently.
|
Only when 1 - 4 are all normal and the problem is still occurring, replace
the ABS actuator assembly.
| 1) |
Check the DTC reconfirming that the normal code is output.
|
| 2) |
Wheel speed sensor circuit.
|
| 3) |
Stop lamp switch circuit.
|
| 4) |
Check the hydraulic circuit for leakage.
|
|
Communication with diagnostic tool is not possible. (Communication with
any system is not possible)
|
|
Communication with diagnostic tool is not possible. (Communication with
ABS only is not possible)
|
|
When ignition key is turned ON (engine OFF), the ABS warning lamp does not
light up.
|
| 1) |
ABS warning lamp circuit
|
|
Even after the engine is started, the ABS warning lamp remains ON.
|
| 1) |
ABS warning lamp circuit
|
|
| •
|
During ABS operation, the brake pedal may vibrate or may not
be able to be depressed. Such phenomena are due to intermittent
changes in hydraulic pressure inside the brake line to prevent
the wheels from locking and is not an abnormality.
|
| •
|
Such phenomena are due to intermittent changes in hydraulic
pressure inside the brake line to prevent the wheels from locking
and is not an abnormality.
|
|

Detecting condition
Trouble Symptoms
|
Possible Cause
|
Brake operation varies depending on driving conditions and road surface
conditions, so diagnosis can be difficult. However if a normal DTC is displayed,
check the following probable cause. When the problem is still occurring,
replace the ESP control module.
|
| –
|
Faulty power source circuit
|
| –
|
Faulty wheel speed sensor circuit
|
| –
|
Faulty hydraulic circuit for leakage
|
|
Inspection procedures
DTC Inspection
|
1. |
Connect the diagnostic tool with the data link connector and turn the
ignition switch ON.
|
|
2. |
Verify that the DTC code is output.
|
|
3. |
Is the DTC code output?
|

|
â–¶ Check
the power source circuit.
|
|

|
â–¶ Erase
the DTC and recheck using diagnostic tool.
|
|
Check the power source circuit
|
1. |
Disconnect the connector from the ESP control module.
|
|
2. |
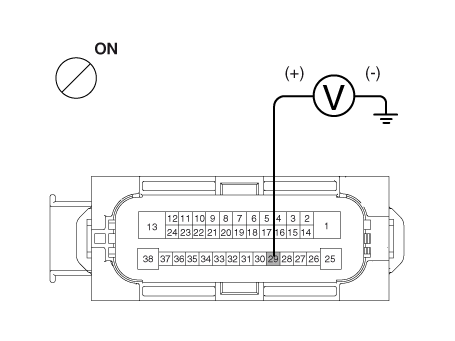
Turn the ignition switch ON, measure the voltage between terminal 29
of the ESP control module harness side connector and body ground.
|
Specification : approximately B+
|
Is the voltage within specification?
|

|
â–¶ Check
the ground circuit.
|
|

|
â–¶ Check
the harness or connector between the fuse (7.5A) in the engine compartment
junction block and the ESP control module. Repair if necessary.
|
|
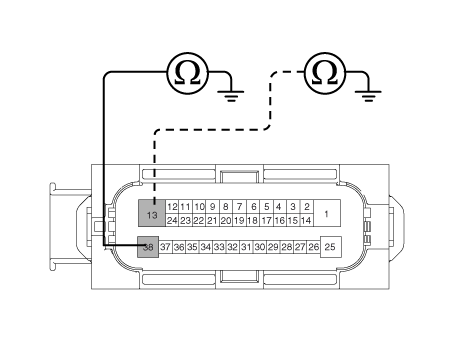
Check the ground circuit
|
1. |
Disconnect the connector from the ESP control module.
|
|
2. |
Check for continuity between terminals 13, 38 of the ESP control module
harness side connector and ground point.
Is there continuity?
|

|
â–¶ Check
the wheel speed sensor circuit.
|
|

|
â–¶ Repair
an open in the wire and ground point.
|
|
Check the wheel speed sensor circuit
|
1. |
Refer to the DTC troubleshooting procedures.
|
|
2. |
Is it normal?
|

|
â–¶ Check
the hydraulic circuit for leakage.
|
|

|
â–¶ Repair
or replace the wheel speed sensor.
|
|
Check the hydraulic circuit for leakage
|
1. |
Inspect leakage of the hydraulic lines.
|
|
2. |
Is it normal?
|

|
â–¶ The
problem is still occurring, replace the ESP control module.
|
|

|
â–¶ Repair
the hydraulic lines for leakage.
|
|

Detecting condition
Trouble Symptoms
|
Possible Cause
|
Brake operation varies depending on driving conditions and road surface
conditions, so diagnosis can be difficult. However if a normal DTC is displayed,
check the following probable cause. When the problem is still occurring,
replace the ESP control module.
|
| –
|
Faulty power source circuit
|
| –
|
Faulty wheel speed sensor circuit
|
| –
|
Faulty hydraulic circuit for leakage
|
|
Inspection procedures
DTC Inspection
|
1. |
Connect the diagnostic tool with the data link connector and turn the
ignition switch ON.
|
|
2. |
Verify that the DTC code is output.
|
|
3. |
Is the DTC code output?
|

|
â–¶ Check
the wheel speed sensor circuit.
|
|

|
â–¶ Erase
the DTC and recheck using diagnostic tool.
|
|
Check the wheel speed sensor circuit
|
1. |
Refer to the DTC troubleshooting procedures.
|
|
2. |
Is it normal?
|

|
â–¶ Check
the stop lamp switch circuit.
|
|

|
â–¶ Repair
or replace the wheel speed sensor.
|
|
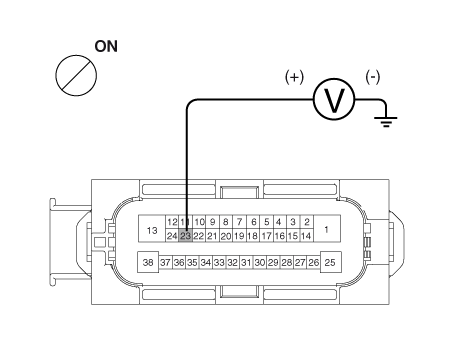
Check the stop lamp switch circuit
|
1. |
Check that stop lamp lights up when brake pedal is depressed and turns
off when brake pedal is released.
|
|
2. |
Measure the voltage between terminal 23 of the ESP control module harness
side connector and body ground when brake pedal is depressed.
|
Specification : approximately B+
|
Is the voltage within specification?
|

|
â–¶ Check
the hydraulic circuit for leakage.
|
|

|
â–¶ Repair
the stop lamp switch. Repair an open in the wire between the ESP
control module and the stop lamp switch.
|
|
Check the hydraulic circuit for leakage
|
1. |
Refer to the hydraulic lines.
|
|
2. |
Inspection leakage of the hydraulic lines.
|
|
3. |
Is it normal?
|

|
â–¶ The
problem is still occurring, replace the ESP control module.
|
|

|
â–¶ Repair
the hydraulic lines for leakage.
|
|

Detecting condition
Trouble Symptoms
|
Possible Cause
|
Possible defect in the power supply system (including ground) for the diagnosis
line.
|
| –
|
Faulty power source circuit
|
|
Inspection procedures
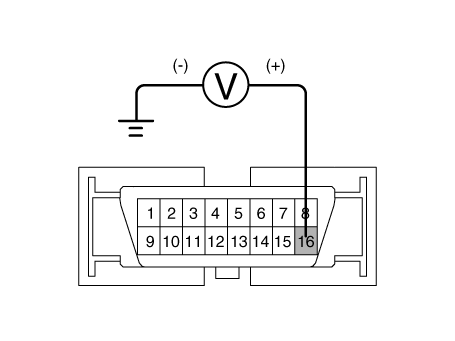
Check The Power Supply Circuit For The Diagnosis
|
1. |
Measure the voltage between terminal 16 of the data link connector and
body ground.
|
Specification : approximately B+
|
Is voltage within specification?
|

|
â–¶ Check
the ground circuit for the diagnosis.
|
|

|
â–¶ Repair
an open in the wire. Check and replace fuse from the engine compartment
junction block.
|
|
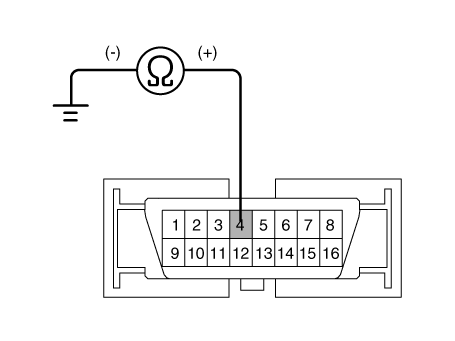
Check the ground circuit for the diagnosis
|
1. |
Check for continuity between terminal 4 of the data link connector and
body ground.
Is there continuity?
|

|
â–¶ Repair
an open in the wire between terminal 4 of the data link connector
and ground point.
|
|

Detecting condition
Trouble Symptoms
|
Possible Cause
|
When communication with diagnostic tool is not possible, the cause may be
probably an open in the HECU power circuit or an open in the diagnosis output
circuit.
|
| –
|
Faulty power source circuit
|
|
Inspection procedures
Check for Continuity in the CAN Line
|
1. |
Disconnect the connector from the ESP control module.
|
|
2. |
Check for continuity between terminals 26, 14 of the ESP control module
connector and 3, 11 of the data link connector.
|
|
3. |
Is there continuity?
|

|
â–¶ Check
the power source of ESP control module.
|
|

|
â–¶ Repair
an open in the wire.
|
|
Check the power source of ESP control module
|
1. |
Disconnect the connector from the ESP control module.
|
|
2. |
Turn the ignition switch ON, measure the voltage between terminal 29
of the ESP control module harness side connector and body ground.
|
Specification : approximately B+
|
Is voltage within specification?
|

|
â–¶ Check
for poor ground.
|
|

|
â–¶ Check
the harness or connector between the fuse (10A) in the engine compartment
junction block and the ESP control module.Repair if necessary.
|

|
Check for poor ground
|
1. |
Check for continuity between terminal 4 of the data link connector and
ground point.
|
|
2. |
Is the electric current applied between groundings?
|

|
â–¶ Replace
the ESP control module and recheck.
|
|

|
â–¶ Repair
an open in the wire or poor ground
|

|

Detecting condition
Trouble Symptoms
|
Possible Cause
|
When current flows in the HECU the ABS warning lamp turns from ON to OFF
as the initial check. Therefore if the lamp does not light up, the cause
may be an open in the lamp power supply circuit, a blown bulb, an open in
the both circuits between the ABS warning lamp and the HECU, and the faulty
HECU.
|
| –
|
Faulty ABS warning lamp bulb
|
| –
|
Blown fuse is related to ABS in the engine compartment junction
block
|
| –
|
Faulty ABS warning lamp damaged
|
| –
|
Faulty ABS warning lamp module
|
|
Inspection procedures
Problem verification
|
1. |
Disconnect the connector from the ESP control module and turn the ignition
switch ON.
|
|
2. |
Does the ABS warning lamp light up?
|

|
â–¶ Inspectagain
after replacing the ESP HECU.
|
|

|
â–¶ Check
the power source for the ABS warning lamp.
|
|
Check the power source for the ABS warning lamp
|
1. |
Disconnect the instrument cluster connector (M08) and turn the ignition
switch ON.
|
|
2. |
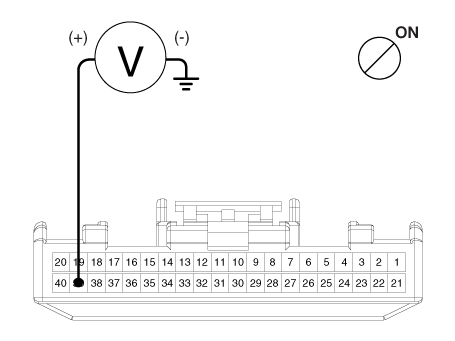
Measure the voltage between terminal (M08) 39 of the cluster harness
side connector and body ground.
|
Specification : approximately B+
|
|
|
3. |
Is voltage within specification?
|

|
â–¶ Check
the CAN circuit resistance for ABS warning lamp.
|
|

|
â–¶ Check
for blown fuse.
|
|
Check the CAN circuit resistance for ABS warning lamp
|
1. |
Disconnect the instrument cluster connector (M08) and turn the ignition
switch OFF.
|
|
2. |
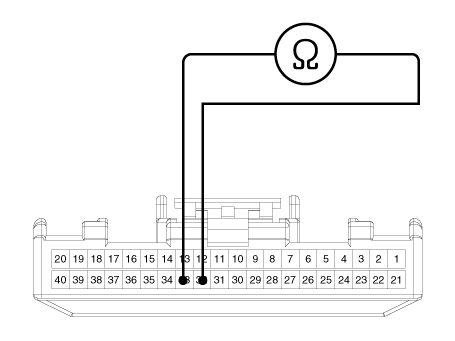
Measure the resistance between terminal (M08) 32 and 33 of the cluster
harness side connector.
|
|
3. |
Is resistance within specification?
|

|
â–¶ Repair ABS warning lamp bulb or instrument cluster assembly.
|
|

|
â–¶ Check the CAN circuit wiring for ABS warning lamp.
|
|
Check the CAN circuit wiring for ABS warning lamp
|
1. |
Disconnect the instrument cluster connector (M08) and ESP HECU connector,
and then turn the ignition switch OFF.
|
|
2. |
Check for continuity between terminal (M08) 32 of the cluster harness
side connector and terminal 26 of ESP HECU harness side.
Check for continuity between terminal (M08) 33 of the cluster harness
side connector and terminal 14 of ESP HECU harness side.
|
Specification : Below 1Ω
|
|
|
3. |
Is resistance within specification?
|

|
â–¶ Repair short of wiring between terminal 26, 14 of ESP HECU harness
connector and ABS warning lamp module.
|
|

|
â–¶ Repair open of wiring between terminal 26, 14 of ESP HECU harness
connector and ABS warning lamp module.
|
|

Detecting condition
Trouble Symptoms
|
Possible Cause
|
If the HECU detects trouble, it lights the ABS warning lamp while at the
same time prohibiting ABS control. At this time, the HECU records a DTC
in memory. Even though the normal code is output, the ABS warning lamp remains
ON, then the cause may be probably an open or short in the ABS warning lamp
circuit.
|
| –
|
Faulty instrument cluster assembly
|
| –
|
Faulty ABS warning lamp module
|
|
Inspection procedures
Check DTC Output
|
1. |
Connect the diagnostic tool to the 16P data link connector located behind
the driver's side kick panel.
|
|
2. |
Check the DTC output using diagnostic tool.
|
|
3. |
Is DTC output?
|

|
â–¶ Perform
the DTC troubleshooting procedure (Refer to DTC troubleshooting).
|
|

|
â–¶ Check
the CAN circuit resistance for ABS warning lamp.
|
|
Check the CAN circuit resistance for ABS warning lamp
|
1. |
Disconnect the instrument cluster connector (M08) and turn the ignition
switch OFF.
|
|
2. |
Measure the resistance between terminal (M08) 32 and 33 of the cluster
harness side connector.

|
|
3. |
Is resistance within specification?
|

|
â–¶ Repair
ABS warning lamp bulb or instrument cluster assembly.
|
|

|
â–¶ Check
the CAN circuit wiring for ABS warning lamp.
|
|
Check the CAN circuit wiring for ABS warning lamp
|
1. |
Disconnect the instrument cluster connector (M08) and ESP HECU connector,
and then turn the ignition switch OFF.
|
|
2. |
Check for continuity between terminal (M08) 32 of the cluster harness
side connector and terminal 26 of ESP HECU harness side.
Check for continuity between terminal (M08) 33 of the cluster harness
side connector and terminal 14 of ESP HECU harness side.
|
Specification : Below 1Ω
|
|
|
3. |
Is resistance within specification?
|

|
â–¶ Repair
short of wiring between terminal 26, 14 of ESP HECU harness connector
and ABS warning lamp module.
|
|

|
â–¶ Repair
open of wiring between terminal 26, 14 of ESP HECU harness connector
and ABS warning lamp module.
|
|
ESP Control Module. Components and components location
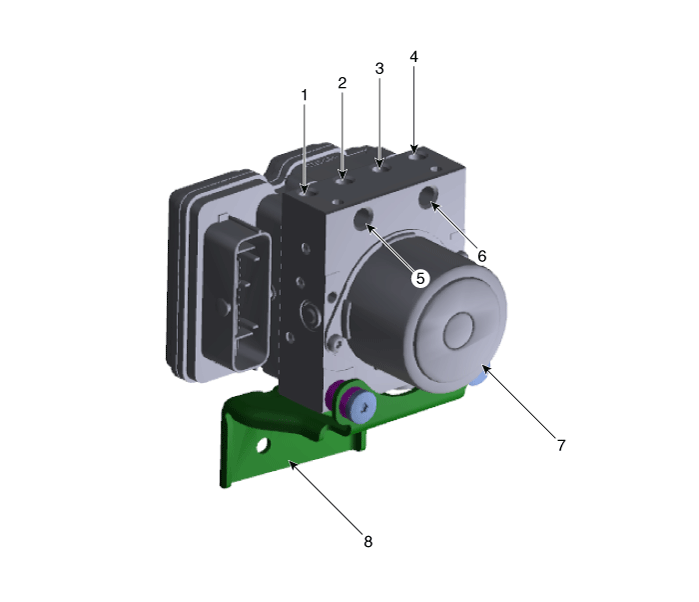
1. Front - right
(FR)
2. Rear - left (RL)
3. Rear - right (RR)
4. Front - left (FL)
|
5. MC2
6. MC1
7. ESP control module (HECU)
8. Bracket
|
ESP Control Module. Repair procedures
|
1. |
Turn ignition switch OFF and disconnect the negative (-) battery cable.
|
|
2. |
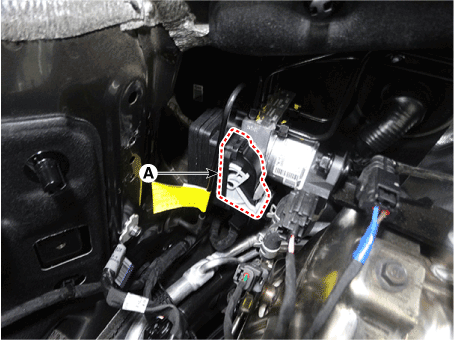
Pull up the lock of the HECU connector and then disconnect the connector
(A).
|
|
3. |
Remove the brake tube (A, B) after loosening the brake tube flare nuts.
|
Tightening torque :
13.7 - 16.7 N.m (1.4 - 1.7 kgf.m, 10.1 - 12.3 lb-ft)
|
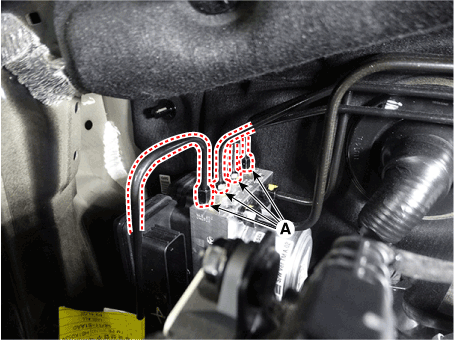
|
Tightening torque :
18.6 - 22.6 N.m (1.9 - 2.3 kgf.m, 13.7 - 16.6 lb-ft)
|
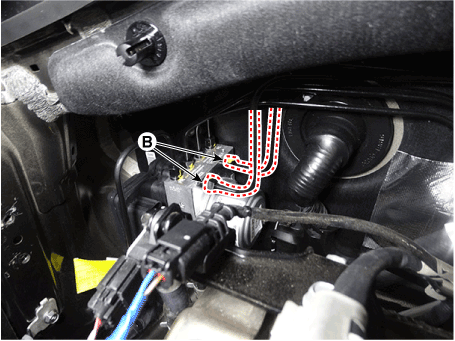
|
|
4. |
Remove the ESP control module (A) after loosening the mounting nuts.
|
Tightening torque :
16.7 - 25.5 N.m (1.7 - 2.6 kgf.m, 12.3 - 18.8 lb-ft)
|
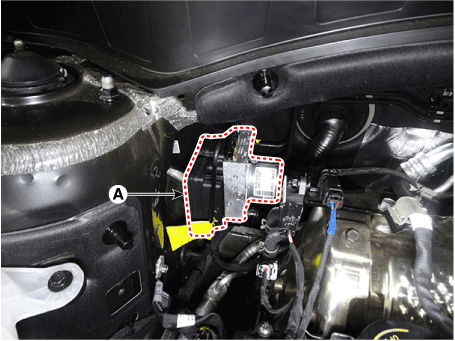
|
|
5. |
Separate the bracket (B) after remove the mounting bolt from the HECU
(A).
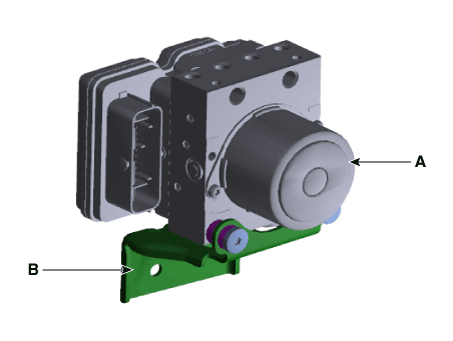
|
|
1. |
To install, reverse the removal procedure.
|
|
2. |
After installation, bleed the brake system.
(Refer to ESP(Electronic Stability Program) System - "ESP System Bleeding")
|
|
3. |
Connect the diagnostic tool to the data link connector located underneath
the dash panel.
|
|
4. |
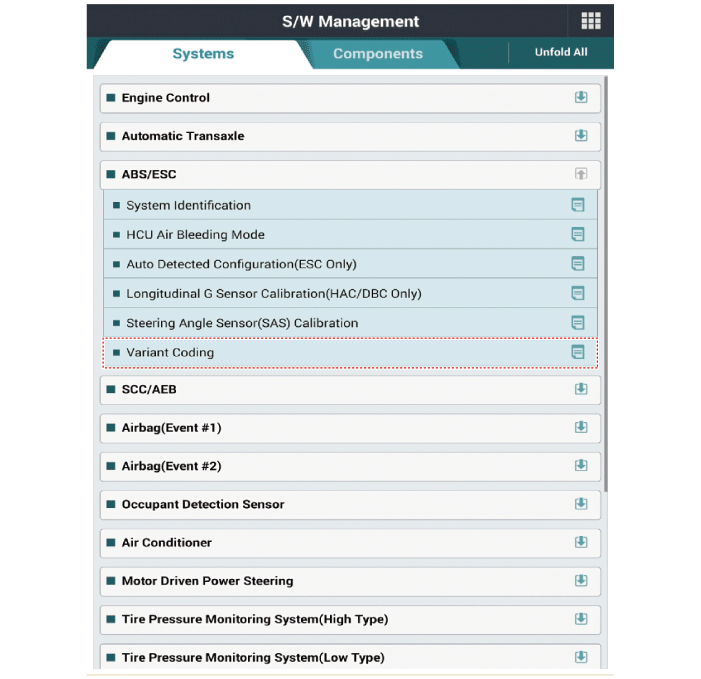
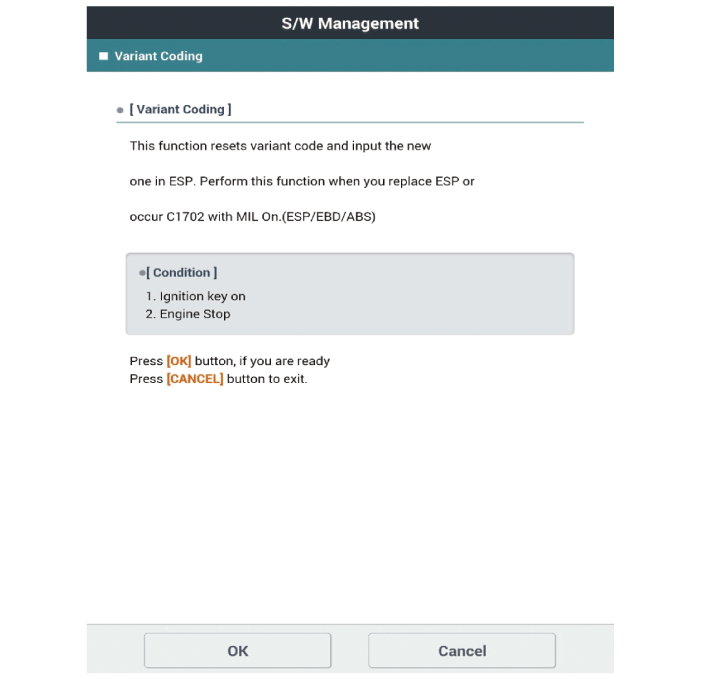
Conduct the Variant coding.
|
|
5. |
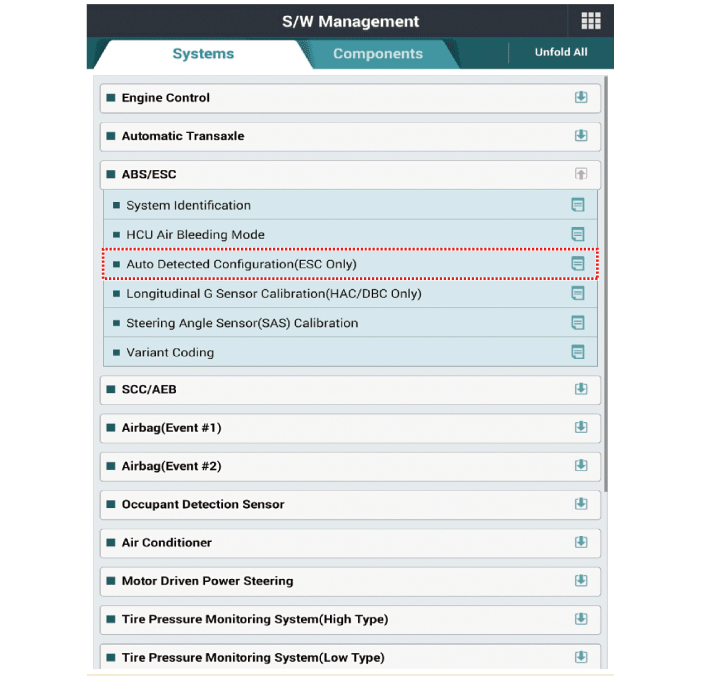
Conduct the Auto Detected Sensor Calibration.
|
|
6. |
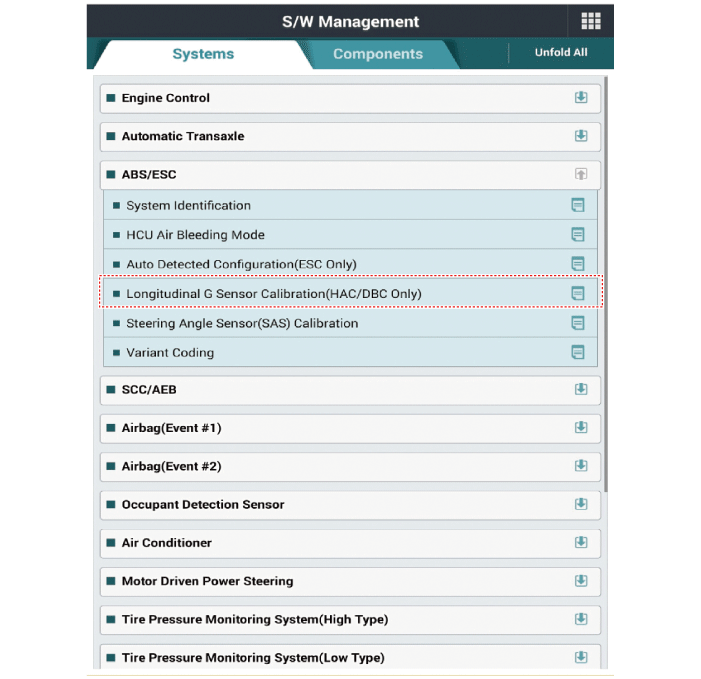
Conduct the Longitudinal G Sensor Calibration.
|
|
7. |
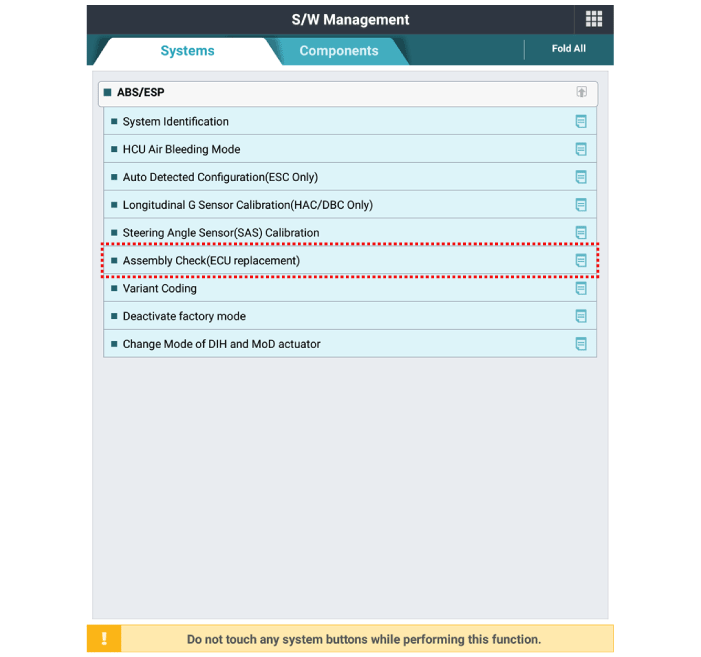
After replacing the ESP control module execute the "Assembly Check (ECU
replacement)" of the additional function to check that the mounting
is successful.
|
Perform diagnostic procedure by using diagnostic device as shown below :
|
1. |
Connect self-diagnosis connector (16pins) located under the driver side
crash pad to self-diagnosis device, and then turn the self-diagnosis
device after key is ON.
|
|
2. |
Select the "vehicle model" and "ESP/ESC" on diagnostic tool vehicle
selection screen, then select OK.
[Variant Code Reset]
[Variant Coding]
[Longitudinal G Sensor Calibration]
Assembly Check (ECU replacement)
|
ESP OFF Switch. Description and operation
|
1. |
The ESP OFF switch is for the user to turn off the ESP system.
|
|
2. |
The ESP OFF lamp is on when ESP OFF switch is engaged.
|
ESP OFF Switch. Repair procedures
|
1. |
Turn ignition switch OFF and disconnect the negative (-) battery cable.
|
|
2. |
Remove the crash pad lower panel.
(Refer to Body - "Crash Pad")
|
|
3. |
Remove the crash pad garnish assembly (A).
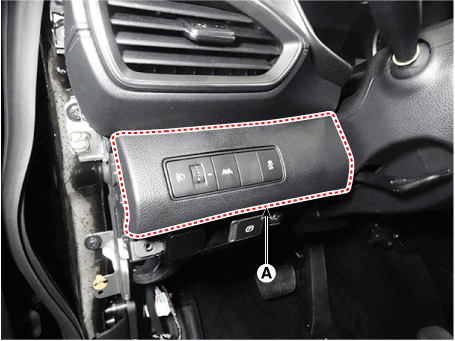
|
|
4. |
Remove the connector (A) by pressing the locking pin.
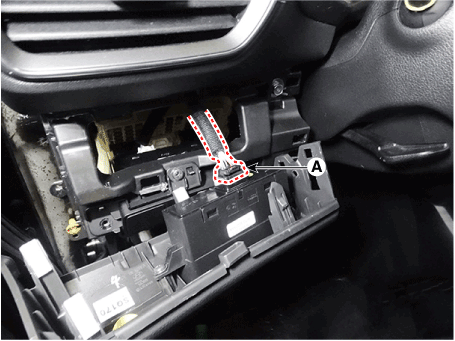
|
|
5. |
Remove the ESP OFF switch (A) after loosening the screw.
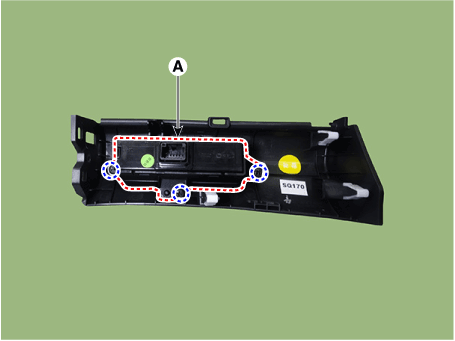
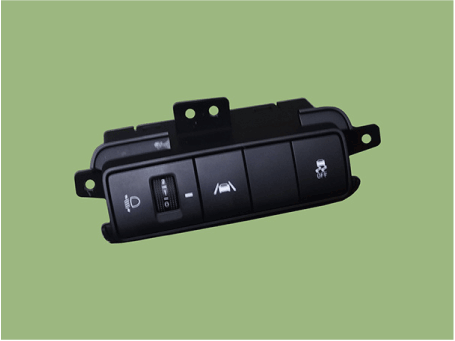
|
|
1. |
To install, reverse the removal procedures.
|
Front Wheel Speed Sensor. Components and components location
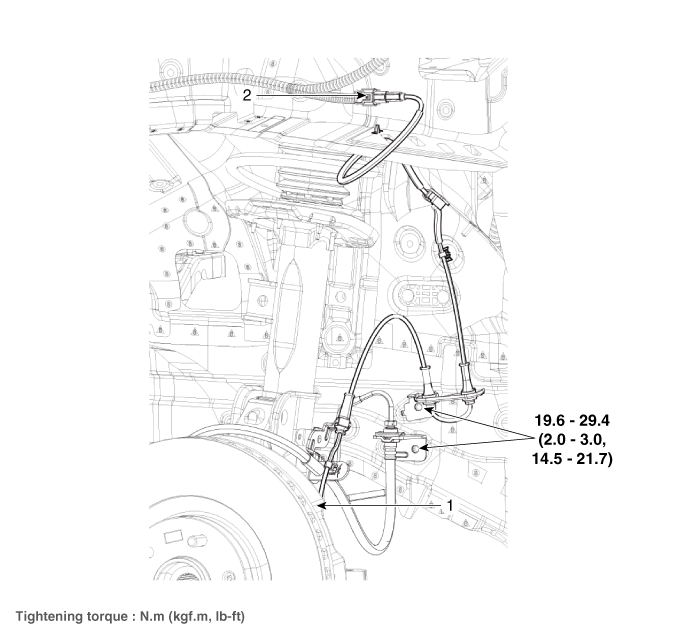
1. Front wheel
speed sensor
|
2. Front wheel
speed sensor connector
|
Front Wheel Speed Sensor. Repair procedures
| •
|
Be careful not to damage the parts located under the vehicle
(floor under cover, fuel filter, fuel tank and canister) when
raising the vehicle using the lift.
(Refer to General Information - "Lift and Support Points")
|
|
|
1. |
Loosen the wheel nuts slightly.
Raise the vehicle, and make sure it is securely supported.
|
|
2. |
Remove the front wheel and tire (A) from the front hub.
|
Tightening torque :
107.9 - 127.5 N.m (11.0 - 13.0 kgf.m, 79.6 - 94.0 lb-ft)
|
|
• |
Be careful not to damage the hub bolts when removing
the front wheel and tire (A).
|
|

|
|
3. |
Remove the front wheel guard.
(Refer to Body - "Front Wheel Guard")
|
|
4. |
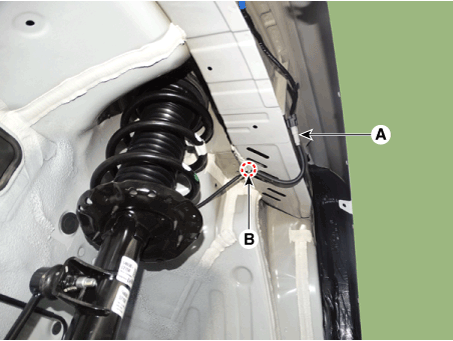
Disconnect the front wheel speed sensor connector (A) and then remove
the fixing clip (B).
|
|
5. |
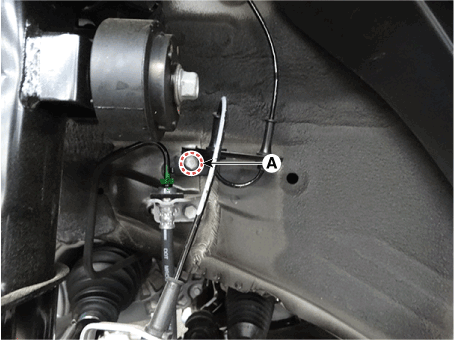
Remove the front wheel speed sensor cable braket bolt (A).
|
Tightening torque :
19.6 - 29.4 N.m (2.0 - 3.0 kgf.m, 14.5 - 21.7 lb-ft)
|
|
|
6. |
Loosen the bolt and then disconnect the front wheel speed sensor (A).
|
Tightening torque :
8.8 - 13.7 N.m (0.9 - 1.4 kgf.m, 6.5 - 10.1 lb-ft)
|
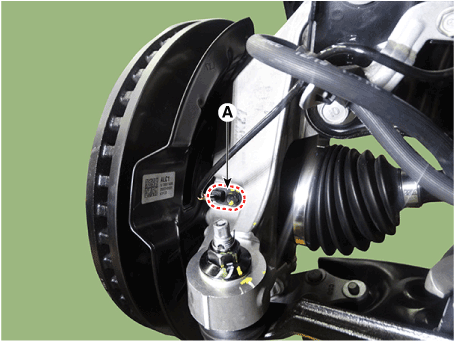
|
|
1. |
Measure the output voltage between the terminal of the wheel speed sensor
and the body ground.
|
• |
In order to protect the wheel speed sensor, when measuring
output voltage, a 100Ω resister must be used as shown.
|
|
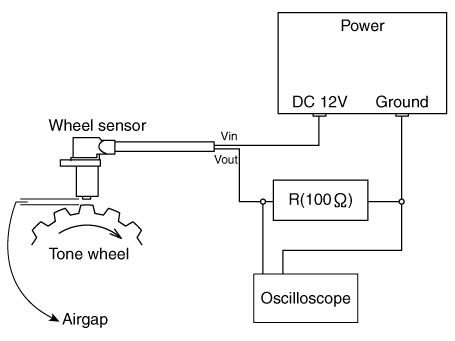
|
|
2. |
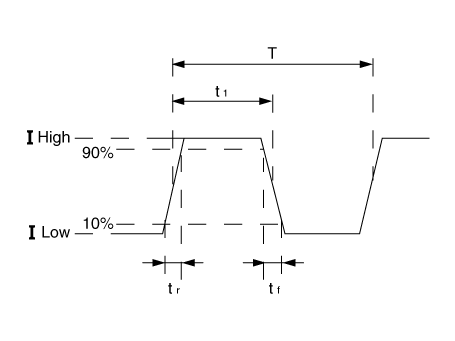
Compare the change of the output voltage of the wheel speed sensor to
the normal change of the output voltage as shown below.
|
• â… low : 5.95 ~ 8.05 mA
• â… HIgh : 11.9 ~ 16.1 mA
• Frequency range : 0.03 ~ 3000 HZ
|
|
|
1. |
Install in the reverse order of removal.
|
Rear Wheel Speed Sensor. Components and components location
[2WD]
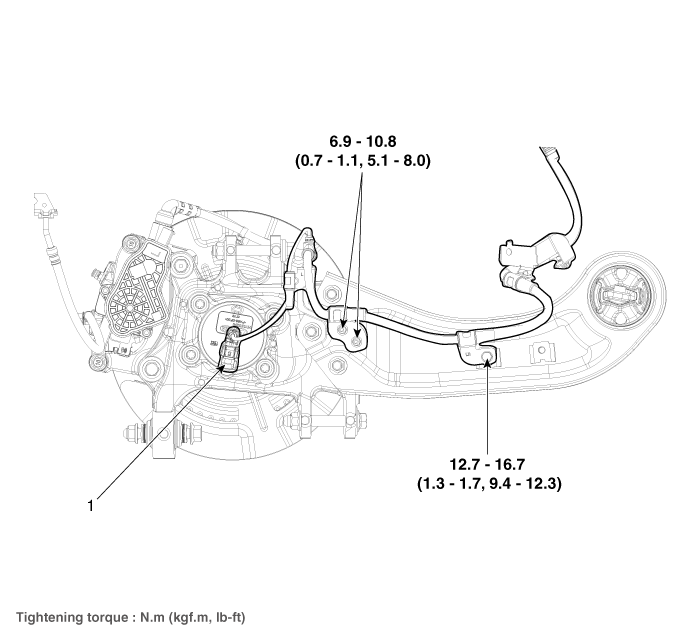
1. Rear wheel
speed sensor
|
|
[4WD]
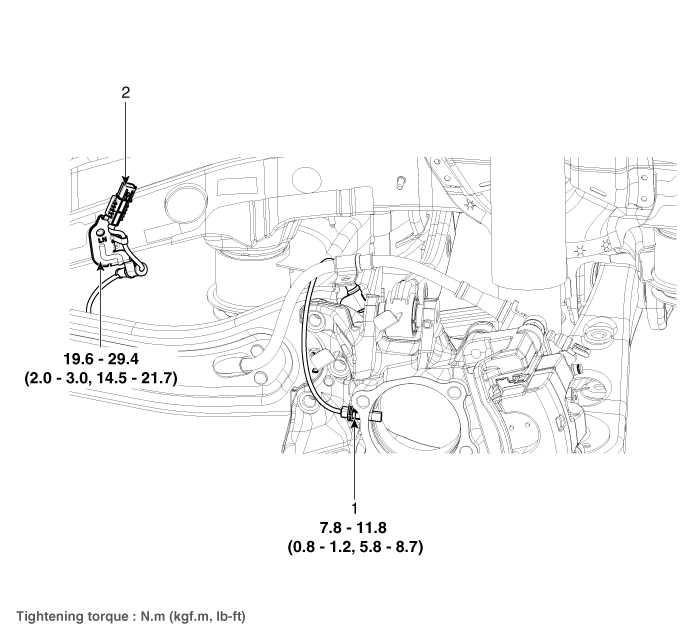
1. Rear wheel
speed sensor
|
2. Rear wheel
speed sensor connector
|
Rear Wheel Speed Sensor. Repair procedures
| •
|
Be careful not to damage the parts located under the vehicle
(floor under cover, fuel filter, fuel tank and canister) when
raising the vehicle using the lift.
(Refer to General Information - "Lift and Support Points")
|
|
[2WD]
|
1. |
Loosen the wheel nuts slightly.
Raise the vehicle, and make sure it is securely supported.
|
|
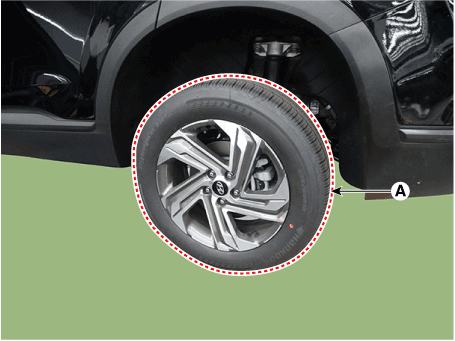
2. |
Remove the rear wheel and tire (A) from the rear hub.
|
Tightening torque :
107.9 - 127.5 N.m (11.0 - 13.0 kgf.m, 79.6 - 94.0 lb-ft)
|
|
• |
Be careful not to damage the hub bolts when removing
the rear wheel and tire (A).
|
|
|
|
3. |
Remove the rear brake caliper.
(Refer to Brake System - "Rear Disc Brake")
|
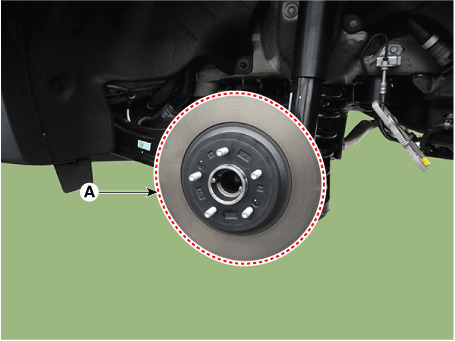
|
4. |
Loosen the screw and the remove the rear break disc.
|
Tightening torque :
4.9 - 5.9 N.m (0.5 - 0.6 kgf.m, 3.6 - 4.3 lb-ft)
|
|
|
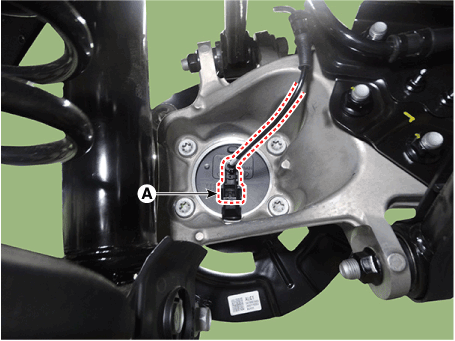
5. |
Disconnect the rear wheel speed sensor connector (A).
|
|
6. |
Loosen the bearing mounting bolts and then remove the hub bearing assembly
& dust cover (A).
|
Tightening torque :
88.2 - 107.8 N.m (9.0 - 11.0 kgf.m, 65.0 - 79.5 lb-ft)
|
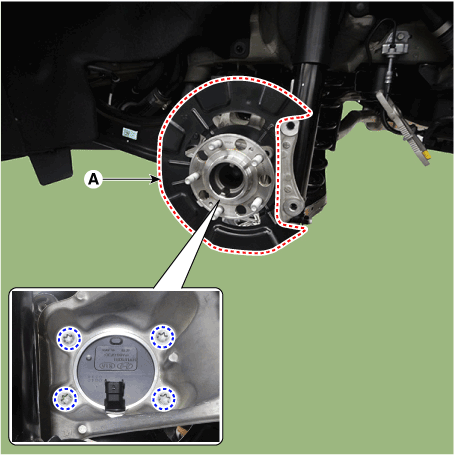
|
[4WD]
|
1. |
Loosen the wheel nuts slightly.
Raise the vehicle, and make sure it is securely supported.
|
|
2. |
Remove the rear wheel and tire (A) from the rear hub.
|
Tightening torque :
107.9 - 127.5 N.m (11.0 - 13.0 kgf.m, 79.6 - 94.0 lb-ft)
|
|
• |
Be careful not to damage the hub bolts when removing
the rear wheel and tire (A).
|
|

|
|
3. |
Remove the rear wheel guard.
(Refer to Body - "Rear Wheel Guard")
|
|
4. |
Disconnect the rear wheel speed sensor connector (A).
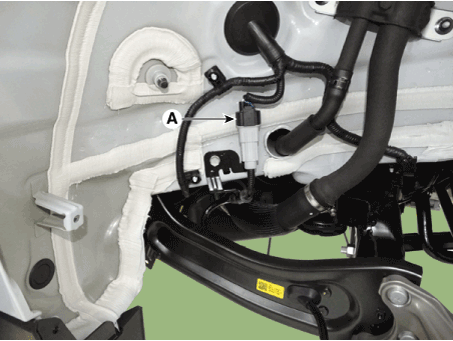
|
|
5. |
Remove the rear wheel speed sensor cable braket bolt (A).
|
Tightening torque :
19.6 - 29.4 N.m (2.0 - 3.0 kgf.m, 14.5 - 21.7 lb-ft)
|
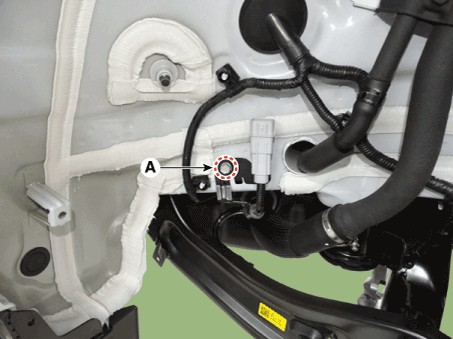
|
|
6. |
Disconnect the EPB actuator connetor (A).
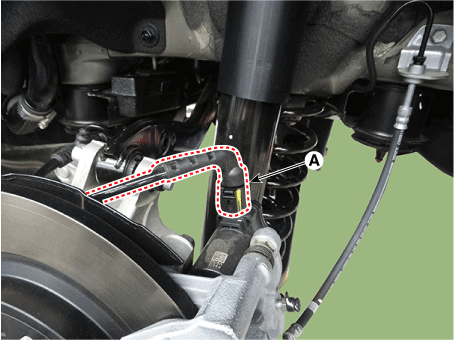
|
|
7. |
Disconnect the rear wheel speed sensor connector (A).
|
Tightening torque :
8.8 - 13.7 N.m (0.9 - 1.4 kgf.m, 6.5 - 10.1 lb-ft)
|
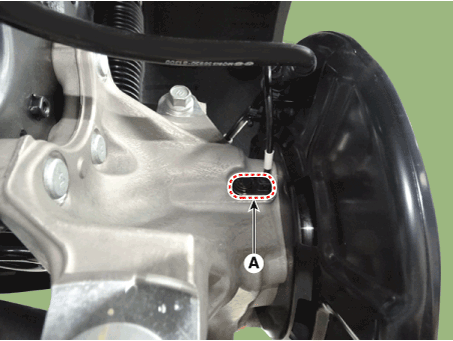
|
|
1. |
Remove the rear wheel hub bearing assembly.
(Refer to Driveshaft and Axle - "Rear Hub - Carrier")
|
|
2. |
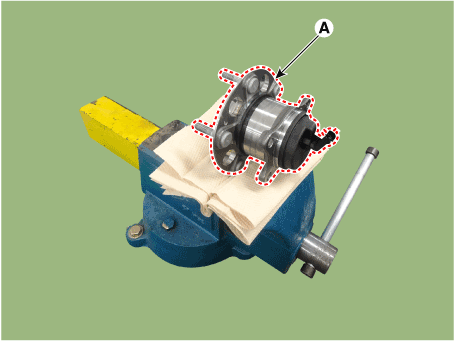
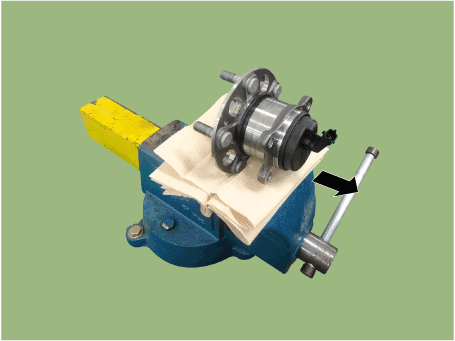
Fix the rear hub bearing assembly (A) on the vise.
|
• |
When fixing on the vise, use a cloth not to be damaged
the hub bearing assembly.
|
|
• |
Be careful if excessive force for fixing on the vise
may damage the hub bearing assembly.
|
|
|
|
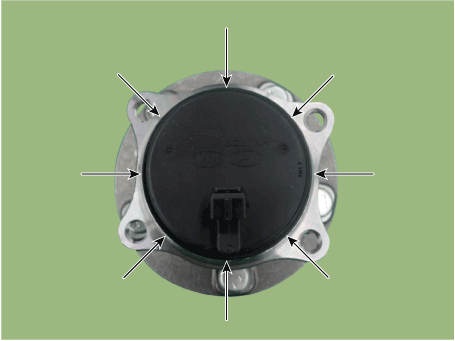
3. |
Check the direction of the sensor cap (A).
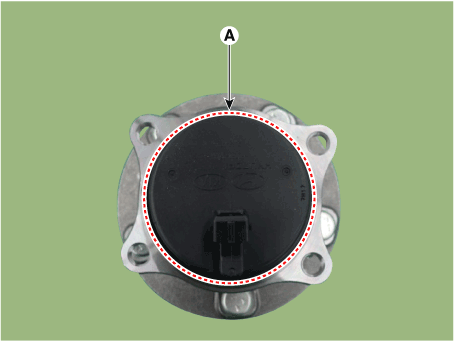
|
|
4. |
Remove the sensor cap by hammering on a gap between sensor cap and hub
bearing assembly using a scraper (A).
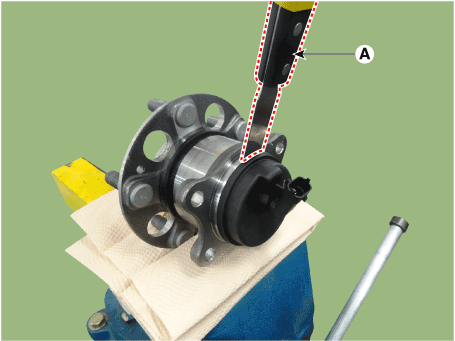
|
• |
In order to widen the gap little by little, hammering
around the bearing cap 10-20 times.
|
|
• |
When removing the sensor cap, remove it in a straight
direction not to damage the tone wheel or encoder.
|
|
|
|
5. |
Check if distorted or damaged the tone wheel or encoder (A).
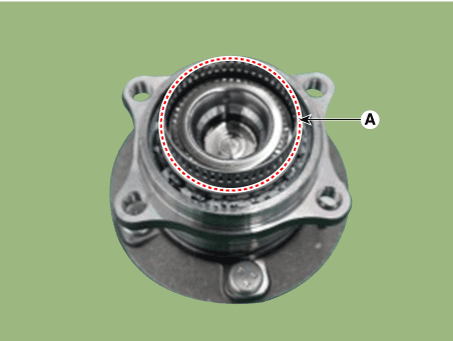
|
• |
Check if damaged the tone wheel or encoder after removing
the sensor cap and replace the hub bearing if it was
deformed.
|
|
• |
If the tone wheel is deformed, it may trigger the MIL
ON or other problems.
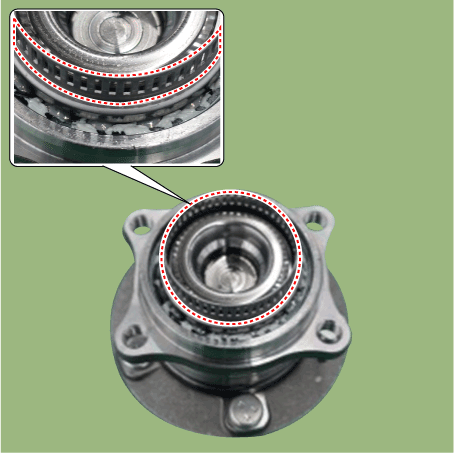
|
|
|
|
6. |
Position the sensor cap to the same direction of sensor cap connector
(A) as you checked before removing.

|
• |
Before installing the sensor cap, do not let any foreign
material and contaminant into the hub bearing (A) assembly.
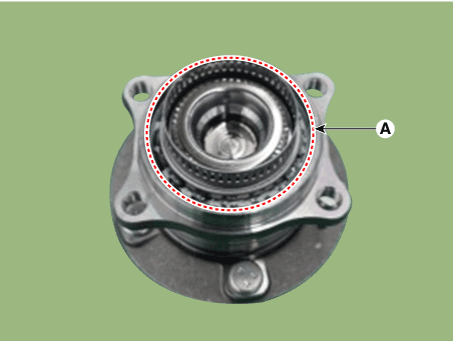
|
|
|
|
7. |
Install the sensor cap (A) with the special service tool (09527-AL500).
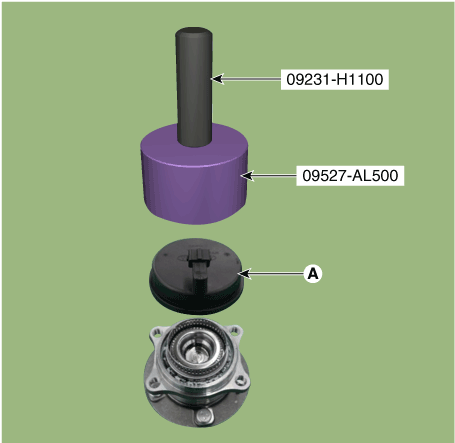
|
• |
Hammer until there is no gap between the SST and hub
bearing assembly and install the sensor cap.
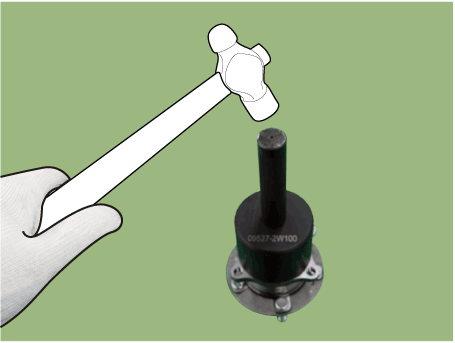
|
|
• |
Be careful not to tilt to one side when installing the
sensor cap as it may damage the tone wheel or encoder.
|
|
• |
When sensor cap installation, hammering it until the
gap disappeared between the sensor cap and hub bearing
assembly.
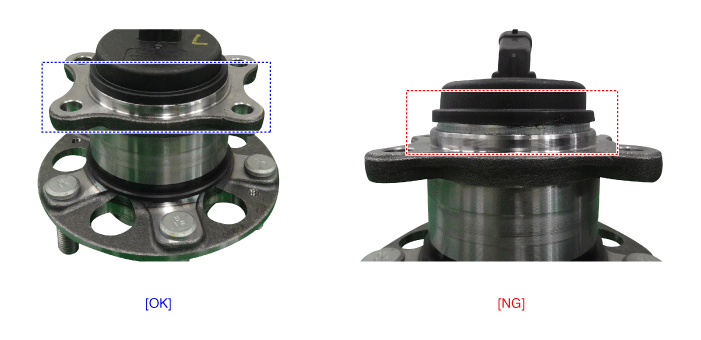
|
|
|
|
8. |
Install the rear wheel hub bearing assembly.
(Refer to Driveshaft and Axle - "Rear Hub - Carrier")
|
|
1. |
Measure the output voltage between the terminal of the wheel speed sensor
and the body ground.
|
• |
In order to protect the wheel speed sensor, when measuring
output voltage, a 100Ω resister must be used as shown.
|
|

|
|
2. |
Compare the change of the output voltage of the wheel speed sensor to
the normal change of the output voltage as shown below.

|
• â… low : 5.95 ~ 8.05 mA
• â… HIgh : 11.9 ~ 16.1 mA
• Frequency range : 0.03 ~ 3000 HZ
|
|
|
1. |
Install in the reverse order of removal.
|
Emergency Signal System. Description and operation
Introduction of quick brake warning system (ESS)
In case of quick brake by driver, the brake lamp or turn signal is blinked to
warn against the vehicle at rear.
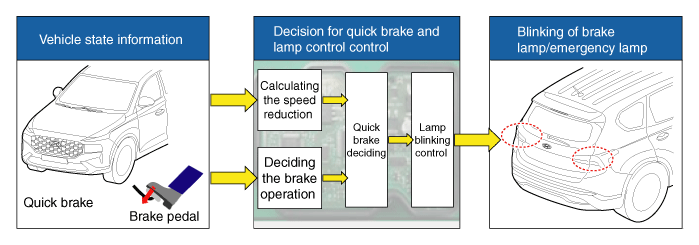
|
1. |
Basic function (Blinking the brake lamp/emergency lamp)
| –
|
Operation condition : In case of quick brake or operation of
ABS above in a certain speed
|
| –
|
Releasing condition : In case of stopping the quick brake or
releasing the ABS operation
|
|
|
2. |
Additional function (Blinking the turn signal)
| –
|
Operation condition : In case of quick brake in low speed
|
| –
|
Releasing condition : Releasing at the start of driving
|

|
System Configuration
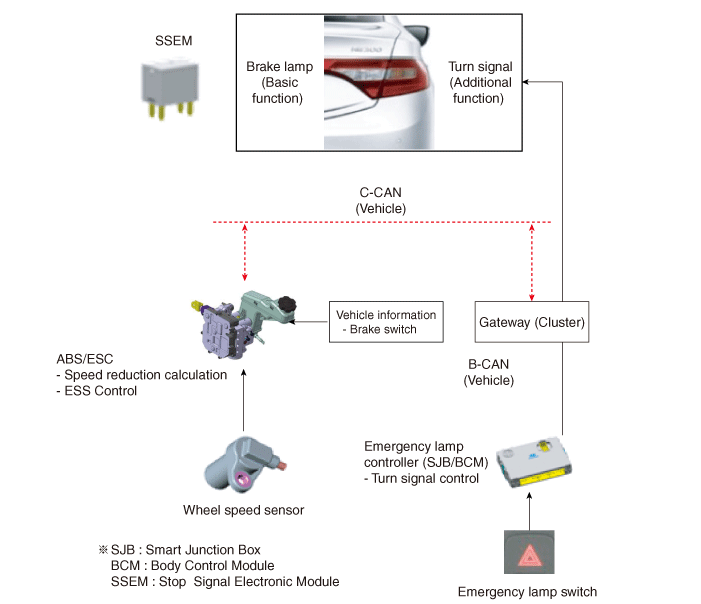
ESS Circuit Diagram
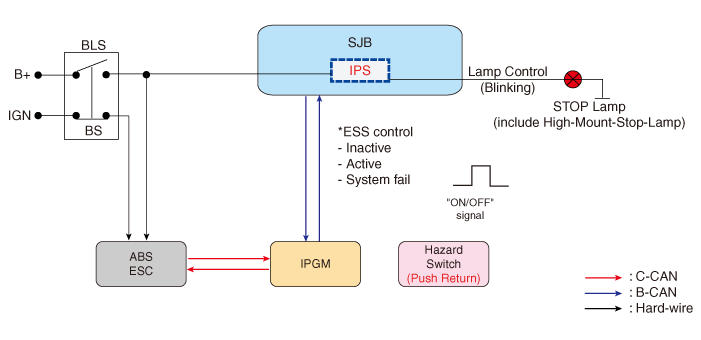
Yaw-rate and G Sensor. Description and operation
The yaw rate and G sensor is included inside the air bag control module (SRSCM).
When the vehicle is turning with respect to a vertical axis the yaw rate sensor
detects the yaw rate electroniclly by the vibration change of plate fork inside
the yaw rate sensor.
If yaw velocity reaches the specific velocity after it detects the vehicle'yawing,
the ESC control is reactivated.
The later G sensor senses vehicle's lateral G. A small element inside the sensor
is attached to a deflectable leverarm by later G.
Direction and magnitude of lateral G loaded to vehicle can be known with electrostatic
capacity changing according to lateral G.
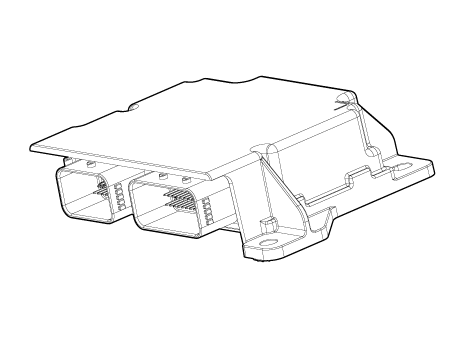
Yaw-rate and G Sensor. Specifications
Description
|
Specification
|
Operating voltage
|
8 - 16V
|
Output signal
|
CAN Interface
|
Operating temperature
|
-40 - 85°C (-40 - 185°F)
|
Yaw-rate sensor
|
Measurement range
|
-128 to +128°/sec
|
Frequency response
|
15 - 45Hz
|
G sensor
|
Measurement range
|
-1.99 to +1.99g
|
Frequency response
|
50 Hz ± 60%
|
Yaw-rate and G Sensor. Schematic diagrams
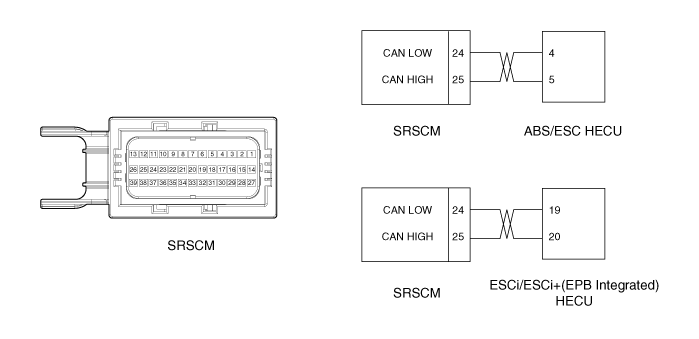
Yaw-rate and G Sensor. Repair procedures
|
1. |
Turn ignition switch OFF and disconnect the negative (-) battery cable.
|
• |
Disconnect the battery negative cable and wait for at
least thirty seconds before beginning work.
|
|
|
|
2. |
Remove the floor console.
(Refer to Body - "Floor Console")
|
|
3. |
Remove the air duct (A) after loosening the mounting bolts (A).
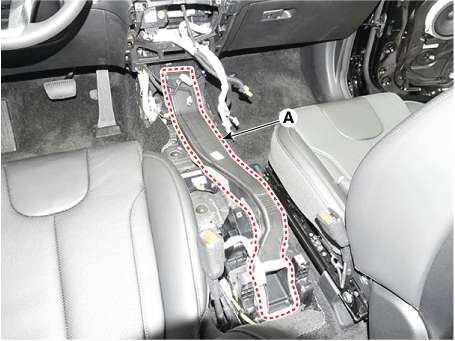
|
|
4. |
Pull up the lock, of the SRSCM connector, the disconnect the connector
(A).
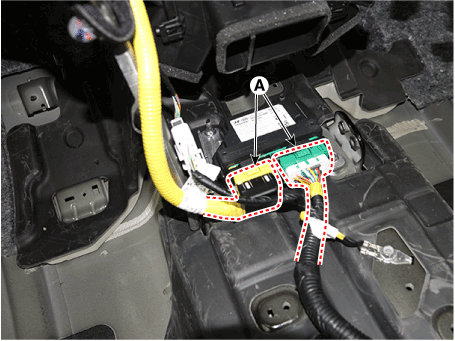
|
|
5. |
Remove the SRSCM (A) after loosening the mounting bolts and nuts.
|
Tightening torque :
9.8 - 12.7 N.m (1.0 - 1.3 kgf.m, 7.2 - 9.4 lb-ft)
|
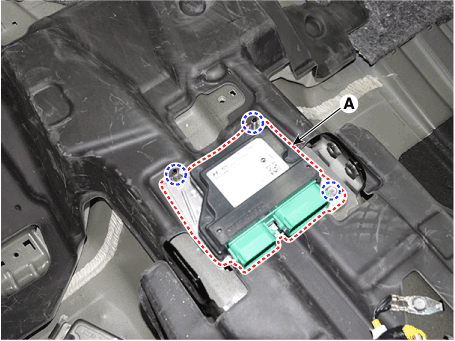
|
|
1. |
To install, reverse the removal procedures.
|
|
2. |
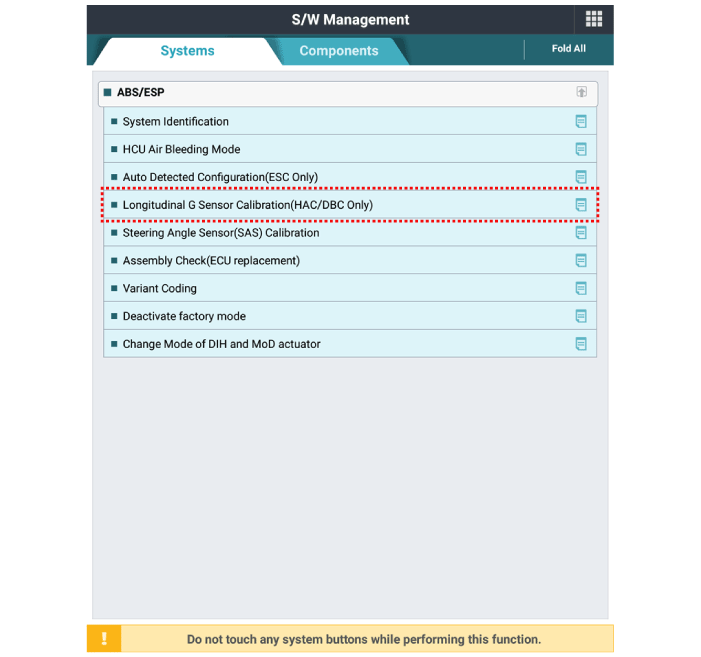
Perform Longitudinal G-sensor calibration in vehicle S/W Management
menu of the diagnostic tool.
|
As manual for diagnosis methods by using diagnosis device, the main contents
are as follows:
|
1. |
Connect self-diagnosis connector(16pins) located in the lower of driver
side crash pad to self-diagnosis device, and then turn the self-diagnosis
device after key is ON.
|
|
2. |
Select the "vehicle model" and "ABS/ESP" on diagnostic tool vehicle
selection screen, then select OK.
[Longitudinal G Sensor Calibration]
|
Description and operation Description Electronic parking brake (EPB) is motor driven braking system operated by a switch instead of pulling or depressing the lever to engage the brake. Pressing the button ...
 Hyundai Santa Fe (TM): ESP(Electronic Stability Program) System


 Parking Brake System. Electronic Parking Brake (EPB)


