Description and operation
|
1. |
System operation
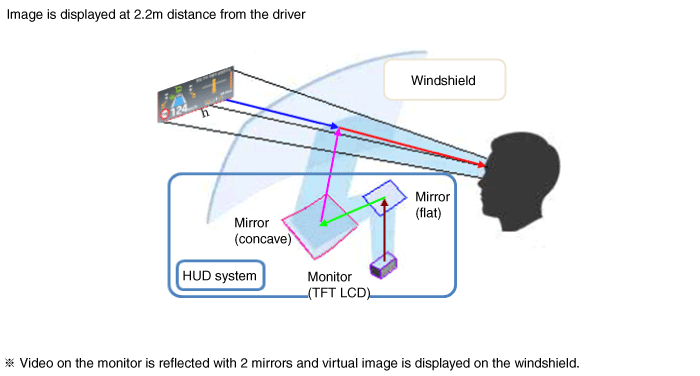
HUD system displays various information on the windshield glass which
minimizes the driverŌĆÖs eye movement to enhance safety and convenience.
The Head Up Display reflects the TFT LCD images to two mirrors (flat/concave)
and displays them 2.2m ahead from the driver's eye.
Information provided by HUD ;
|
(2) |
Integrated (DIS) information TBT (Turn by Turn) navigation information,
road signage
|
|
(3) |
Safety warning lamp: SCC, LKAS, LFW, Blind Spot Warning
|
|
|
2. |
HUD Display Contents
|
|
3. |
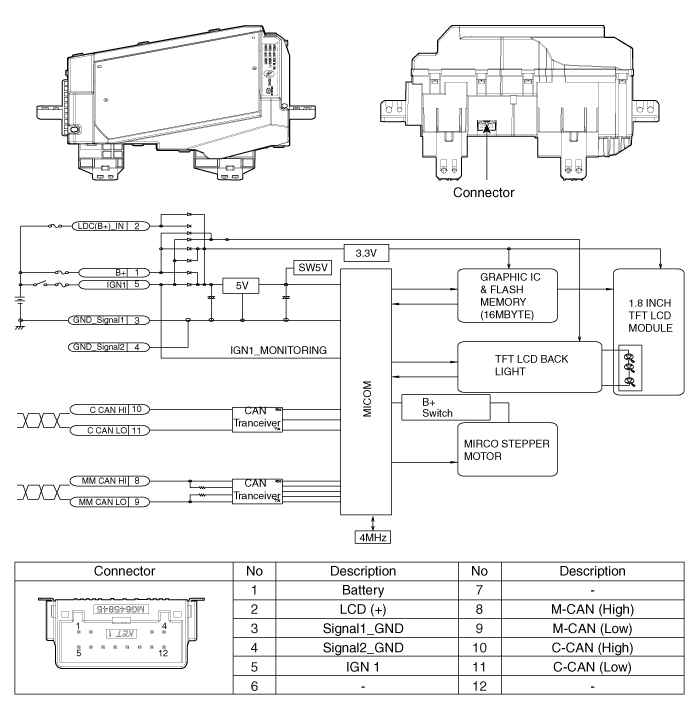
HUD Unit
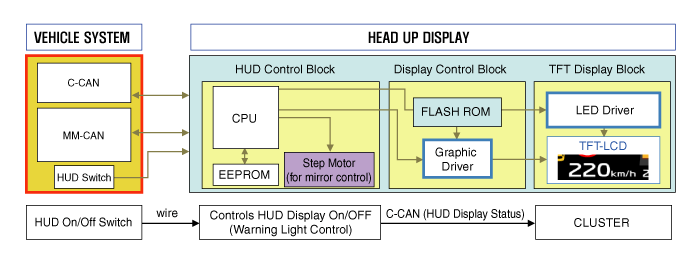
Head Up Display : Information of the vehicle system is output to the
combine through CAN communication.
|
|
4. |
Cluster
|
|
5. |
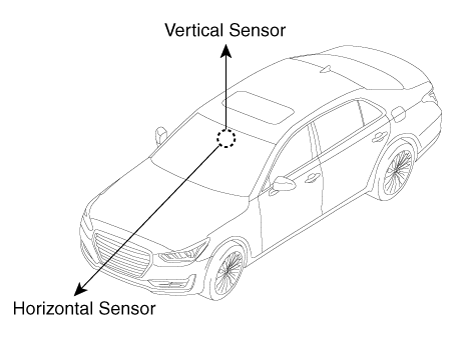
Ambient Light Sensor
Ambient light sensor: The two-direction (horizontal, vertical) measuring
sensor is applied and the HUD brightness is adjusted by the horizontal
measurements.
| ŌĆō
|
Two-direction measuring ambient light sensor applied
|
|
If the ambient light sensor measurement is not recognized, the
HUD does not work. Make sure that the sensor should work before
checking the HUD.
|
|
Components and components location
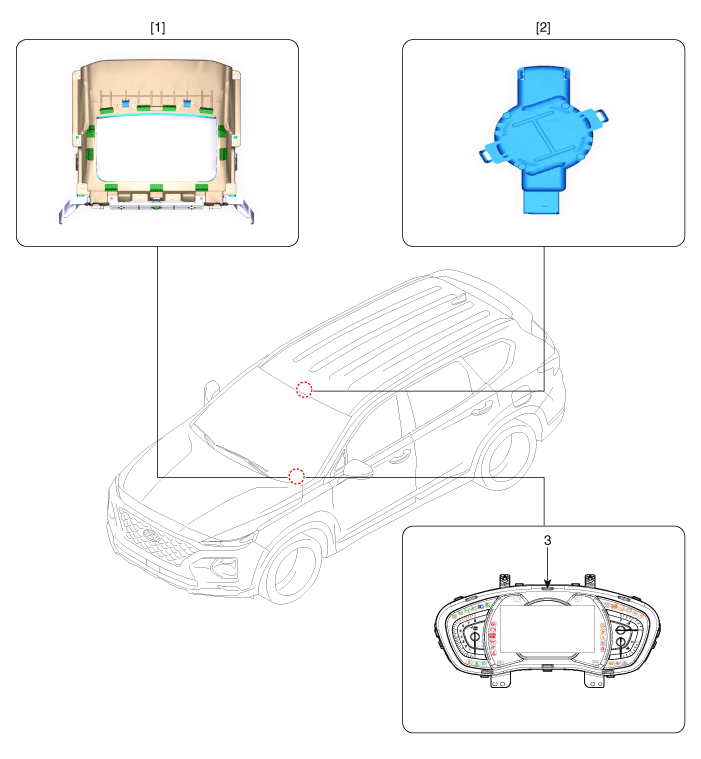
1. Head Up Display
(HUD)
2. Rain(Light) sensor
|
3. Cluster (User
setting menu On/Off)
|
Head Up Display Unit. Components and components location
Head Up Display Unit. Troubleshooting
Category
|
Error symptoms
|
inspection item
|
Detailed inspection item
|
Related parts
|
Lighting
|
| ŌĆó
|
Lighting brightness not automatically controlled (no difference
between day and night)
|
|
| ŌĆó
|
Check the lighting control
|
| ŌĆó
|
Check the ambient light sensor operation
|
| ŌĆó
|
Check the CAN communication
|
|
| ŌĆó
|
Check the lighting control in the cluster USM
ŌåÆ If working, HUD has no problem.
|
| ŌĆó
|
Check the ambient light sensor operation
ŌåÆ If the ambient light sensor works, check the communications
(CGW Ōåö HUD)
|
|
Light sensor
CGW
Cluster
|
Adjustment function
|
| ŌĆó
|
Display position not adjusted
|
|
| ŌĆó
|
Check the mirror movement when IG is on or off (parking position)
|
|
| ŌĆó
|
If the step motor does not work when IG is on or off,
ŌåÆ The step motor in HUD fails.
|
| ŌĆó
|
If the step motor in HUD works when IG is on or off,
ŌåÆ Check the CAN communications (cluster Ōåö HUD)
|
|
HUD
Cluster
|
Head Up Display Unit. Repair procedures
|
1. |
Disconnect the negative (-) battery terminal.
|
|
2. |
Remove the instrument cluster.
(Refer to Indicators And Guages - "Instrument Cluster")
|
|
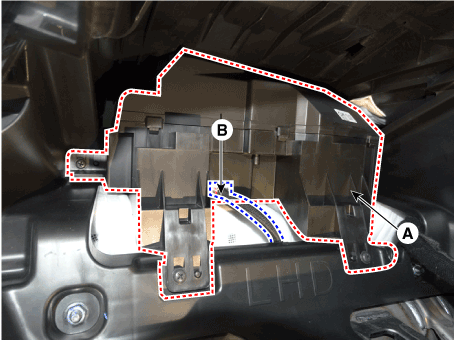
3. |
Remove the head up display unit (A) after disconneting the connector
(B) and loosening the mounting screws.
|
|
1. |
Install the head up display unit.
|
|
2. |
Install the instrument cluster.
|
|
3. |
Connect the negative (-) battery terminal.
|
If a part of the headup display footage is distorted or it is not at eye level
with the driver a Global Diagnostic System (diagnostic tool) can be used to
carry out calibration.
|
1. |
In case calibration is required
| ŌĆō
|
When replacing the head-up display unit.
|
| ŌĆō
|
In case the footage is distorted after replacing the windshield
(double vision removed after film is inner mounted to the glass).
|
| ŌĆō
|
When the HUD mounted main crashpad is removed/installed or replaced.
|
| ŌĆō
|
When the video installation location of the Head-up display
unit is not at eye level of the driver and the focus is inconsistent.
|
|
|
2. |
calibration items
No
|
Footage calibration functions
|
Calibration cases
|
1
|
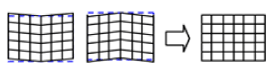
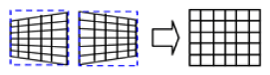
Rotation : Calibration in the half-circle/clockwise direction based
on the center
|

|
2
|
Smile : Calibration based vertically on the center
|
|
3
|
Slanted(up/down) : Calibration according to an upward/downward slant
|

|
4
|
Slanted(left/right) : Calibration according to a left/right slant
|
|
5
|
Parallel compensation
|

|
6
|
Move location of mark to upward/downward : Compensation according
to eye height
|

|
7
|
Initialization : Changed to the status of before video compensation
|
|
|
Components and components location Component Location 1. Head lamp leveling actuator Head Lamp Leveling Switch. Schematic diagrams Circuit diagram Head Lamp Leveling Switch. Repair procedures Inspection ...
Description and operation Description The system detects the passenger in the vehicle and prevents the driver from getting off the vehicle with the passenger in the back. - 1st warning: If you open the ...
 Hyundai Santa Fe (TM): Head Up Display System
 Auto Head Lamp Leveling Device
 Rear Occupant Alert