Description and operation
The immobilizer system will disable the vehicle unless the proper ignition key
is used, in addition to the currently available anti-theft systems such as car
alarms, the immobilizer system aims to drastically reduce the rate of auto theft.
|
1. |
Transponder (TP) – IMMO ECU Communication
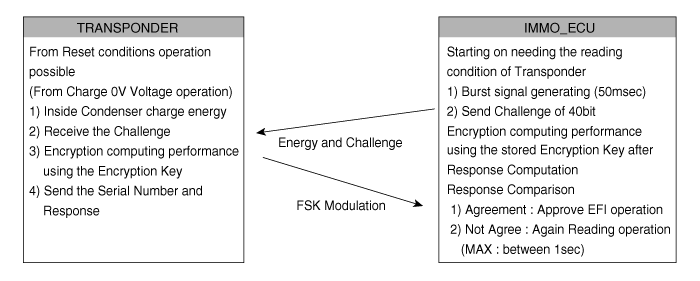
TP Read Protocol
|
(1) |
IMMO_ECU after IGN on(or CPU Reset cancellation) is sent Challenge
to TP and confirmed Serial Number and Signature.
|
|
(2) |
When response of input transponder is not correct, input is
retry.
|
|
(3) |
When response of input transponder is correct, The data that
calculate Encryption operation in the EEPROM program compared
with received data from TP.
When Codes is same, input is finished.
If the codes are not same, input are continued until when codes
are same.
|
|
(4) |
If IMMO_ECU EEPROM code is not programming, when correct transponder
is inputted (CRC Check OK), input is finished.
|
|
(5) |
After IGN1 on(CPU Reset cancellation), IMMO_ECU is reading the
maximum 5times Transponder Code
|
|
(6) |
In the IGN1 ON&EMS_state=Lock state, when received ANKNOWLEDGE,
TP is re-authenticated
|
|
|
2. |
Transponder / IMMO ECU / EMS authentication
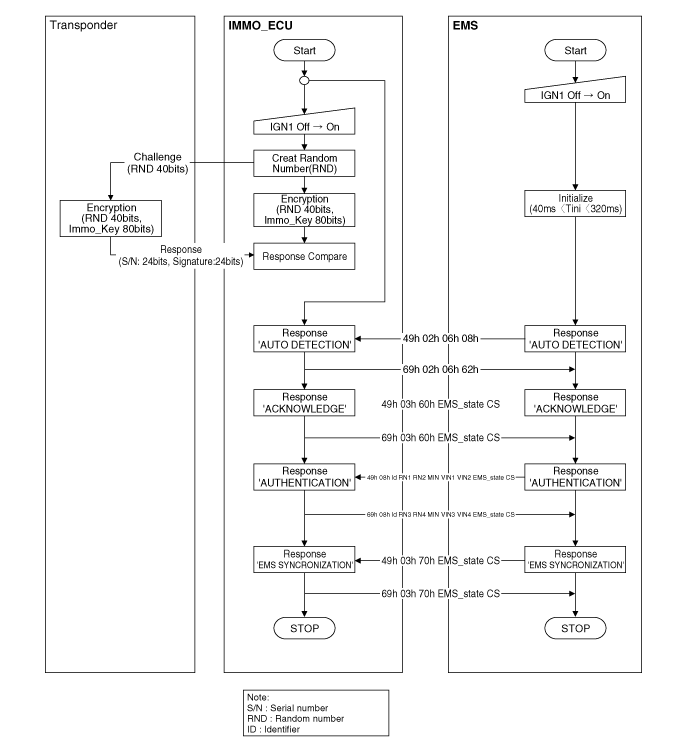
|
PCM (Power Train Control Module)
|
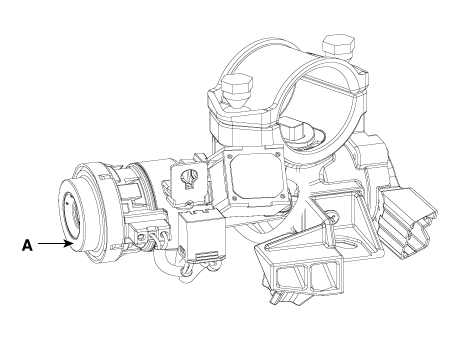
1. |
The PCM(ECM) (A) carries out a check of the ignition key using a special
encryption algorithm, which is programmed into the transponder as well
as the PCM(ECM) simultaneously. Only if the results are equal, the engine
can be started. The data of all transponders, which are valid for the
vehicle, are stored in the PCM(ECM).
ERN (Encrypted Randorm Number) value between EMS and encrypted smartra
unit is checked and the validity of coded key is decided by EMS.
|
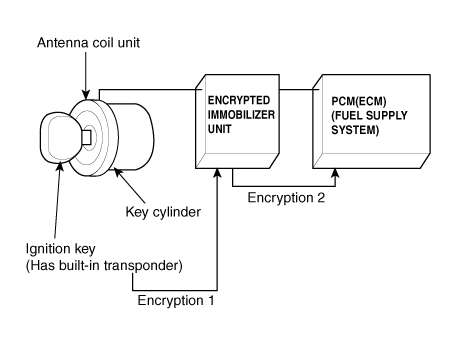
ENCRYPTED IMMOBILIZER unit (A)
The IMMOBILIZER carries out communication with the built-in transponder in the
ignition key. This wireless communication runs on RF (Radio frequency of 125
kHz). The IMMOBILIZER is mounted behind of the crash pad close to center cross
bar.
The RF signal from the transponder, received by the antenna coil, is converted
into messages for serial communication by the IMMOBILIZER device. And, the received
messages from the PCM(ECM) are converted into an RF signal, which is transmitted
to the transponder by the antenna.
The IMMOBILIZER does not carry out the validity check of the transponder or
the calculation of encryption algorithm. This device is only an advanced interface,
which converts the RF data flow of the transponder into serial communication
to the PCM(ECM) and vice versa.
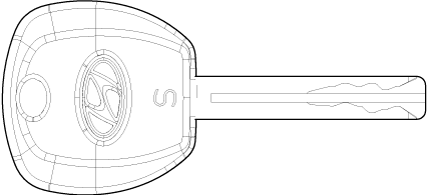
Transponder (Built-in keys)
The transponder has an advanced encryption algorithm. During the key teaching
procedure, the transponder will be programmed with vehicle specific data. The
vehicle specific data are written into the transponder memory. The write procedure
is once only; therefore, the contents of the transponder can never be modified
or changed.
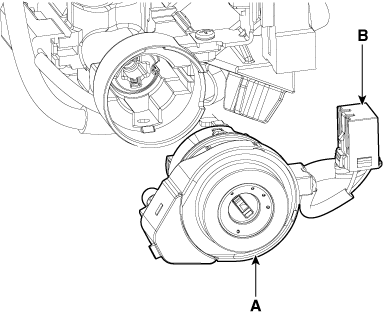
Antenna Coil
The antenna coil (A) has the following functions.
| – |
The antenna coil supplies energy to the transponder.
|
| – |
The antenna coil receives signal from the transponder.
|
| – |
The antenna coil sends transponder signal to the IMMOBILIZER.
It is located directly in front of the steering handle lock.
|
Repair procedures
| Diagnosis with diagnostic
tool |
|
1. |
In the body electrical system, failure can be quickly diagnosed by using
the vehicle diagnostic system (diagnostic tool).
The diagnostic system (diagnostic tool) provides the following information.
|
(1) |
Fault Code Searching : Checking failure and code number (DTC)
|
|
(2) |
Data Analysis : Checking the system input/output data state
|
|
(3) |
Actuation test : Checking the system operation condition
|
|
(4) |
S/W Management : Controlling other features including system
option setting and zero point adjustment
|
|
Data Analysis
|
1. |
Select the 'Data Analysis' and 'Car model'.
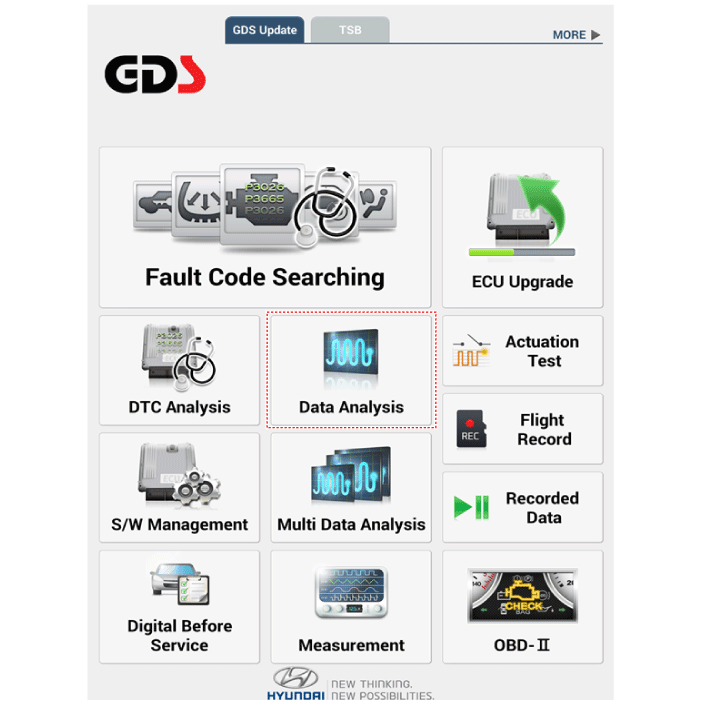
|
|
2. |
Select the 'IMMO' to search the current state of the input/output data.
|
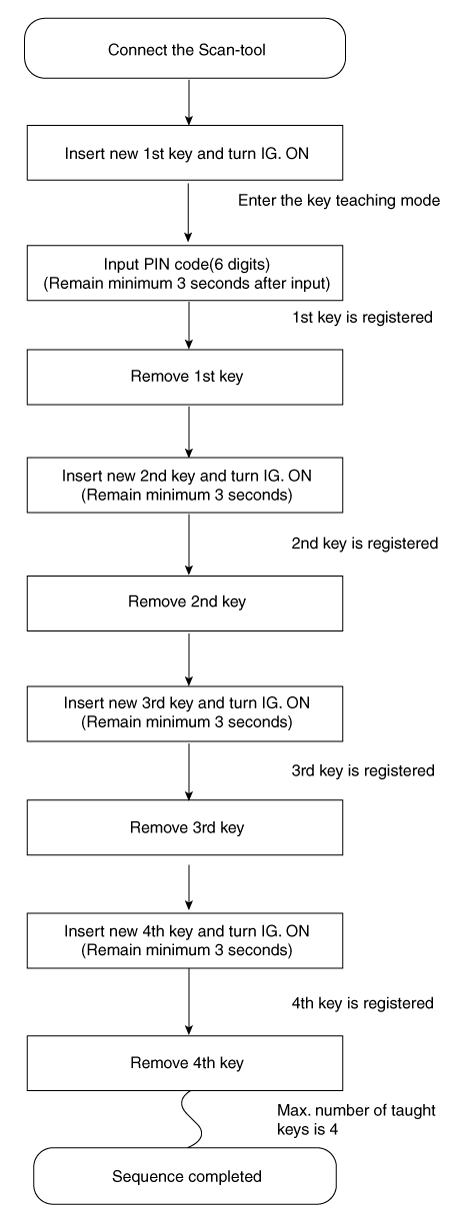
Key Teaching Procedure
Key teaching must be done after replacing a defective PCM(ECM) or when providing
additional keys to the vehicle owner.
The procedure starts with an PCM(ECM) request for vehicle specific data (PIN
code: 6digits) from the tester. The "virgin" PCM(ECM) stores the vehicle specific
data and the key teaching can be started. The "learnt" PCM(ECM) compares the
vehicle specific data from the tester with the stored data. If the data are
correct, the teaching can proceed.
If incorrect vehicle specific data have been sent to the PCM(ECM) three times,
the PCM(ECM) will reject the request of key teaching for one hour. This time
cannot be reduced by disconnecting the battery or any other manipulation. After
reconnecting the battery, the timer starts again for one hour.
The key teaching is done by ignition on with the key and additional tester commands.
The PCM(ECM) stores the relevant data in the EEPROM and in the transponder.
Then the PCM(ECM) runs the authentication required for confirmation of the teaching
process. The successful programming is then confirmed by a message to the tester.
If the key is already known to the PCM(ECM) from a previous teaching, the authentication
will be accepted and the EEPROM data are updated. There is no changed transponder
content (this is impossible for a learnt transponder).
The attempt to repeatedly teach a key, which has been taught already during
the same teaching cycle, is recognized by the PCM(ECM). This rejects the key
and a message is sent to the tester.
The PCM(ECM) rejects invalid keys, which are presented for teaching. A message
is sent to the tester. The key can be invalid due to faults in the transponder
or other reasons, which result from unsuccessful programming of data. If the
PCM(ECM) detects different authenticators of a transponder and an PCM(ECM),
the key is considered to be invalid.
The maximum number of taught keys is 4.
If an error occurs during the Immobilizer Service Menu, the PCM(ECM) status
remains unchanged and a specific fault code is stored.
If the PCM(ECM) status and the key status do not match for teaching of keys,
the tester procedure will be stopped and a specific fault code will be stored
at PCM(ECM).
| •
|
When teaching the 1st key, Smartra regists at the same time.
|
|
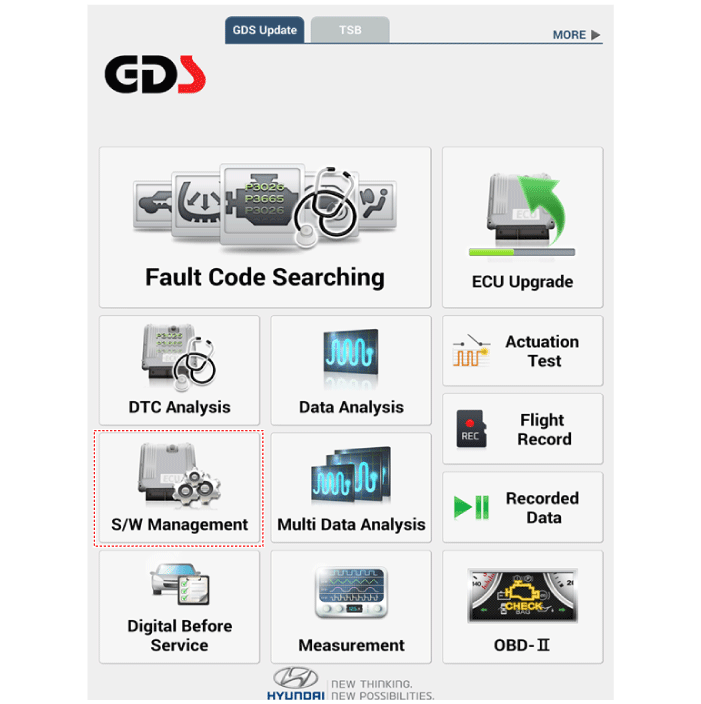
The following section describes how to diagnose faults using a diagnostic instrument.
|
1. |
Connect the cable of diagnostic tool to the data link connector in driver
side crash pad lower panel, and turn on the diagnostic tool.
|
|
2. |
Select the 'S/W Management' and 'Car model'.
|
|
3. |
Select "Imoobilizer" and "LEARNT KEYS".

|
|
4. |
Perform the "LEARNT KEYS" procedure according to the diagnostic tool
screen message.
|
Password Teaching / Changing
The user password for limp home is taught at the service station. The owner
of the vehicle can select a number with four digits.
The user password teaching is only accepted by a "learnt" PCM(ECM). Before first
teaching of user password to an PCM(ECM), the status of the password is "virgin"
No limp home function is possible.
The teaching is started by ignition on, with a valid key(learnt key) and sending
the user password by tester. After successful teaching, the status of the user
password changes from "virgin" to "learnt".
The learnt user password can also be changed. This can be done if the user password
status is "learnt" and the tester sends authorization of access, either the
old user password or the vehicle specific data. After correct authorization,
the PCM(ECM) requests the new user password. The status remains "learnt" and
the new user password will be valid for the next limp home mode.
If wrong user passwords or wrong vehicle specific data have been sent to the
PCM(ECM) three times continuously or intermittently, the PCM(ECM) will reject
the request to change the password for one hour. This time cannot be reduced
by disconnecting the battery or any other actions. After reconnecting the battery,
the timer starts again for one hour.
The following section describes how to diagnose faults using a diagnostic instrument.
|
1. |
Connect the cable of diagnostic tool to the data link connector in driver
side crash pad lower panel, and turn on the diagnostic tool.
|
|
2. |
Select the 'S/W Management' and 'Car model'.
|
|
3. |
Select "Imoobilizer" and "Password Teaching / Changing".

|
|
4. |
Perform the "Password Teaching / Changing" procedure according to the
diagnostic tool screen message.
|
Limp Home Function
If the PCM(ECM) detects the fault of the SMARTRA or transponder, the PCM(ECM)
will allow limp home function of the immobilizer. Limp home is only possible
if the user password (4 digits) has been given to the PCM(ECM) before. This
password can be selected by the vehicle owner and is programmed at the service
station.
The user password can be sent to the PCM(ECM) via the special tester menu.
Only if the PCM(ECM) is in status "learnt" and the user password status is "learnt"
and the user password is correct, the PCM(ECM) will be unlocked for a period
of time (30 sec.). The engine can only be started during this time. After the
time has elapsed, engine start is not possible.
If the wrong user password is sent, the PCM(ECM) will reject the request of
limp home for one hour. Disconnecting the battery or any other action cannot
reduce this time. After connecting the battery to the PCM(ECM), the timer starts
again for one hour.
|
1. |
Connect the cable of diagnostic tool to the data link connector in driver
side crash pad lower panel, and turn on the diagnostic tool.
|
|
2. |
Select the 'S/W Management' and 'Car model'.
|
|
3. |
Select "Imoobilizer" and "Limp Home Mode".

|
|
4. |
Perform the "Limp Home Mode" procedure according to the diagnostic tool
screen message.
|
Neutralizing Of ECM
The PCM(ECM) can be set to the "neutral" status by a tester.
A valid ignition key is inserted and after ignition on is recorded, the PCM(ECM)
requests the vehicle specific data from the tester. The communication messages
are described at "Neutral Mode" After successfully receiving the data, the PCM(ECM)
is neutralized.
The ECM remains locked. Neither the limp home mode nor the "twice ignition on"
function, is accepted by the PCM(ECM).
The teaching of keys follows the procedure described for the virgin PCM(ECM).
The vehicle specific data have to be unchanged due to the unique programming
of the transponder. If data should be changed, new keys with a virgin transponder
are requested.
This function is for neutralizing the PCM(ECM) and Key. Ex) when lost key, Neutralize
the PCM(ECM) then teach keys.
(Refer to the Things to do when Key & PIN Code the PCM(ECM) can be set to the
"neutral" status by a scanner. If wrong vehicle specific data have been sent
to SMATRA three times continuously or intermittently, the SMATRA will reject
the request to enter neutral mode for one hour. Disconnecting the battery or
other manipulation cannot reduce this time. After connecting the battery the
timer starts again for one hour.
| •
|
Neutralizing setting condition
- In case of PCM(ECM) status "Learnt" regardless of user password
"Virgin or Learnt"
- Input correct PIN code by scanner.
- Neutralizing meaning .
: PIN code (6) & user password (4) deletion.
: Locking of ECM (except key teaching permission)
|
| •
|
Neutralizing meaning:
- PIN Code(6) & User P/Word(4) deletion
- Locking of EMS(except Key Learning permission)
|
|
|
1. |
Connect the cable of diagnostic tool to the data link connector in driver
side crash pad lower panel, and turn on the diagnostic tool.
|
|
2. |
Select the 'S/W Management' and 'Car model'.
|
|
3. |
Select "Imoobilizer" and "Limp Home Mode".

|
|
4. |
Perform the "Limp Home Mode" procedure according to the diagnostic tool
screen message.
|
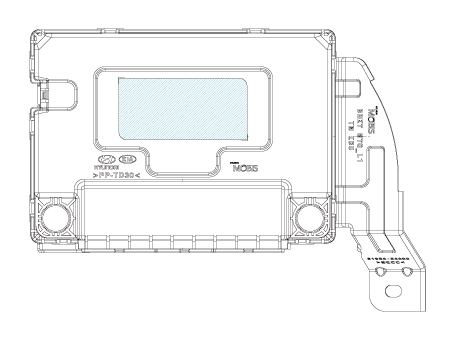
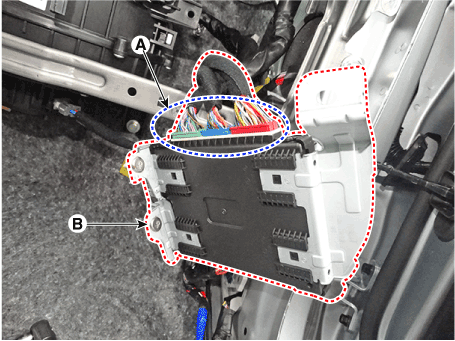
Immobilizer Control Unit. Repair procedures
|
1. |
Disconnect the negative (-) battery terminal.
|
|
2. |
Remove the glove box housing.
(Refer to Body - "Glove Box Housing Cover")
|
|
3. |
Disconnect the connector (A) and then remove the IBU (B) after loosening
a nut.
|
|
1. |
Install the IBU after connecting the unit connector.
|
|
2. |
Install the glove box housing.
|
|
3. |
Connect the negative (-) battery terminal.
|
Antenna Coil. Repair procedures
|
1. |
Disconnect the negative (-) battery terminal.
|
|
2. |
Remove the crash pad lower panel.
(Refer to Body - "Crash Pad Lower Panel")
|
|
3. |
Disconnect the 6P connector (B) of the coil antenna and then remove
the coil antenna (A) after loosening the screw.
|
|
1. |
Install the coil antenna and connect the 6P connector.
|
|
2. |
Install the crash pad lower panel.
|
|
3. |
Connect the negative (-) battery terminal.
|
Description and operation Description The system detects the passenger in the vehicle and prevents the driver from getting off the vehicle with the passenger in the back. - 1st warning: If you open the ...
Description and operation Description System Overview The System offers the following features: – Changing the state of engine ignition and power by using the start button. – Controlling external relays ...
See also:
Compass function
The Compass can be turned ON and OFF and will remember the last state when the ignition is cycled. To turn the display feature ON/OFF: 1. Press and release the button within 1 second to turn the display ...
Sunglass holder
To open the sunglass holder, press the cover and the holder will slowly open. Place your sunglasses in the compartment door with the lenses facing out. Push to close. WARNING Do not keep objects except ...
Fuel Pump. Repair procedures
Inspection [Fuel pump motor] 1. Turn the ignition switch OFF, and then remove battery (-) cable. 2. Remove the fuel pump assembly. 3. Check motor operation by fuel pump connector (A) connecting power (No.4) ...
 Hyundai Santa Fe (TM): Immobilizer System
 Rear Occupant Alert
 Button Engine Start System