 Hyundai Santa Fe (TM): Motor Driven Power Steering
Description and operation
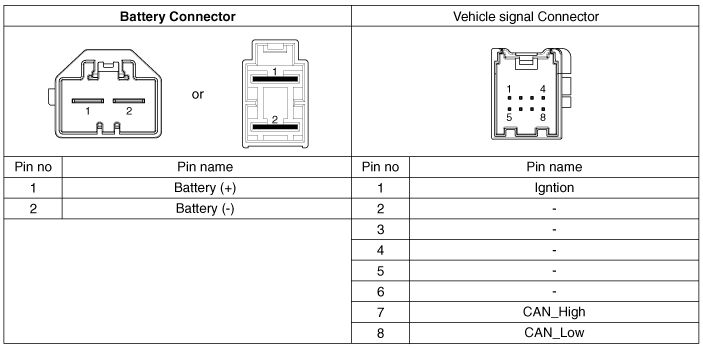
| Description |
Schematic diagrams
| Schematic Diagrams |

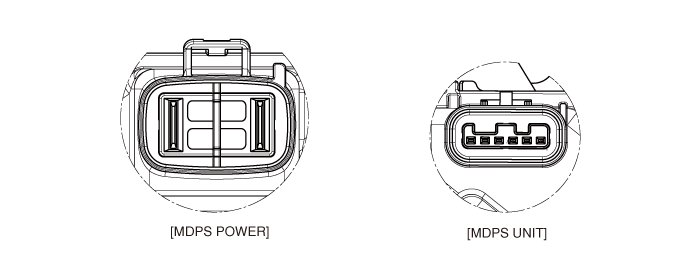
|
Type |
Pin No |
Description |
|
MDPS Power |
1 |
Battery - |
|
2 |
Battery + |
|
|
MDPS Unit |
1 |
- |
|
2 |
- |
|
|
3 |
IG 1 |
|
|
4 |
C-CAN [High] |
|
|
5 |
C-CAN [Low] |
|
|
6 |
- |
Repair procedures
| A/S Repair produres [C-MDPS] |

| 1. |
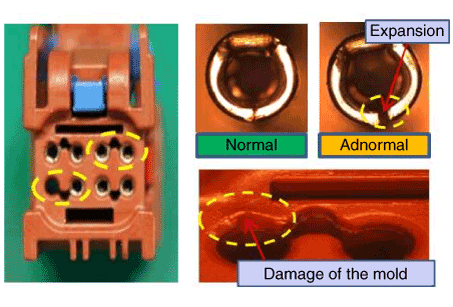
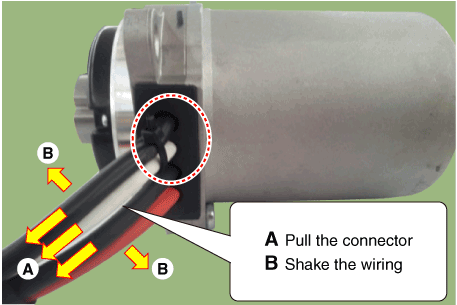
Checking Connectors and Wiring.
Check for damage, push-back, or improper connection in each connector
and wiring.
|


|
DTC |
Problem |
First analysis method |
How to repair |
|
C1290 |
Torque sensor signal error |
First erase DTC, check connector connection. |
In case of reoccurrence, replace column & housing. |
|
C1112 |
Torque sensor voltage error |
Check connector between torque sensor and ECU. |
In case of reoccurrence, replace ECU. |
|
C1705 |
ECU hardware error |
First erase DTC and then check, check ECU connector. |
|
|
C1604 |
ECU over/discharge error |
||
|
C2413 |
ECU hardware error |
||
|
C2400 |
Motor signal error |
IIn case of reoccurrence, replace motor. |
|
|
C2401 |
Motor circuit error |
||
|
C2412 |
Motor voltage supply error |
First erase DTC and check, Check ECU/motor connector. |
First replace ECU. In case of reoccurrence, replace motor. |
|
C1259 |
Angle sensor signal error |
After Resetting zero point & erasing DTC, check connector connection condition. |
In case of reoccurrence, replace column & Housing. |
|
C1261 |
Zero-setting error |
After Resetting zero point, recheck. |
Reset the zero-setting. |
|
C1102 |
Battery voltage problem |
Check battery voltage condition. |
Recharge battery voltage. |
|
C1696,C1697 |
SPAS signal error |
Check SPAS. |
Erase DTC (MDPS is not to be replaced). |
|
C1612,C1646 |
TCU signal error |
Check TCU. |
|
|
C1628,C1656 |
Instrument cluster signal error |
Check instrument cluster. |
|
|
C1692,C1693 |
VSM signal error |
Check VSM. |
|
|
C1260 |
Angle sensor signal error |
After resetting the angle, recheck. If C1259 does not occur, check CAN line. |
Reset Angle sensor. Erase DTC. |
|
C1611 |
CAN time out EMS |
1. Check G-SCAN condition. 2. Check connector connection. 3. Check ECU CAN line. 4. Check MDPS ground line. |
Check the EMS CAN Line. |
|
C1616 |
CAN BUS OFF |
Check the chassis CAN Line. |
|
|
C1622 |
Vehicle speed signal error |
Check the EMS (Engine ECU). |
|
|
C1623,C1687,C1688 |
Can time out Steering angle sensor |
1. Check MDPS Power Connector & FUSE 2. Check MDPS Ground line 3. Check MDPS ECU / VSM CAN line 4. Communication status with diagnostic tool |
In case of reoccurrence, replace ECU (Heavy steering and no communication) |
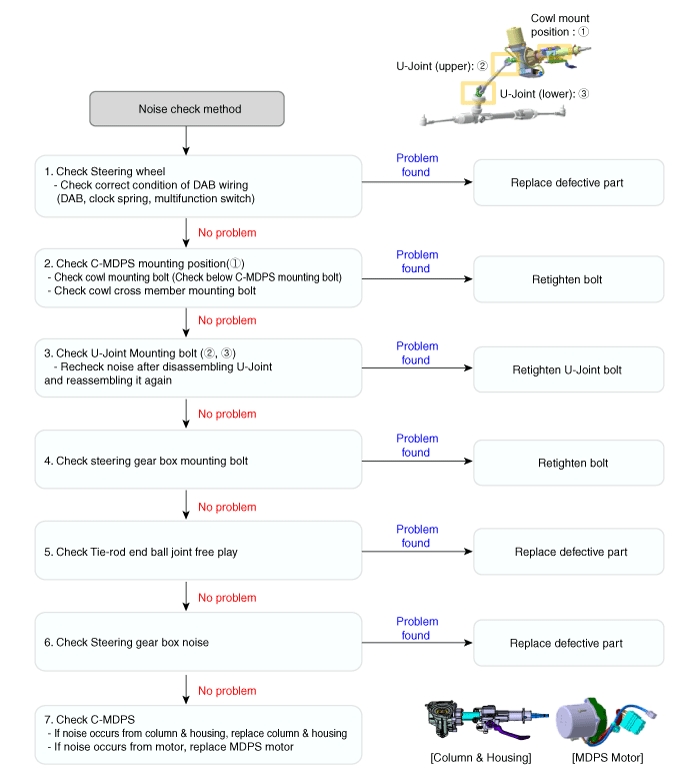
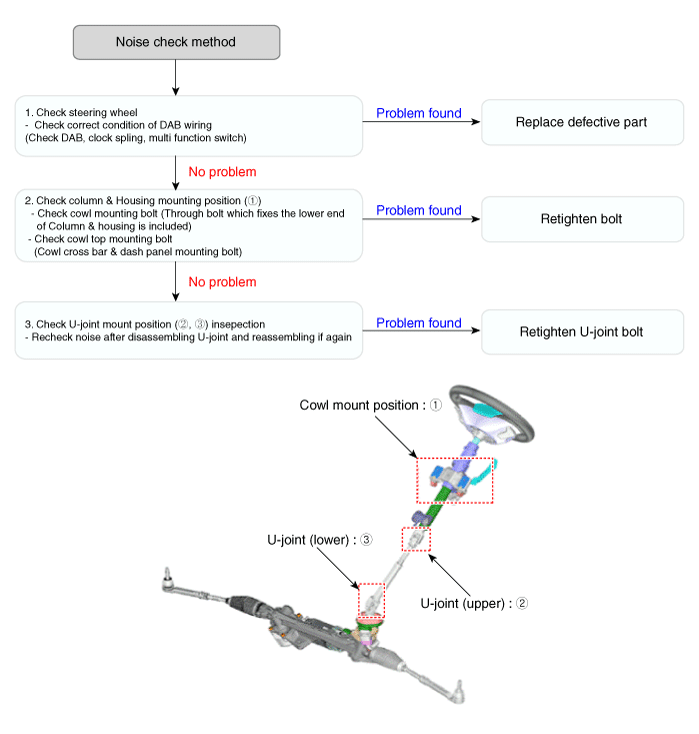
| 1. |
Inspect steering angle and DTCs relevant to the steering system.
|
| 2. |
Inspection for heavy steering effort
|
|
Case 1 |
Case 2 |
Case 3 |
|
|
|
|
|
U-Joint noise |
Clock spring noise |
DAB / Wire noise |
|
Retighten the bolt |
Replace clock spring |
Rearrange and replace DAB |
|
Case 4 |
Case 5 |
Case 6 |
|
|
|
|
|
Multifunction switch noise |
MB nut mount defect |
M10 nut mount defect |
|
Replace multifunction switch |
Retighten nut |
Retighten nut |
|
Case 7 |
Case 8 |
|
|
|
|
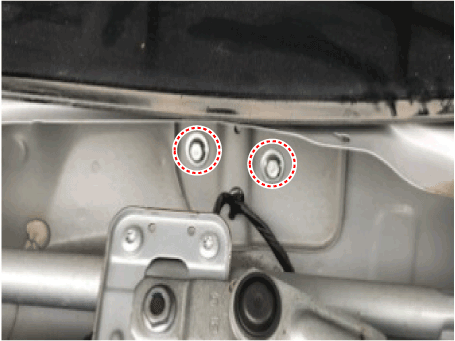
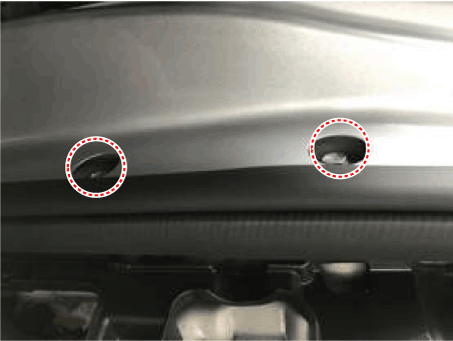
Cowl top bolt mount defect |
Cowl bar nut mount defect |
|
Retighten cowl top bolt |
Replace clock spring |
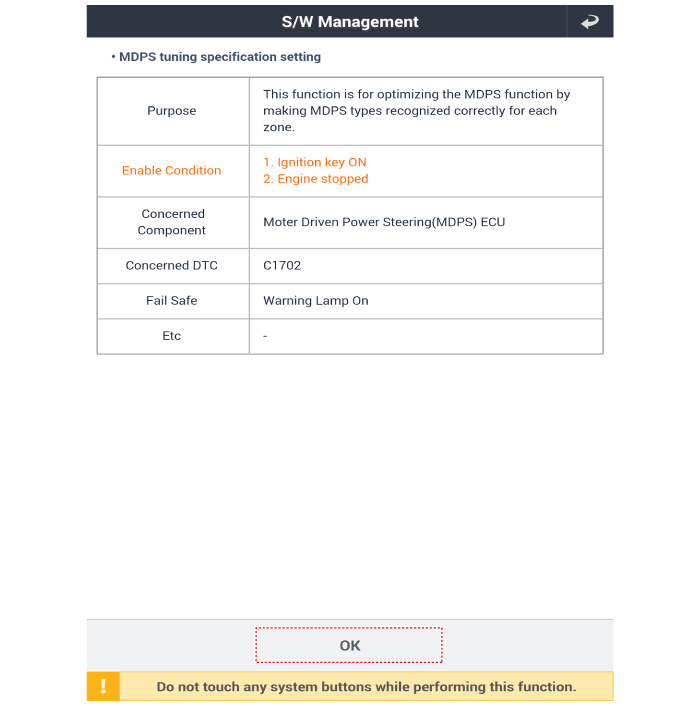
Cautions to be taken when handling the MDPS (Motor Driven Power Steering)
|

| A/S Repair Procedures [R-MDPS] |
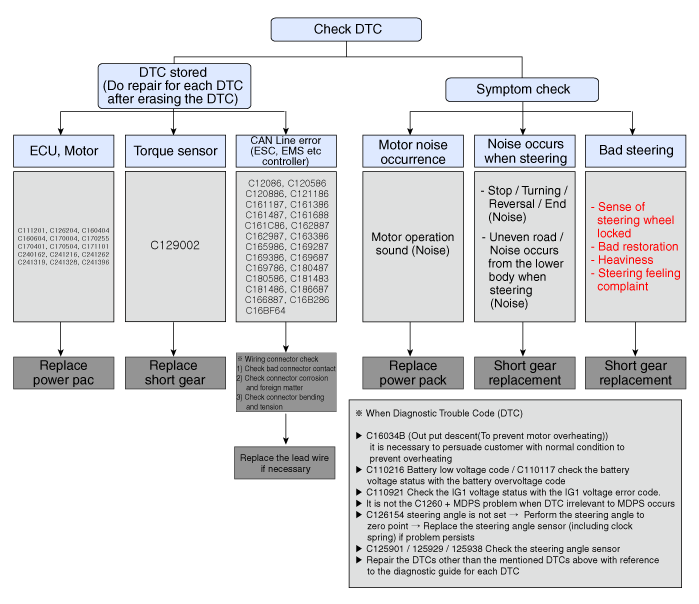
|
NO |
DTC |
Problem |
Items to check |
|
1 |
C110117 |
High battery voltage |
1. Generator |
|
2. Battery |
|||
|
3. MDPS ECU |
|||
|
2 |
C110216 |
Low battery voltage |
1. Generator |
|
2. Battery |
|||
|
3. MDPS ECU |
|||
|
3 |
C110921 |
IG1 voltage error |
1. Generator |
|
2. IGN Line |
|||
|
3.MDPS ECU |
|||
|
4 |
C111201 |
Torque sensor supply voltage error |
1. MDPS ECU |
|
5 |
C120286 |
Wheel speed sensor signal error |
1. CAN Line |
|
C120586 |
2. MDPS ECU |
||
|
C120886 |
3. Wheel sensor line |
||
|
C121186 |
|||
|
6 |
C125901 |
Steering angle circuit error |
1. MDPS ECU |
|
C125929 |
|||
|
C125938 |
|||
|
7 |
C126154 |
Steering angle sensor zero point error |
1. Whether to initialize steering angle |
|
2. Battery |
|||
|
8 |
C126204 |
Temperature sensor error |
1. Temperature sensor |
|
(MDPS ECU) |
|||
|
9 |
C129002 |
Torque sensor main signal error |
1. Main torque sensor |
|
2. Torque sensor connector |
|||
|
10 |
C16034B |
Out put descent (Prevent overheating) |
1. MDPS ECU |
|
11 |
C160404 |
ECU hardware error |
1. MDPS ECU |
|
12 |
C160604 |
MDPS ECU software error |
1. MDPS ECU |
|
13 |
C161187 |
ECU CAN communication response delay |
1. Check engine ECU CAN line |
|
2. Check CAN Line |
|||
|
14 |
C161386 |
ECU CAN communication signal error |
1. Check engine ECU CAN line |
|
2. Check CAN Line |
|||
|
15 |
C161487 |
HCU CAN communication response delay |
1. Check engine ECU CAN line |
|
2. Check CAN Line |
|||
|
16 |
C161688 |
CAN BUS error |
1. Check CAN Line |
|
17 |
C161C86 |
HCU CAN communication signal error |
1. Check engine ECU CAN line |
|
2. Check CAN Line |
|||
|
18 |
C162887 |
CLU CAN communication response delay |
1. CAN Line |
|
2. MDPS ECU |
|||
|
3. Cluster |
|||
|
19 |
C162986 |
CLU CAN communication signal error |
1. CAN Line |
|
2. MDPS ECU |
|||
|
3. Cluster |
|||
|
20 |
C163386 |
CLU CAN communication signal error |
1. CAN Line |
|
2. MDPS ECU |
|||
|
3. Cluster |
|||
|
21 |
C165987 |
CAN SAS signal not entered |
1. SAS Delivery UNIT |
|
2. CAN Line |
|||
|
22 |
C169287 |
VSM CAN signal not entered |
1. CAN Line |
|
2. MDPS ECU |
|||
|
3. BCM (IPM) |
|||
|
23 |
C169386 |
VSM CAN signal error |
1. CAN Line |
|
2. MDPS ECU |
|||
|
3. BCM (IPM) |
|||
|
24 |
C169687 |
PA CAN signal not entered |
1. CAN Line |
|
2. MDPS ECU |
|||
|
3. SPAS ECU |
|||
|
25 |
C169786 |
PA CAN signal error |
1. CAN Line |
|
2. MDPS ECU |
|||
|
3. SPAS ECU |
|||
|
26 |
C170004 |
Specification recognition not applied (BYTE) |
1. MDPS ECU |
|
27 |
C170255 |
Specification recognition not applied (Variant) |
1. Select regional specifications |
|
28 |
C170401 |
ECU safety relay error |
1. MDPS ECU |
|
29 |
C170504 |
ECU spare charge circuit error |
1. Motor relay |
|
2. MDPS ECU |
|||
|
30 |
C171101 |
Abnormal power OFF accumulate |
1. Generator |
|
2. Battery |
|||
|
3. MDPS ECU |
|||
|
31 |
C180487 |
LKAS CAN signal not entered |
1. CAN Line |
|
2. MDPS ECU |
|||
|
3. LKAS ECU |
|||
|
32 |
C180586 |
LKAS CAN signal error |
1. CAN Line |
|
2. MDPS ECU |
|||
|
3. LKAS ECU |
|||
|
33 |
C181483 |
CAN SAS signal error |
1. SAS Delivery UNIT |
|
C181486 |
1. CAN Line |
||
|
34 |
C240162 |
Motor circuit error |
1. Motor location sensor |
|
2. Motor connector |
|||
|
35 |
C241216 |
Motor short/break |
1. Motor |
|
C241262 |
2. Motor connector |
||
|
36 |
C186687 |
ICSC CAN Not received |
1. ICSC (Integrated controller) |
|
37 |
C166B87 |
Wheel speed sensor signal Not received |
1. Wheel speed sensor |
|
2. CAN Line |
|||
|
38 |
C16B286 |
Wheel speed sensor signal error |
1. Wheel speed sensor |
|
2. CAN Line |
|||
|
39 |
C16BF64 |
Wheel speed sensor monitoring error |
1. Wheel speed sensor |
|
2. CAN Line |
|||
|
40 |
C241319 |
Motor current error |
1. Motor current sensor |
|
C241328 |
|||
|
C241396 |
| 1. |
Checking Connectors and Wiring.
Check for damage, push-back, or improper connection in each connector
and wiring.
|
| 1. |
A failure may occur due to the internal damage when a new partial part
is dropped, impacted or excessive external load is applied.
→ If a partial part is impacted or is dropped, replace it with a new
part.
|
| 2. |
If excessive impact is applied when assembling the steering wheel, center
point of the torque sensor may be warped.
→ Caution is needed when tightening by excessive impact.
|
| 3. |
Be careful for the damage to the wiring due to deformation, when detaching/attaching
the contactor or excessive external force is applied.
→ Excessive insertion of the connector or using after removal is prohibited.
|
| 4. |
Caution is needed for partial part storage and replacement work under
abnormal condition of the temperature and humidity.
|
MDPS PowerPack Assembly. Repair procedures
| Replacement |
| 1. |
Turn the ignition switch OFF and disconnect the battery negative (-)
cable.
|
| 2. |
Turn the steering wheel so that the front wheels are placed in the straight
ahead position.
|
| 3. |
Remove the steering column shroud lower panel.
(Refer to Body - "Steering Column Shroud lower Panel")
|
| 4. |
Remove the crash pad lower pannel.
(Refer to Body - "Crash Pad Lower Pannel")
|
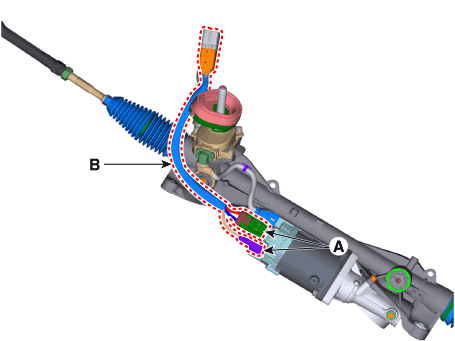
| 5. |
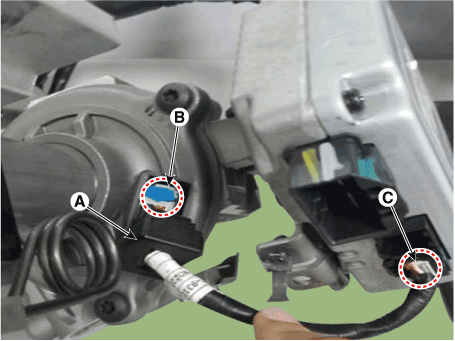
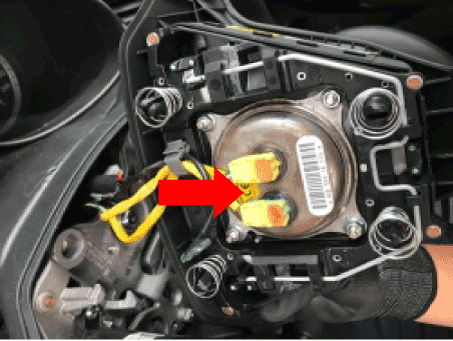
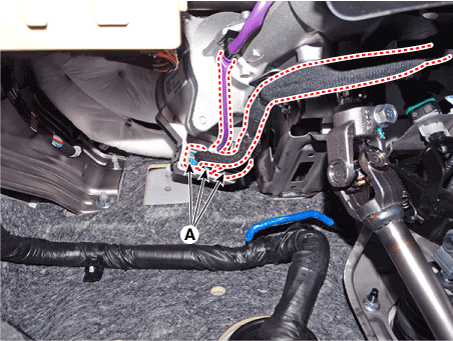
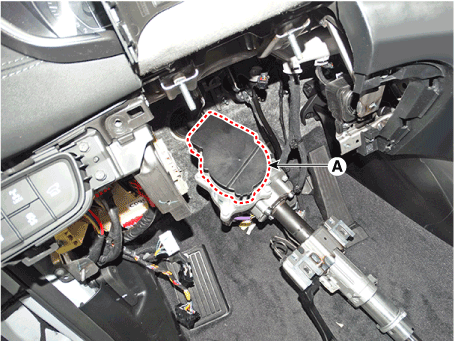
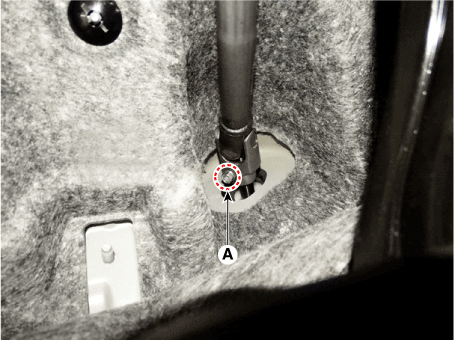
Disconnect the MDPS connector (A).
|
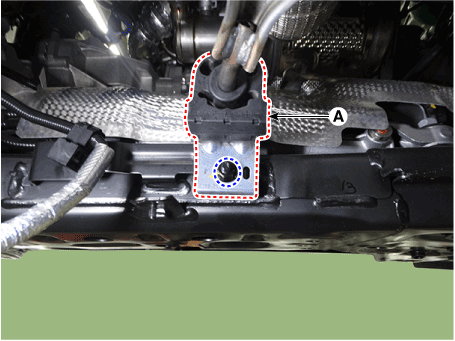
| 6. |
Remove the fixed clip (A) and then remove the wiring from the steering
column.
|
| 7. |
Remove the stop lamp switch.
(Refer to Brake System - "Stop Lamp Switch")
|
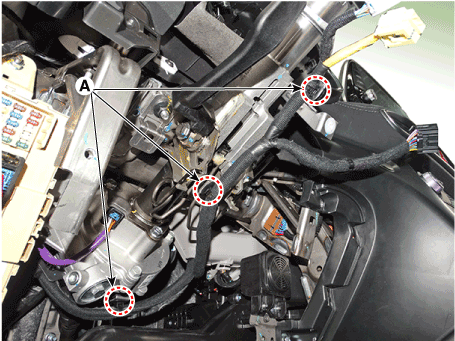
| 8. |
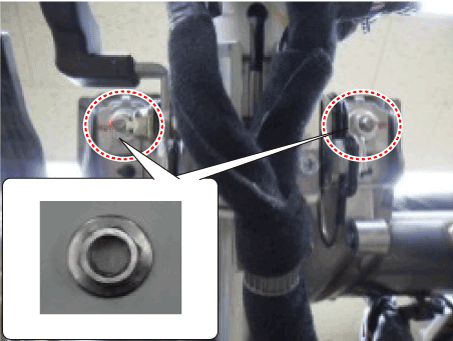
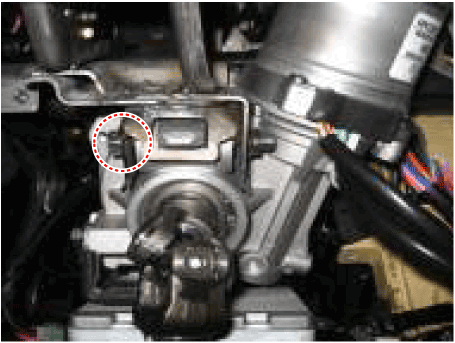
Loosen the mounting nut (A) and bolt (B) and leave the steering column
and EPS unit assembly lie on the vehicle's floor.
|
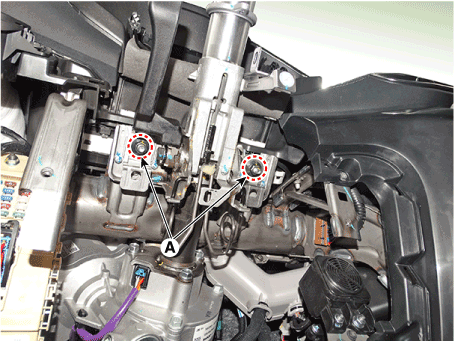
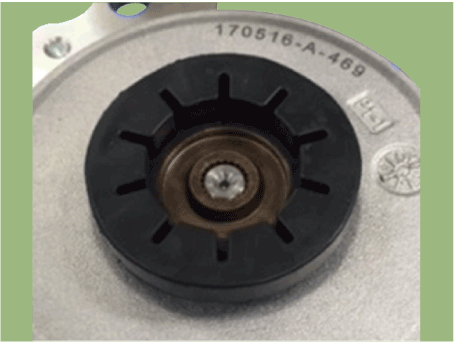
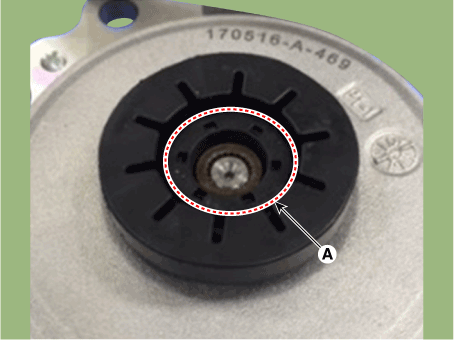
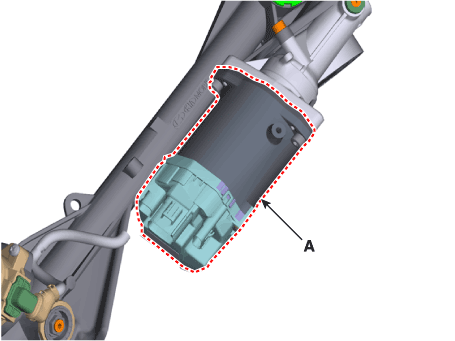
| 9. |
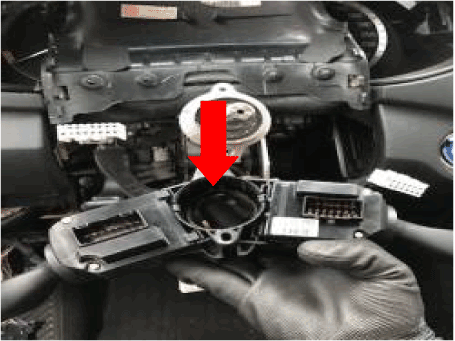
Remove the MDPS motor (A) after loosening the bolts.
|
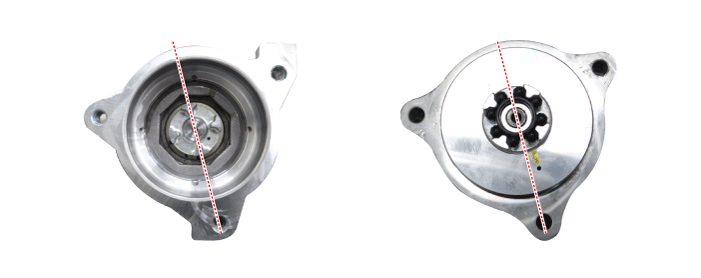
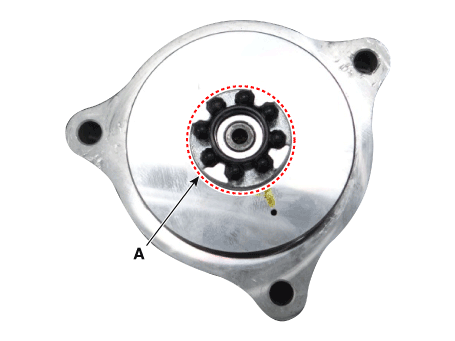
| 10. |
Check the axial damper (A) whether it is assembled, before installing
the new MDPS motor.
|
| 11. |
Install in the reverser order of removal.
|
| 12. |
Conduct the "EPS Type Recognition" by diagnostic tool.
(Refer to MDPS motor - "Diagnosis with diagnostic tool")
|
| 13. |
Conduct the "ASP Calibration" by diagnostic tool.
(Refer to MDPS motor - "Diagnosis with diagnostic tool")
|
| 14. |
Check the DTC.
|
| 15. |
Turn off the IGN switch and wait for 20 seconds or more. Then check
the operation after starting the engine.
|
| Diagnosis with diagnostic tool |
| EPS Type Recognition |
|
| 1. |
Connect self-diagnosis connector(16pins) located in the lower of driver
side crash pad to self-diagnosis device.
|
| 2. |
Turn the self-diagnosis device after key is ON.
|
| 3. |
Turn the steering wheel to straight ahead position.
|
| 4. |
After Selecting the "vehicle model" and "system", select the "EPS Type
Recognition" on diagnostic tool vehicle selection screen.
|
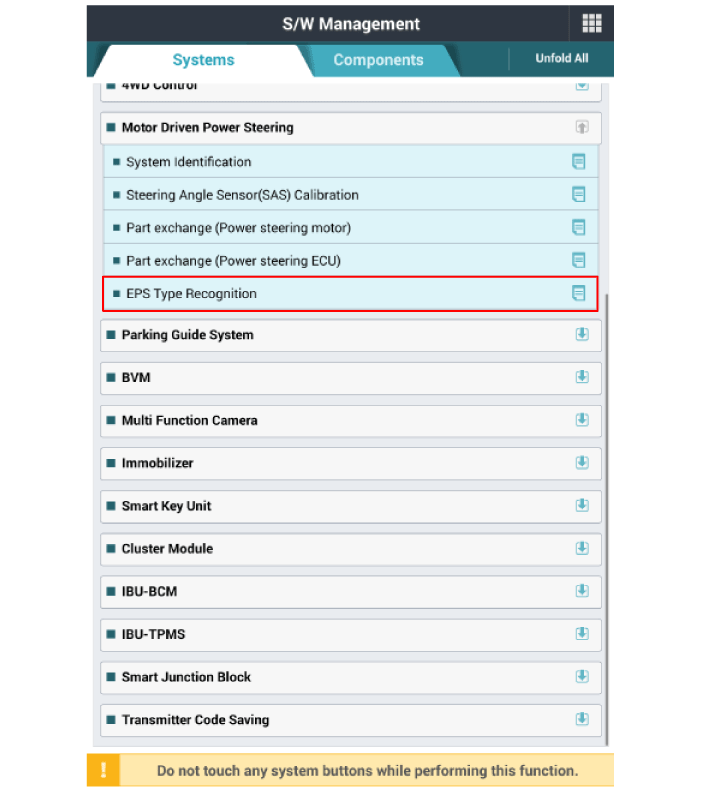
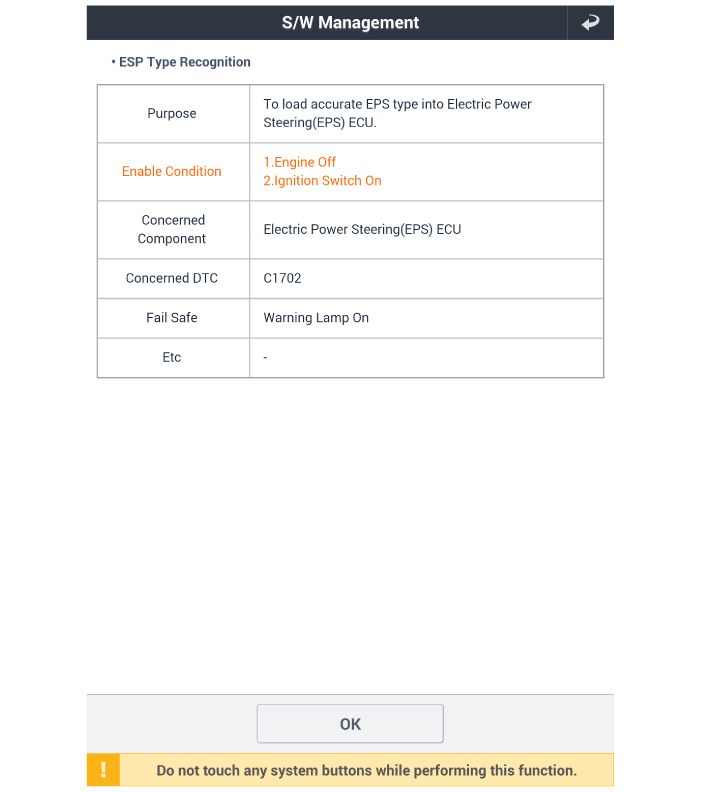
| 5. |
Remove the DTC.
|
| 6. |
Turn off the IG switch and wait for 20 seconds or more before starting
the engine. And then make sure that MDPS works properly.
SAS Calibration
|
| 1. |
Connect self - diagnosis connector (16pins) located in the lower of
driver side crash pad to self - diagnosis device.
|
| 2. |
Turn the self - diagnosis device after key is ON.
|
| 3. |
Turn the steering wheel to straight ahead position.
|
| 4. |
After Selecting the "vehicle model" and "system", select the "SAS Calibration"
on diagnostic tool vehicle selection screen.
|

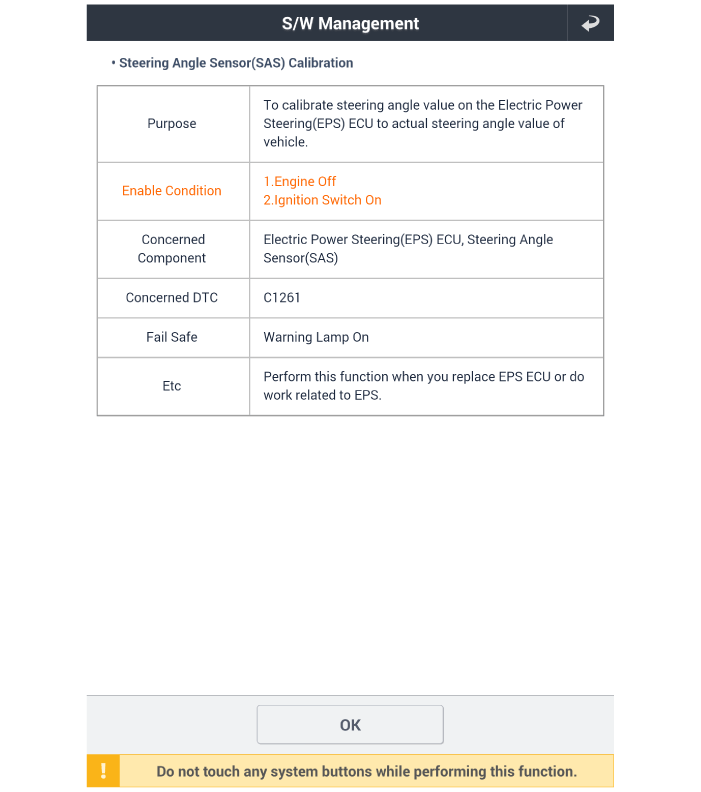
| 5. |
Remove the DTC.
|
| 6. |
Turn off the IG switch and wait for 10 seconds or more before starting
the engine. And then make sure that MDPS works properly.
|
Steering Column and Shaft. Repair procedures
| Removal |
| 1. |
Turn the ignition switch OFF and disconnect the battery negative (-)
cable.
|
| 2. |
Turn the steering wheel so that the front wheels are placed in the straight
ahead position.
|
| 3. |
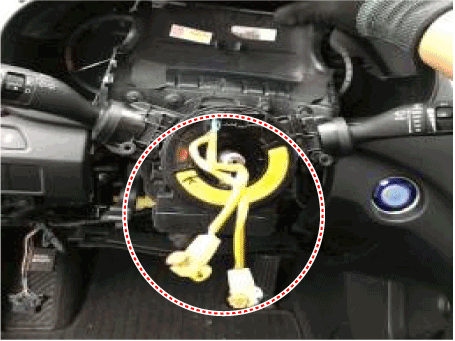
Remove the driver airbag module.
(Refer to Restraint - "Driver Airbag (DAB) Module and Clock Spring")
|
| 4. |
Remove the steering wheel.
(Referto Steering System - "Steering Wheel")
|
| 5. |
Remove the clock spring.
(Refer to Restraint - "Driver Airbag (DAB) Module and Clock Spring")
|
| 6. |
Remove the multifunction switch.
(Refer to Body Electrical System - "Multifunction switch")
|
| 7. |
Remove the steering column shroud lower panel
(Refer to Body - "Steering Column Shroud lower Panel")
|
| 8. |
Remove the crash pad lower pannel.
(Refer to Body - "Crash Pad Lower Pannel")
|
| 9. |
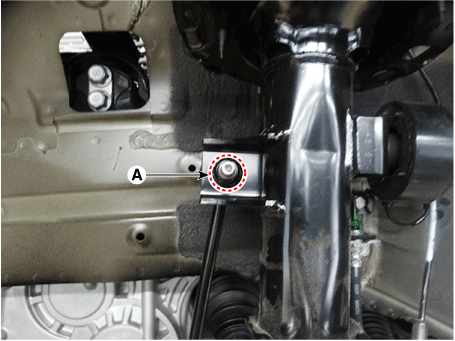
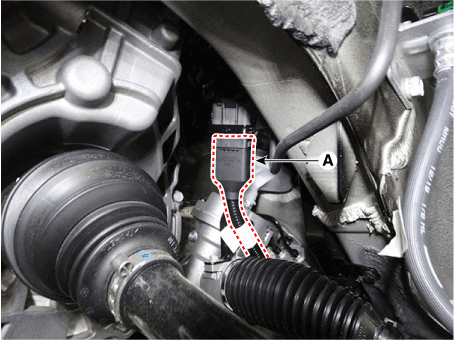
Disconnect the MDPS connector (A).
|
| 10. |
Remove the fixed clip (A) and then remove the wiring from the steering
column.
|
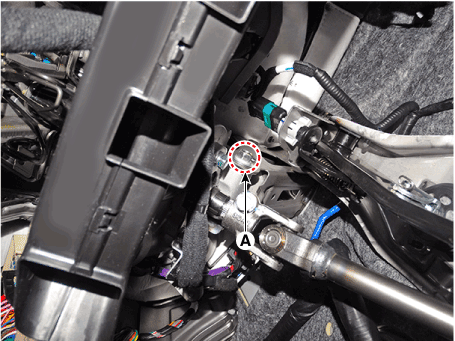
| 11. |
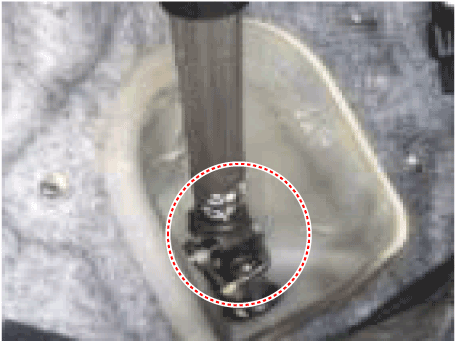
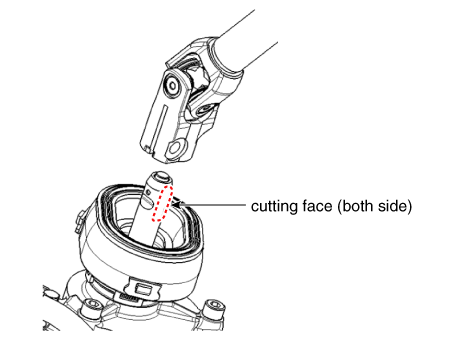
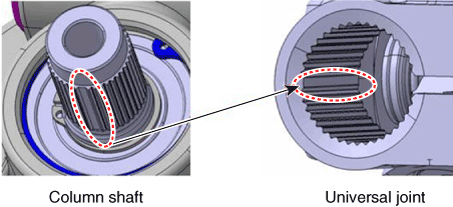
Loosen the bolt (A) and then disconnect the universal joint assembly
from the pinion of the steering gear box.
|
| 12. |
Remove the stop lamp switch.
(Refer to Brake System - "Stop Lamp Switch")
|
| 13. |
Remove the MDPS assembly by loosening the mounting nuts (A) and bolt
(B).
|
| 14. |
Install in the reverser order of removal.
|
| 15. |
Conduct the "EPS Type Recognition" by diagnostic tool.
(Refer to MDPS motor - "Diagnosis with diagnostic tool")
|
| 16. |
Conduct the "ASP Calibration" by diagnostic tool.
(Refer to MDPS motor - "Diagnosis with diagnostic tool")
|
| 1. |
Turn the steering wheel so that the front wheels are placed in the straight
ahead position.
|
| 2. |
Turn the ignition switch OFF and disconnect the battery negative (-)
cable.
|
| 3. |
Remove the driver airbag module.
(Refer to Restraint - "Driver Airbag (DAB) Module and Clock Spring")
|
| 4. |
Remove the steering wheel.
(Referto Steering System - "Steering Wheel")
|
| 5. |
Remove the clock spring.
(Refer to Restraint - "Driver Airbag (DAB) Module and Clock Spring")
|
| 6. |
Remove the multifunction switch.
(Refer to Body Electrical System - "Multifunction switch")
|
| 7. |
Remove the steering column shroud lower panel
(Refer to Body - "Steering Column Shroud lower Panel")
|
| 8. |
Remove the crash pad lower pannel.
(Refer to Body - "Crash Pad Lower Pannel")
|
| 9. |
Remove the fixing clip (A) from the steering column.
|
| 10. |
Loosen the bolt (A) and then disconnect the universal joint assembly
from the pinion of the steering gear box.
|
| 11. |
Remove the stop lamp switch.
(Refer to Brake System - "Stop Lamp Switch")
|
| 12. |
Remove the MDPS assembly by loosening the mounting nuts (A) and bolt
(B).
|
| Disassembly |
| 1. |
Loosen the bolt (A) and then disconnect the universal joint assembly
from the steering column assembly.
|
| 2. |
Reassembly is the reverse of the disassembly.
|
| Inspection |
| 1. |
Check the steering column for damage and deformation.
|
| 2. |
Check the steering column for damage and deformation.
|
| 3. |
Check the join bearing for damage and wear.
|
| 4. |
Check the tilt bracket for damage and cracks.
|
| 5. |
Check the key lock assembly for proper operation and replace it if necessary.
|
| Diagnosis with diagnostic tool |
| EPS Type Recognition |
|
| 1. |
Connect self-diagnosis connector(16pins) located in the lower of driver
side crash pad to self-diagnosis device.
|
| 2. |
Turn the self-diagnosis device after key is ON.
|
| 3. |
Turn the steering wheel to straight ahead position.
|
| 4. |
After Selecting the "vehicle model" and "system", select the "EPS Type
Recognition" on diagnostic tool vehicle selection screen.
|
| 5. |
Remove the DTC.
|
| 6. |
Turn off the IG switch and wait for 20 seconds or more before starting
the engine. And then make sure that MDPS works properly.
SAS Calibration
|
| 1. |
Connect self - diagnosis connector (16pins) located in the lower of
driver side crash pad to self - diagnosis device.
|
| 2. |
Turn the self - diagnosis device after key is ON.
|
| 3. |
Turn the steering wheel to straight ahead position.
|
| 4. |
After Selecting the "vehicle model" and "system", select the "SAS Calibration"
on diagnostic tool vehicle selection screen.
|
| 5. |
Remove the DTC.
|
| 6. |
Turn off the IG switch and wait for 10 seconds or more before starting
the engine. And then make sure that MDPS works properly.
|
| Installation |
| 1. |
To install, reverse the removal procedures.
|
| 2. |
Check the alignment.
(Refer to Suspension System - "Alingment")
|
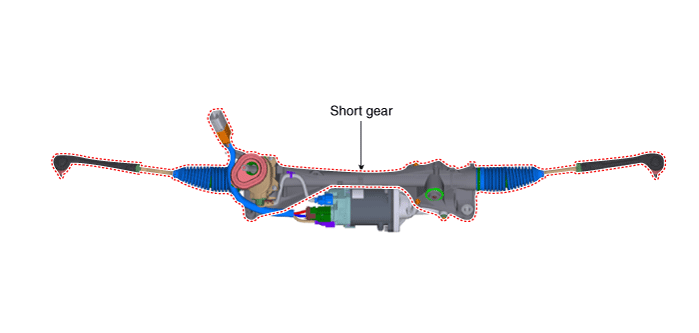
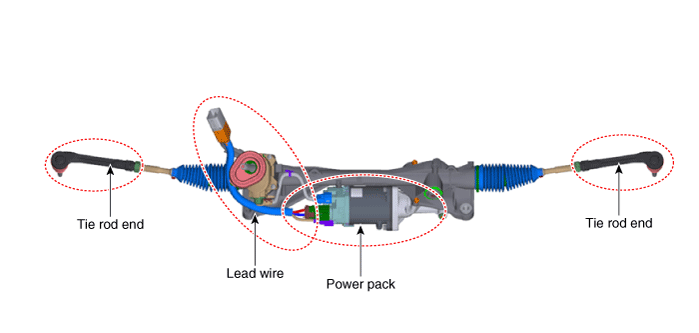
Steering Gear Box. Components and components location
| Components |
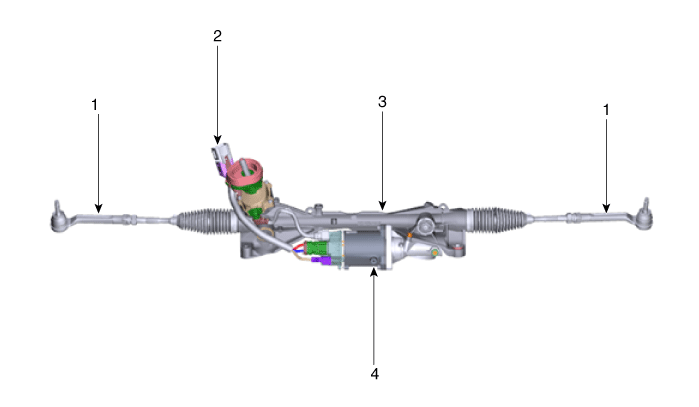
| 1. Tie rod end 2. Lead wire |
3. Short gear 4. Power pack |
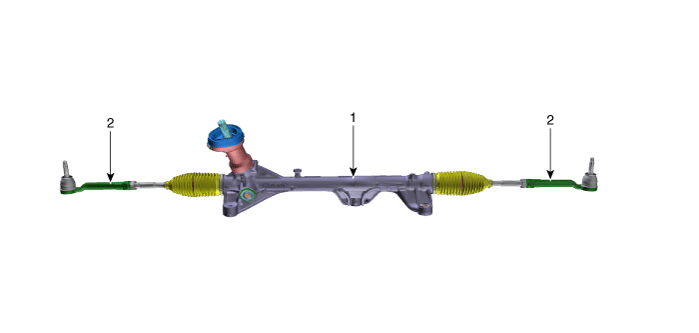
| 1. Steering gera
box |
2 Tie rod end |
Steering Gear Box. Repair procedures
| Removal and installation |
|
| 1. |
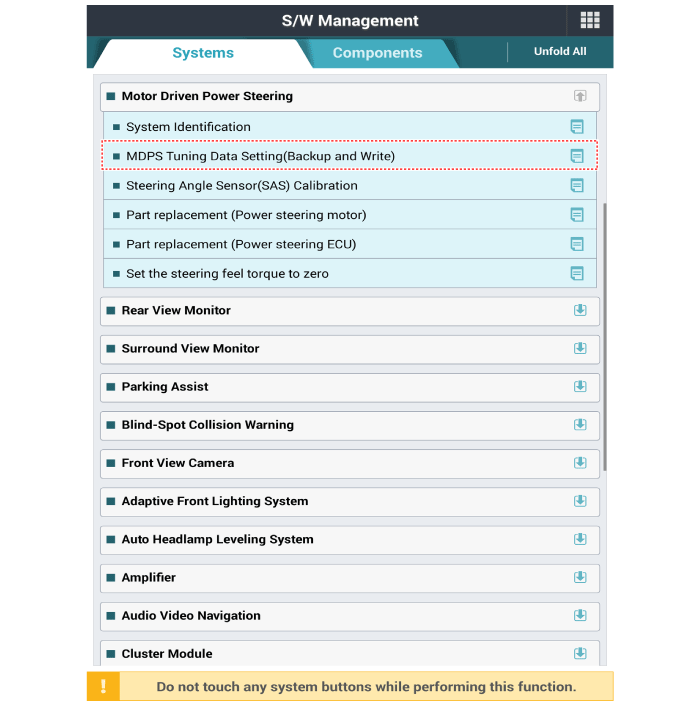
Perform the "ECU data backup" by diagnostic tool following in the order
below.
|
| 2. |
Loosen the wheel nuts slightly.
Raise the vehicle, and make sure it is securely supported.
|
| 3. |
Remove the front wheel and tire (A) from the front hub.
|

| 4. |
Disconnect the stabilizer link with the front strut assembly after loosening
the nut (A).
|
| 5. |
Remove the split pin and lock nut (A).
|
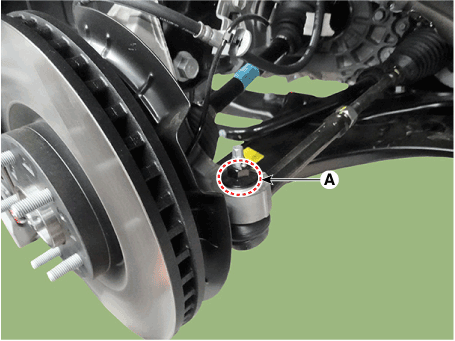
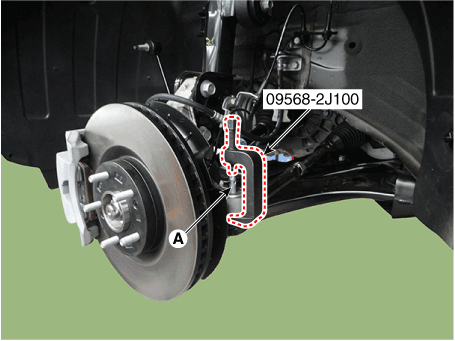
| 6. |
Remove the tie rod end ball joint (A) using the SST (09568-2J100).
|
| 7. |
Remove the split pin and nut (A).
|
| 8. |
Remove the lower arm from the knuckle by using the SST (09568-4R100).
|

| 9. |
Loosen the bolt (A) and then disconnect the universal joint assembly
from the pinion of the steering gear box.
|
| 10. |
Remove the under cover.
(Refer to Engine Mechanical System - "Engine Room Under Cover")
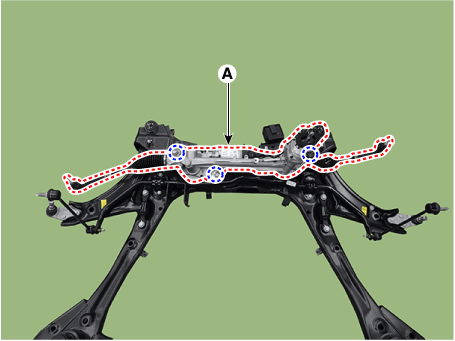
|
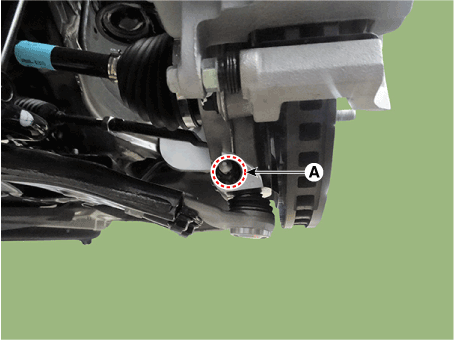
| 11. |
Disconnect the R-MDPS main connector (A). [R-MDPS Type only]
|
| 12. |
Remove the muffler rubber hanger (A) from the sub frame after loosening
the mounting bolt.
|
| 13. |
Remove the roll rod bracket (C) by loosening the bolt (A), (B).
|
| 14. |
Remove the sub frame stay after loosening the mounting bolts (A, B)
and nut (C).
|
| 15. |
Loosen the sub frame mounting nuts (A).
|
| 16. |
Remove the sub frame.
|
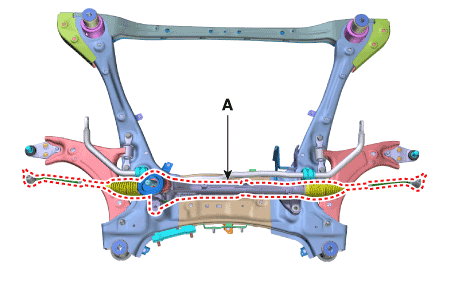
| 17. |
Remove the heat protector (A).
[R-MDPS]
[C-MDPS]
|


| 18. |
Remove the steering gearbox (A) from the front sub frame by loosening
the mounting bolts.
[R-MDPS]
[C-MDPS]
|
| 19. |
To install, reverse the removal procedures.
|
| 20. |
Check the alignment.
(Refer to Suspension System - "Alingment")
|
| 21. |
Conduct the "EPS Type Recognition" by diagnostic tool.
(Refer to MDPS motor - "Diagnosis with diagnostic tool")
|
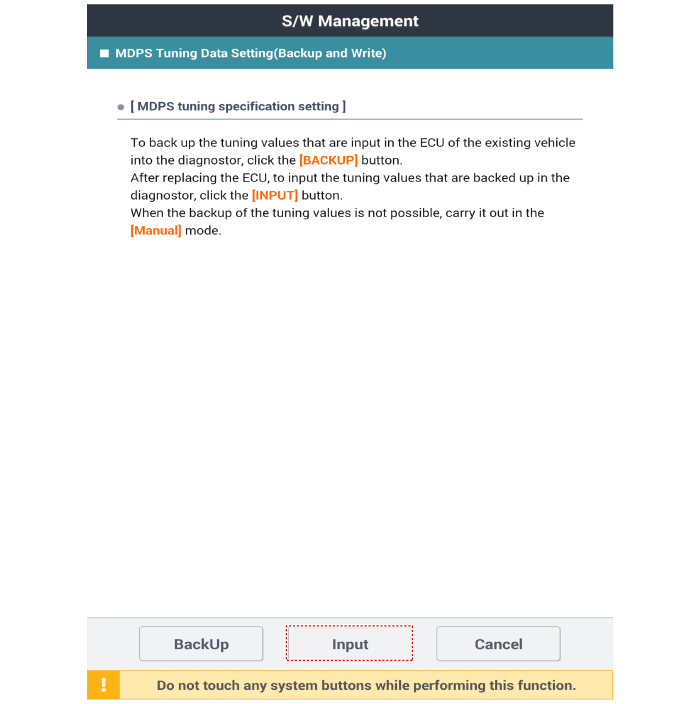
| 22. |
Perform the "ECU data restore" by diagnostic tool following in the order
below. [R-MDPS Only]
|
| Replacement |
|
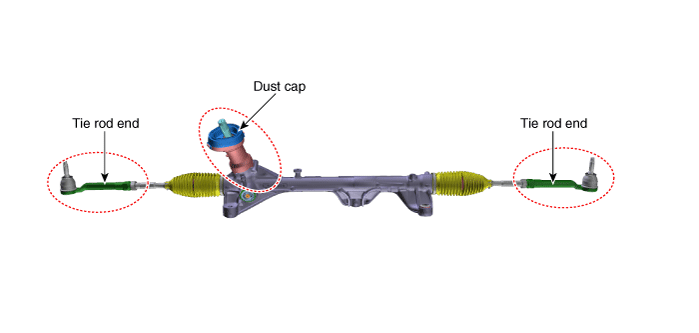
| 1. |
Remove the tie rod end after loosening the nut.
|
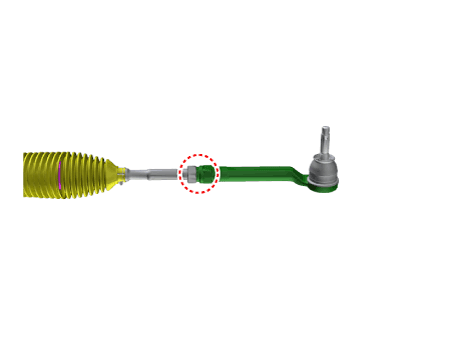
| 2. |
Replace with new parts.
|
| 3. |
Check the alignment.
(Refer to Tires / Wheels - "Alignment")
|
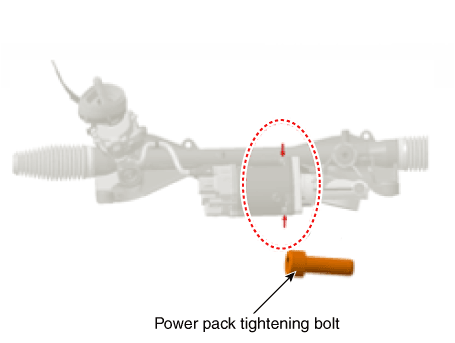
| 1. |
Disconnect the power pack connector (A).
|

| 2. |
Replace the power pack (A) after loosening the mounting bolts.
|
| 3. |
In case of the power pack replacement, replace the power pack only and
reuse the existing short gear.
In case of the short gear replacement, replace the short gear only and
reuse the existing power pack.
|
| 4. |
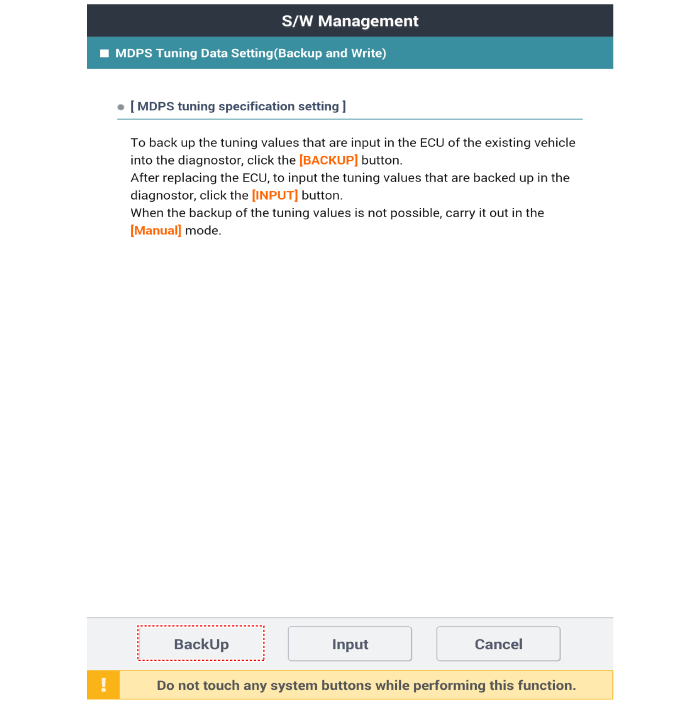
After replacing the power pack motor, "Steering Angle Sensor (SAS) Calibration"
and "MDPS Turning Data Setting (Backup and Write)" and "Set the steering
feel torque to zero" must be done
|
| 1. |
Replace the lead wire (B) after disconnecting the power connector (A).
|
| 1. |
Connect the diagnostic tool diagnostic tool to the vehicle's self-diagnostic
connector.
|
| 2. |
Key on the Ignition switch.
|
| 3. |
After Selecting the "vehicle model" and "system", select the "EPS Type
Recognition" on diagnostic tool vehicle selection screen.
[MDPS Type Recognition]
[MDPS Type Recognition 1]
|
 Steering wheel
Components and components location Components 1. Lower cover 2. Switch bezel 3. Remote control switch 4. Paddle shift 5. Damper 6. Steering Wheel 7. Wiring 8. Drive airbag module (DAB) Repair procedures ...
 Restraint
...
See also:
Turn Signal Lamp. Repair procedures
Removal Door Mirror Turn Signal Lamp 1. Disconnect the negative (-) battery terminal. 2. Remove the mirror holder (A) from the outside mirror assembly. Be careful not to damage the fixing clip 3. Remove ...
Rear Lower Arm. Repair procedures
Removal 1. Remove the rear wheel and tire (A) from rear hub . Tightening torque : 88.2 ~ 107.8 N.m (9.0 ~ 11.0 kgf.m, 65.0 ~ 79.5 lb-ft) Be careful not to damage to the hub bolts when removing the rear ...
Special service tools
Special Service Tools Tool (Number and Name) Illustration Use 09200-3N000 Engine support fixture (Beam) Removal and installation of the transaxle.Use this beam (SST No. : 09200-3N000) with the supporter ...