Components and components location
[Second row seat assembly]
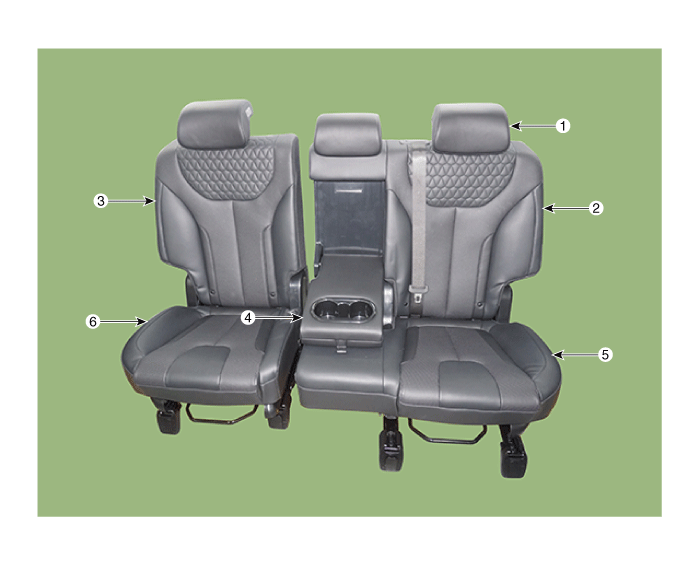
1. Rear seat
headrest
2. Rear seat back assembly [LH]
3. Rear seat back assembly [RH]
|
4. Rear seat
armrest
5. Rear seat cushion assembly [LH]
6. Rear seat cushion assembly [RH]
|
[Third row seat assembly]
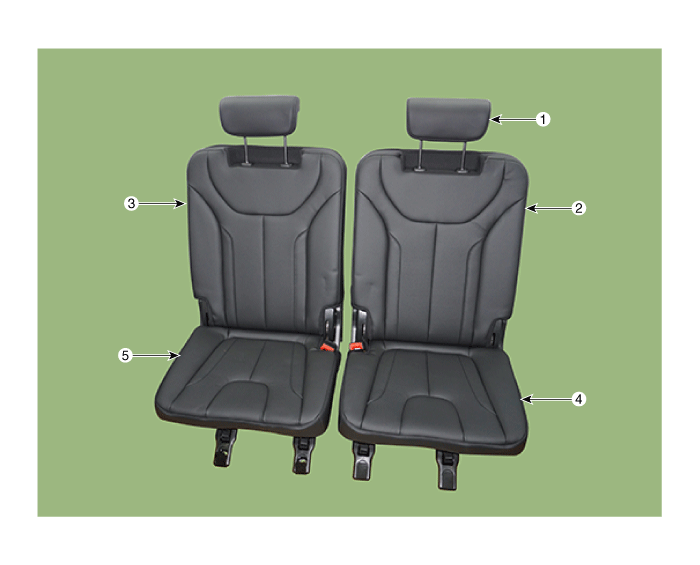
1. Rear seat
headrest
2. Rear seat back assembly [LH]
3. Rear seat back assembly [RH]
|
4. Rear seat
cushion assembly [LH]
5. Rear seat cushion assembly [RH]
|
Rear Seat Assembly. Components and components location
| [Second row seat assembly] |
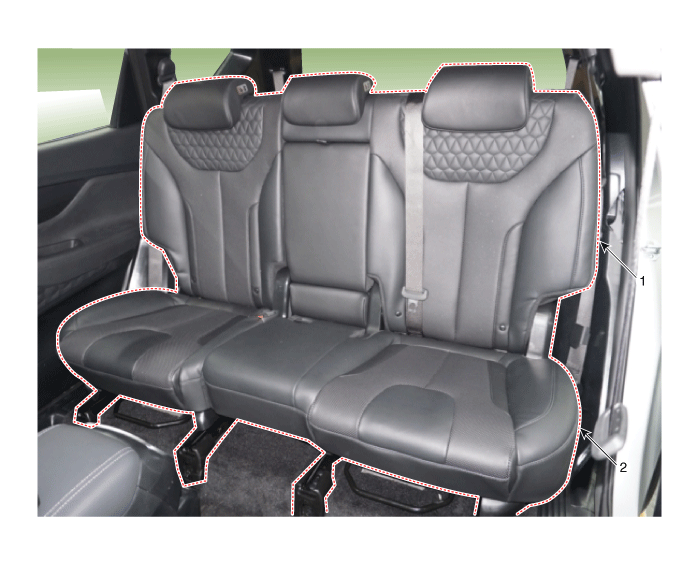
1. Rear seat
back assembly
|
2. Rear seat
cushion assembly
|
| [Third row seat assembly] |
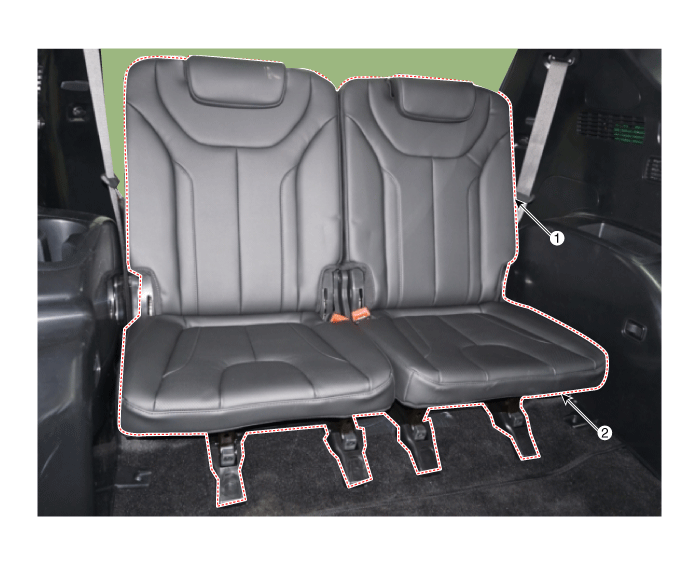
1. Rear seat
back assembly
|
2. Rear seat
cushion assembly
|
Rear Seat Assembly. Repair procedures
[Second row seat assembly]
|
1. |
Push the second row seat assembly (A) towards the front of the vehicle
as far as possible.
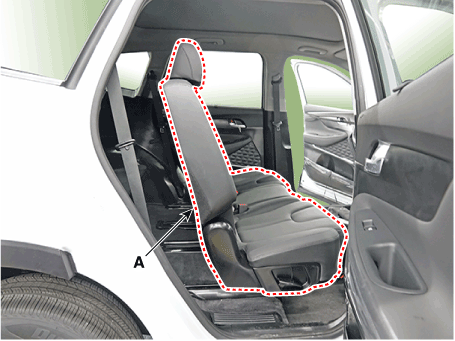
|
|
2. |
Loosen the second center seat belt buckle mounting bolt (A).
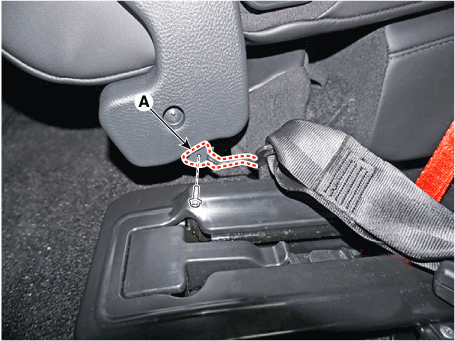
|
|
3. |
Using a screwdriver and remove the rear seat rear block cover (A).
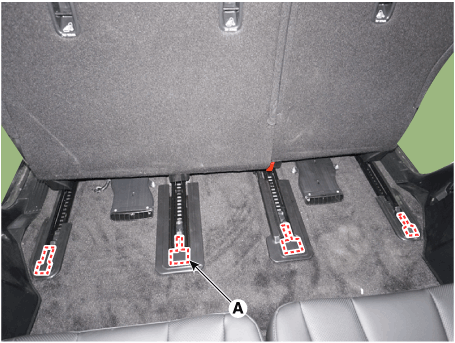
|
|
4. |
Loosen the second row seat rear mounting bolts.
|
Tightening torque :
44.1 - 58.8 N.m (4.5 - 6.0 kgf.m , 32.5 - 43.4 lb-ft)
|
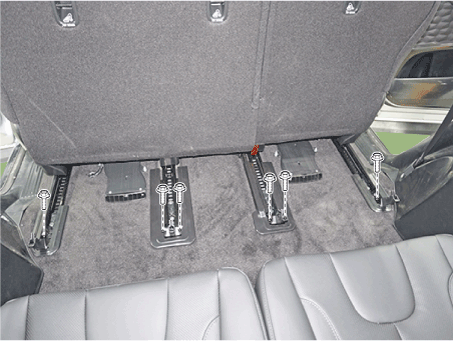
|
|
5. |
Push the second row seat assembly towards the rear of the vehicle as
far as possible.
|
|
6. |
Using a screwdriver and remove the rear seat front block cover (A).
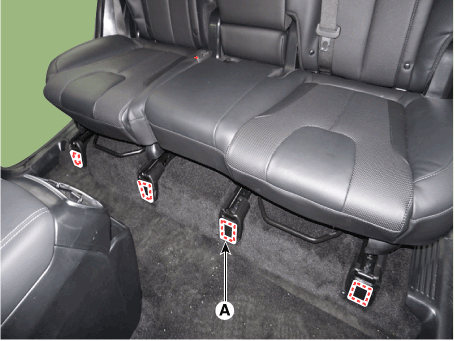
|
|
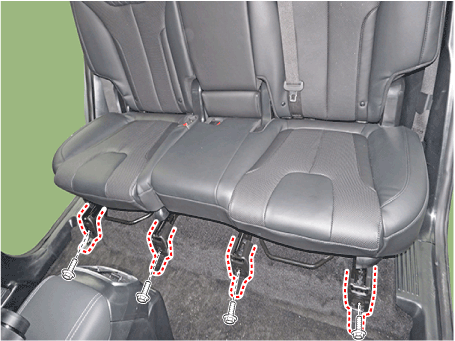
7. |
Loosen the second row seat front mounting bolts.
|
Tightening torque :
44.1 - 58.8 N.m (4.5 - 6.0 kgf.m , 32.5 - 43.4 lb-ft)
|
|
|
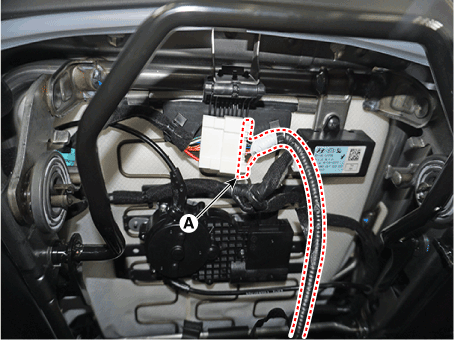
8. |
Press the lock pin and separate the connector (A).
|
|
9. |
To install, reverse removal procedure.
|
[Third row seat assembly]
|
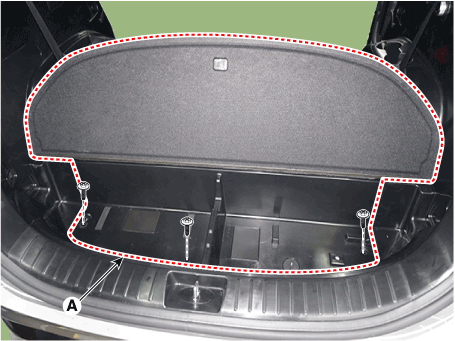
1. |
After loosening the mounting screws, then remove the luggage floor box
(A).
|
|
2. |
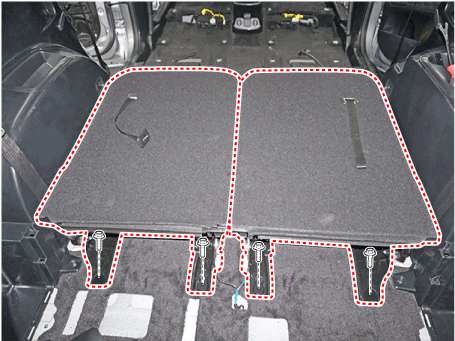
Loosen the third row seat assembly rear mounting bolts.
|
Tightening torque :
44.1 - 58.8 N.m (4.5 - 6.0 kgf.m , 32.5 - 43.4 lb-ft)
|
|
|
3. |
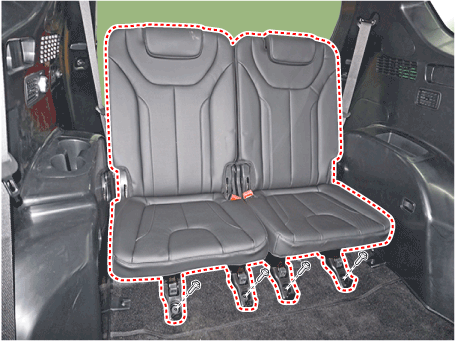
Loosen the mounting bolts and remove the third row seat assembly.
|
Tightening torque :
44.1 - 58.8 N.m (4.5 - 6.0 kgf.m , 32.5 - 43.4 lb-ft)
|
|
|
4. |
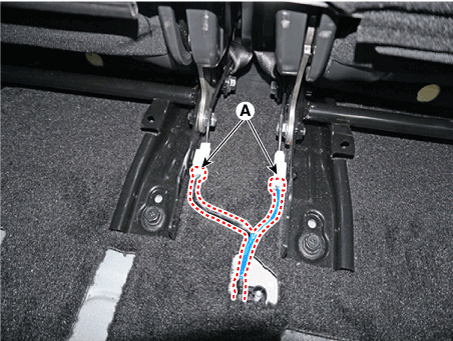
Press the lock pin and separate the connector (A).
|
|
5. |
To install, reverse removal procedure.
|
Rear Seat Back Cover. Components and components location
| [Second row seat assembly] |
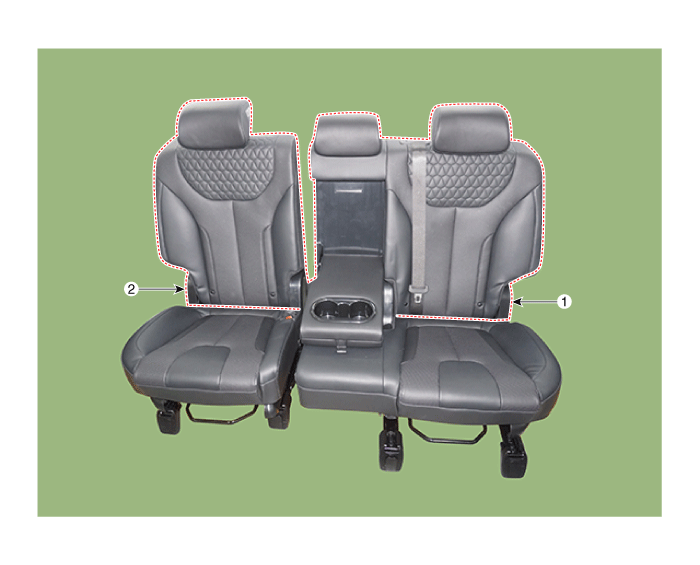
1. Rear seat
back cover [LH]
|
2. Rear seat
back cover [RH]
|
| [Third row seat assembly] |
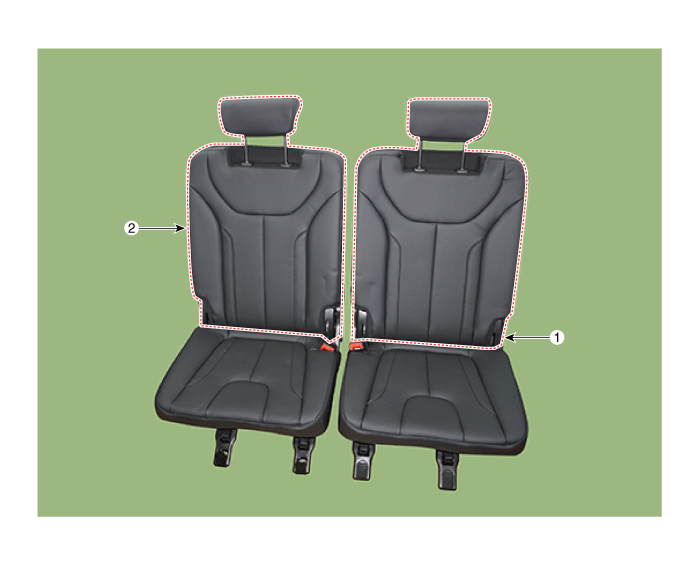
1. Rear seat
back cover [LH]
|
2. Rear seat
back cover [RH]
|
Rear Seat Back Cover. Repair procedures
[Second row seat assembly]
| •
|
Put on gloves to protect your hands.
|
|
| •
|
When prying with a flat-tip screwdriver, wrap it with protective
tape, and apply protective tape around the related parts, to
prevent damage.
|
| •
|
Use a plastic panel removal tool to remove interior trim pieces
to protect from marring the surface.
|
| •
|
Take care not to bend or scratch the trim and panels.
|
|
|
1. |
Remove the second row seat assembly [LH].
(Refer to Rear Seat - "Rear Seat Assembly")
|
|
2. |
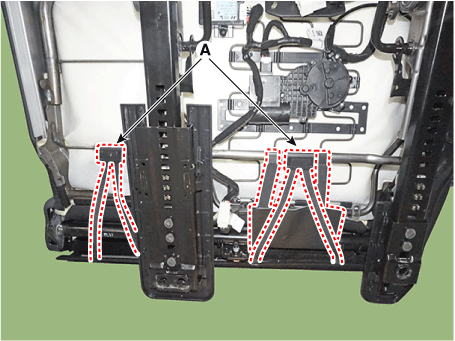
Remove the rear seat lower protector (A).
|
|
3. |
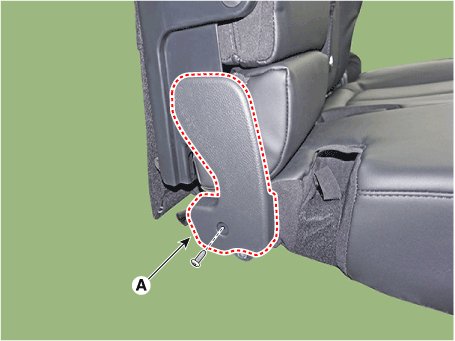
Loosen the mounting screw and remove the rear back hinge cover (A).
|
|
4. |
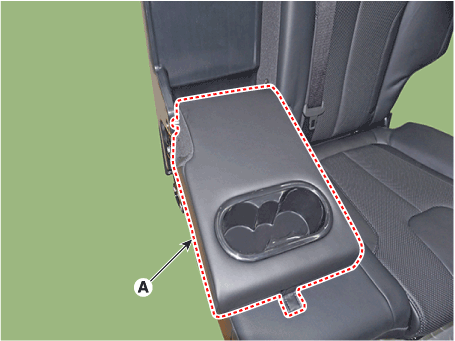
Loosen the mounting bolt and remove the rear back armrest (A).
|
|
5. |
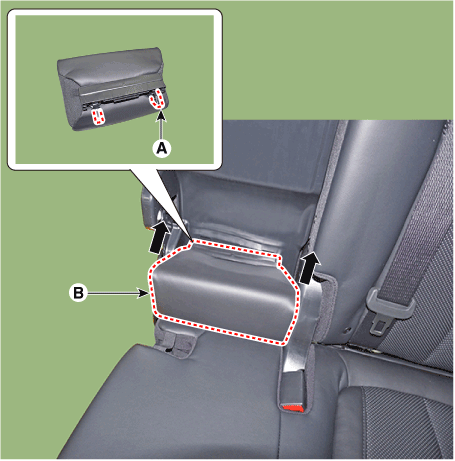
Press the lock pin (A) and remove the rear back armrest pad (B).
|
|
6. |
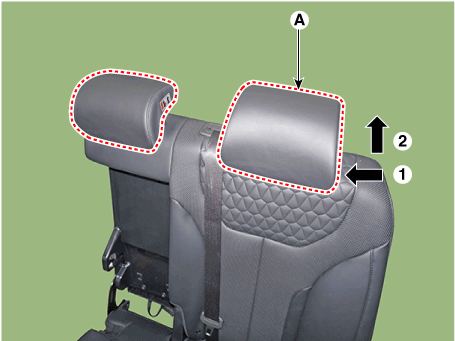
Press the lock pin and remove the rear seat headrest (A).
|
|
7. |
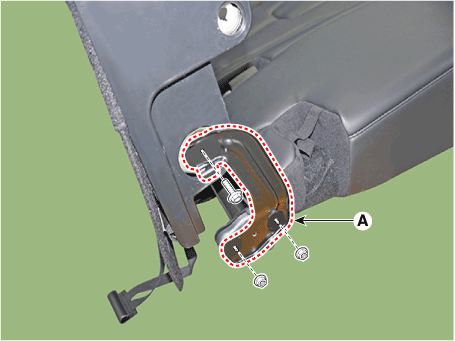
Loosen the mounting bolts and nuts , remove the rear back hinge bracket
(A).
|
|
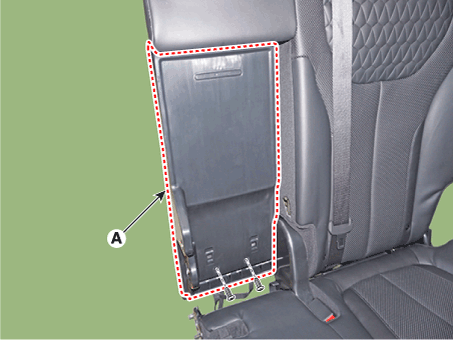
8. |
Loosen the mounting screws and remove the rear back armrest panel (A).
|
|
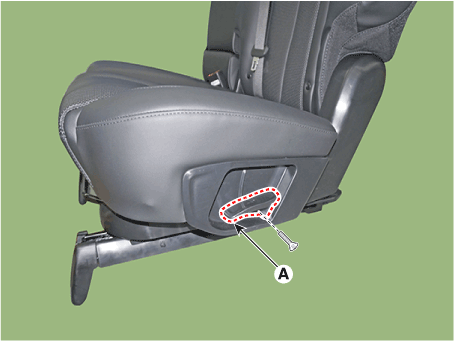
9. |
Using a screwdriver or remover and remove the rear seat shield outer
cover (A).
|
|
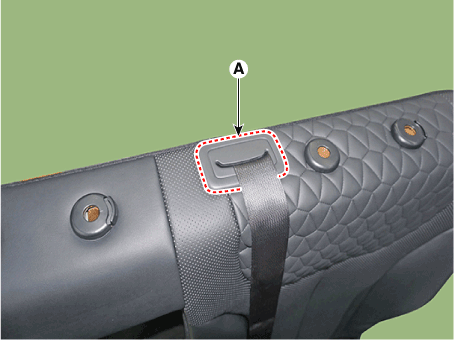
10. |
Using a screwdriver or remover and remove the rear center seat belt
cover (A).
|
|
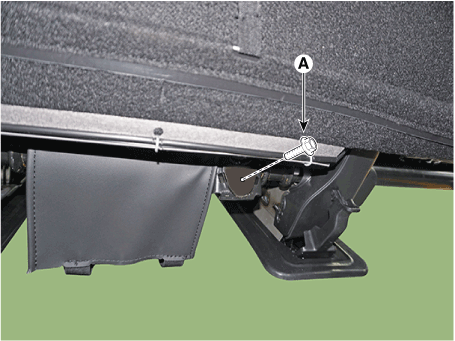
11. |
Loosen the rear center seat belt bolt (A).
|
Tightening torque :
39.2 - 53.9 N.m (4.0 - 5.5 kgf.m , 28.9 - 39.8 lb-ft)
|
|
|
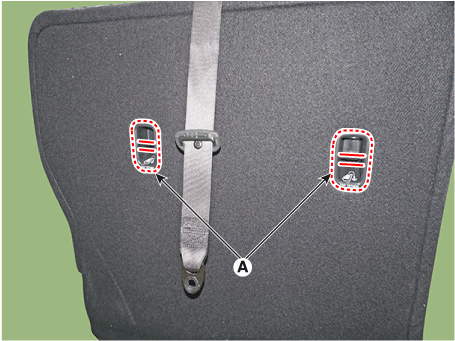
12. |
Using a remover and remove the child anchor cover (A).
|
|
13. |
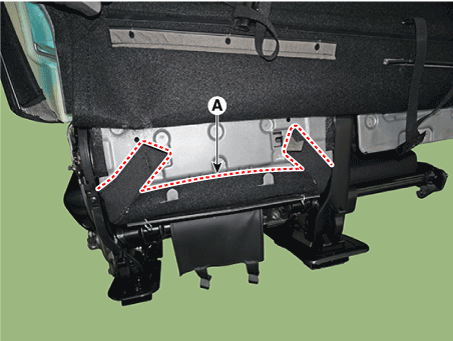
Remove the rear seat lower protector (A).
|
|
14. |
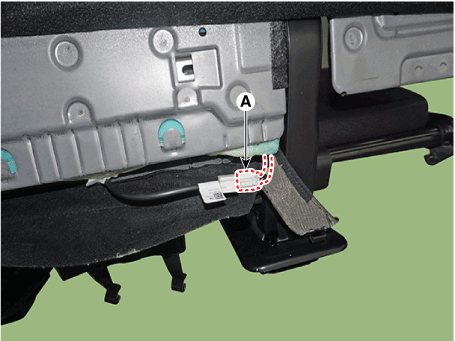
Press the lock pin and separate the seat heater connector (A).
|
|
15. |
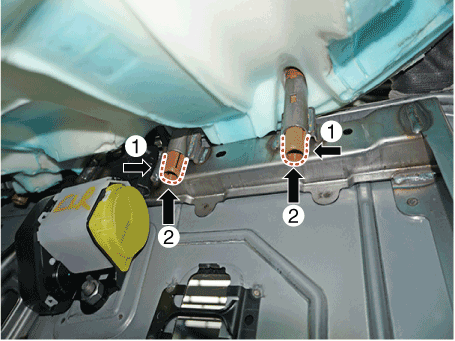
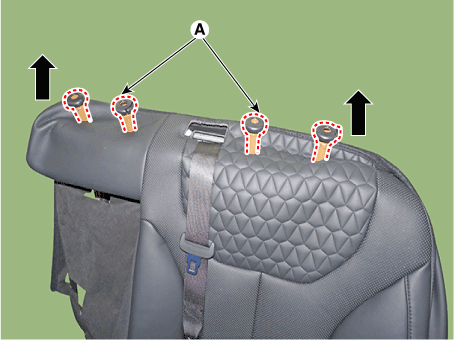
Press the hooks and remove the headrest guide (A).
|
|
16. |
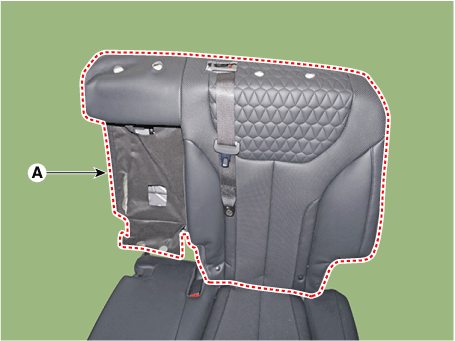
Remove the rear seat back cover assembly (A) from the rear seat frame.
|
|
17. |
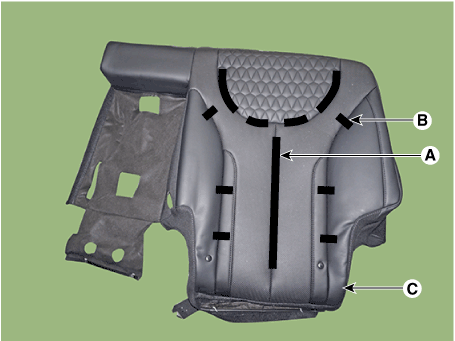
After removing the Velcro tape (A) and tie-down clips (B) inside the
rear seat back cover, remove the rear seat back cover (C).
|
|
18. |
To install, reverse removal procedure.
|
• |
Replace any damaged clips.
|
|
|
| •
|
Put on gloves to protect your hands.
|
|
| •
|
When prying with a flat-tip screwdriver, wrap it with protective
tape, and apply protective tape around the related parts, to
prevent damage.
|
| •
|
Use a plastic panel removal tool to remove interior trim pieces
to protect from marring the surface.
|
| •
|
Take care not to bend or scratch the trim and panels.
|
|
|
1. |
Remove the second row seat assembly [RH].
(Refer to Rear Seat - "Rear Seat Assembly")
|
|
2. |
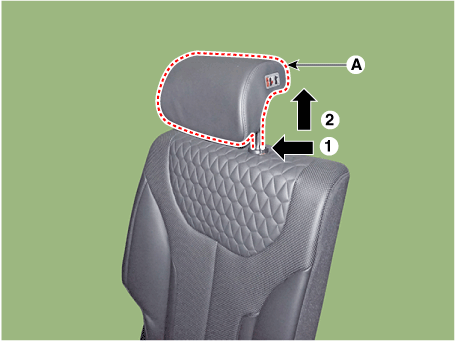
Push the lock pin (B), remove the rear seat headrest (A).
|
|
3. |
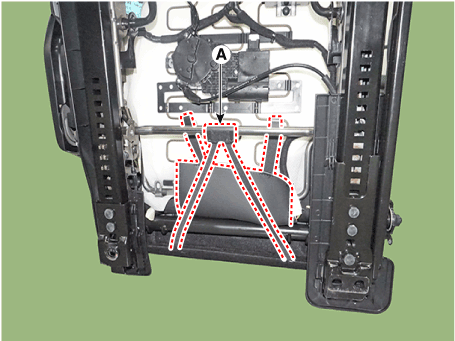
Remove the rear seat lower protector (A).
|
|
4. |
Loosen the mounting screw and remove the rear seat shield inner cover
(A).
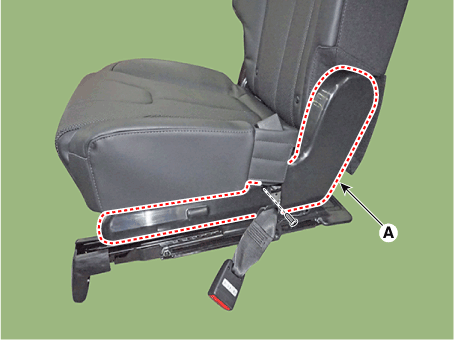
|
|
5. |
Press the lock pin and separate the connector (A).
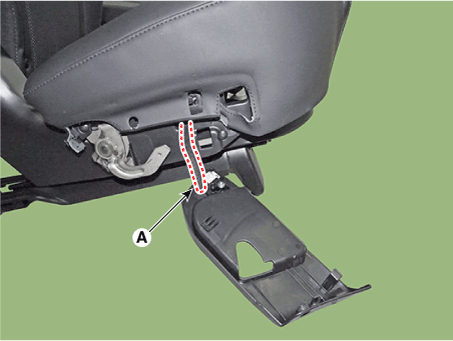
|
|
6. |
Using a screwdriver or remover and remove the rear seat shield outer
cover (A).
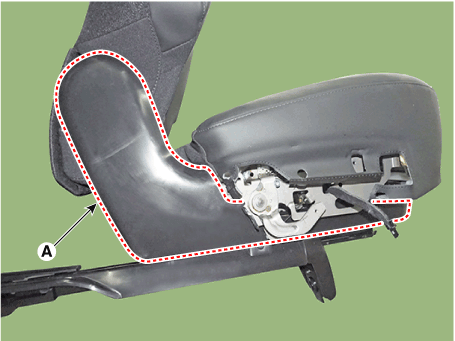
|
|
7. |
Using a remover and remove the child anchor cover (A).
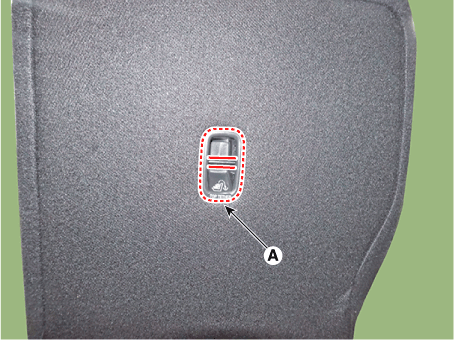
|
|
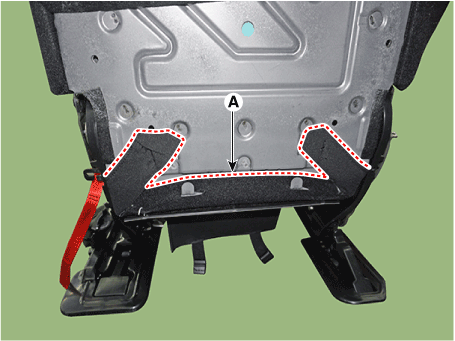
8. |
Remove the rear seat back lower protector (A).
|
|
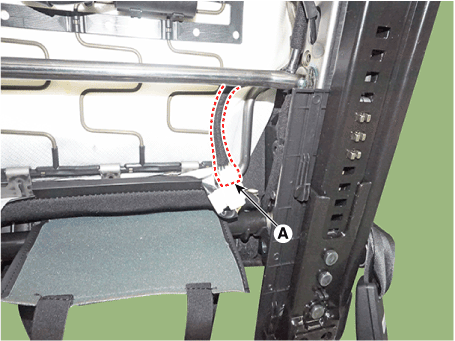
9. |
Press the lock pin and separate the heater connector (A).
|
|
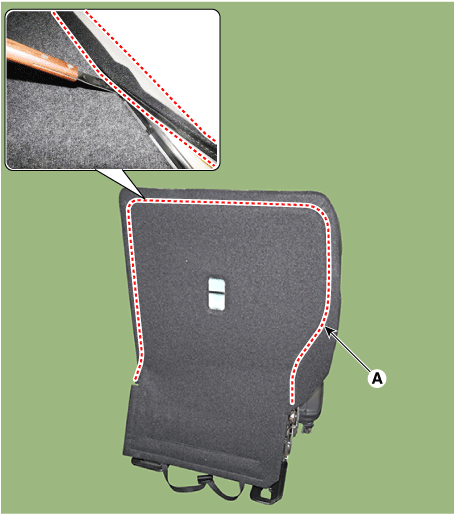
10. |
Using a screwdriver or remover and remove the rear seat back cover (A).
|
|
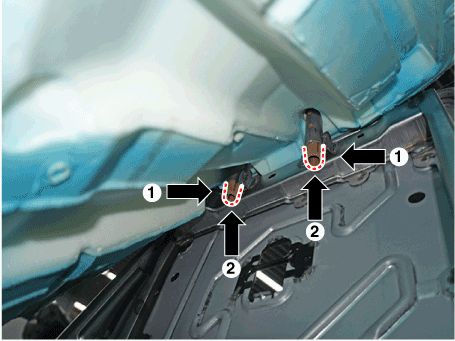
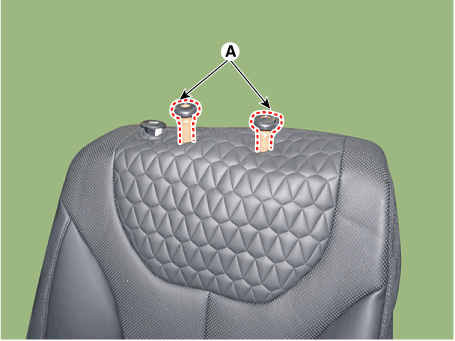
11. |
Press the hooks and remove the headrest guide (A).
|
|
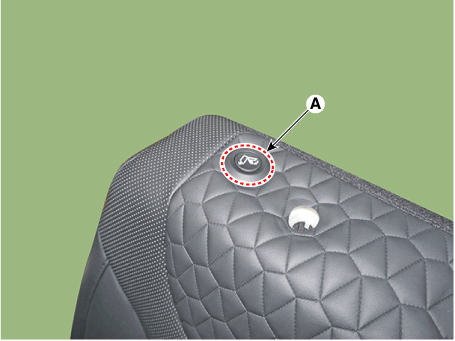
12. |
Using a remover and remove the rear seat back folding swich (A).
|
|
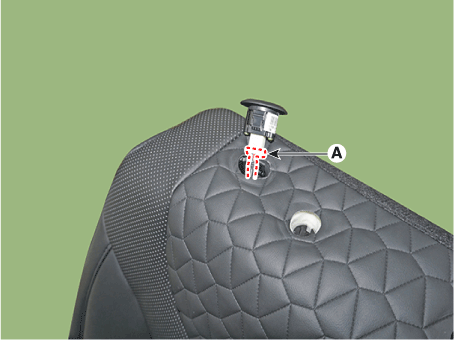
13. |
Press the lock pin and separate the rear seat back folding swich connector
(A).
|
|
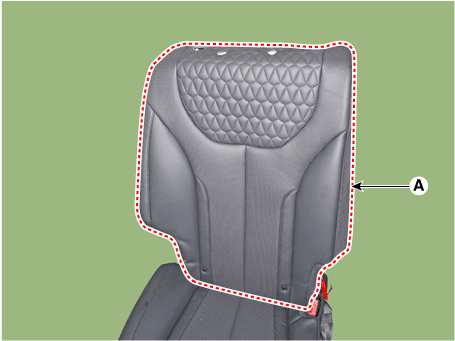
14. |
Remove the rear seat back cover assembly (A) from the rear seat frame.
|
|
15. |
After removing the Velcro tape (A) and tie-down clips (B) inside the
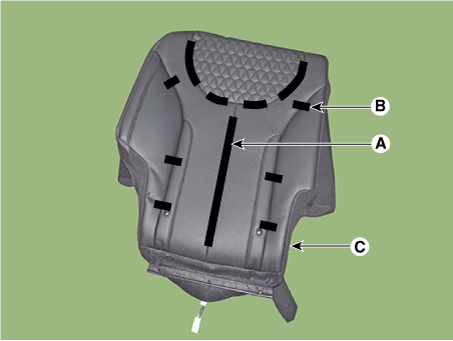
rear seat back cover, remove the rear seat back cover (C).
|
|
16. |
Install in the reverse order of removal.
|
• |
Replace any damaged clips.
|
|
|
[Third row seat assembly]
| •
|
Put on gloves to protect your hands.
|
|
| •
|
When prying with a flat-tip screwdriver, wrap it with protective
tape, and apply protective tape around the related parts, to
prevent damage.
|
| •
|
Use a plastic panel removal tool to remove interior trim pieces
to protect from marring the surface.
|
| •
|
Take care not to bend or scratch the trim and panels.
|
|
|
1. |
Remove the third row seat assembly.
(Refer to Rear Seat - "Rear Seat Assembly")
|
|
2. |
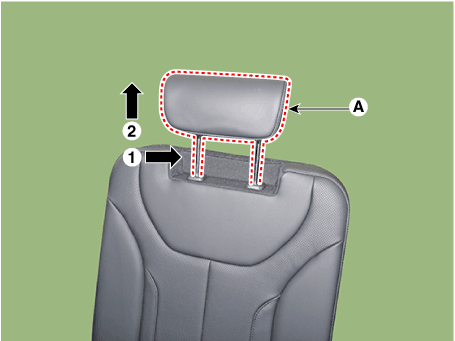
Press the lock pin and remove the headrest (A).
|
|
3. |
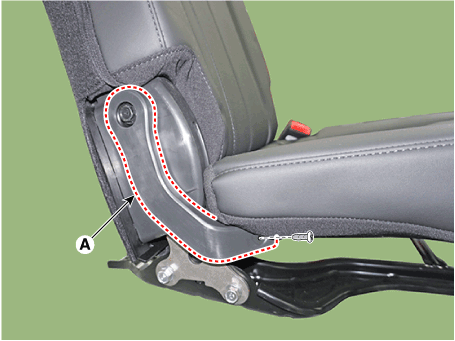
Loosen the mounting screw and remove the rear seat outer cover (A).
|
|
4. |
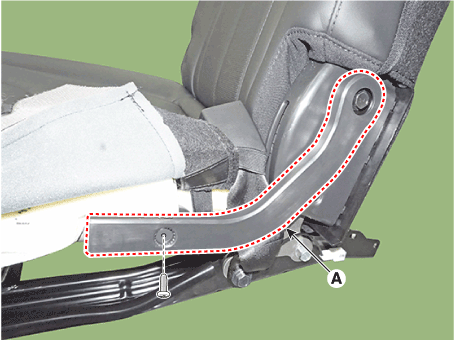
Loosen the mounting screw and remove the rear seat inner cover (A).
|
|
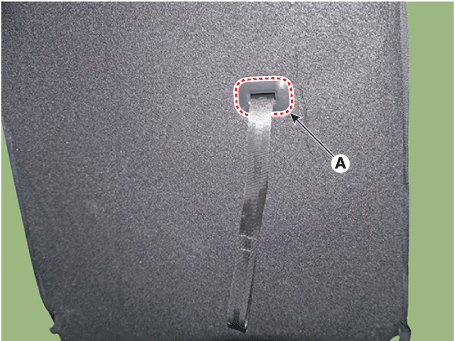
5. |
Remove the rear seat strap cover (A).
|
|
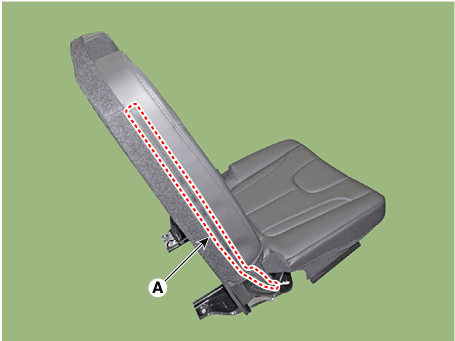
6. |
Open the rear seat back cover side zipper(A).
[LH]
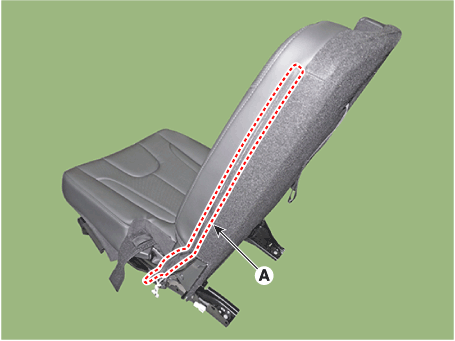
[RH]
|
|
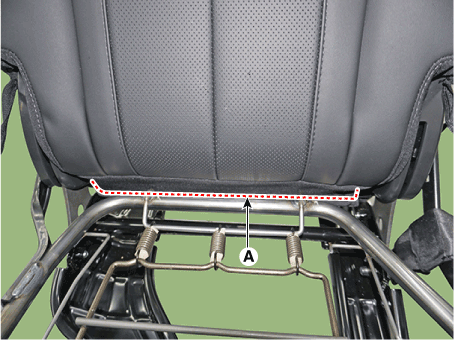
7. |
Remove the seat back cover lower protector (A).
|
|
8. |
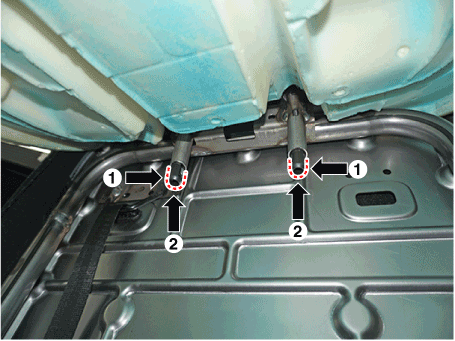
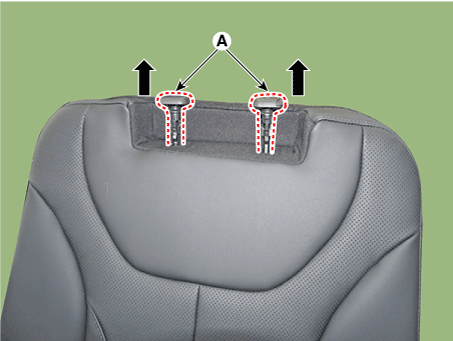
Press the hooks and remove the headrest guide (A).
|
|
9. |
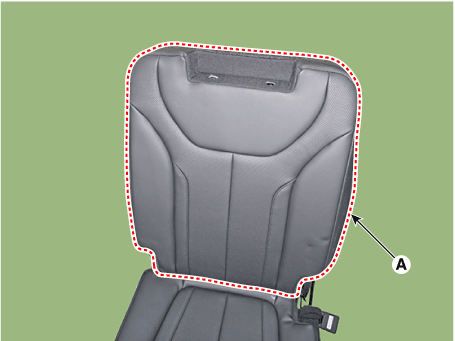
Remove the rear seat back cover assembly (A) from the rear seat frame.
|
|
10. |
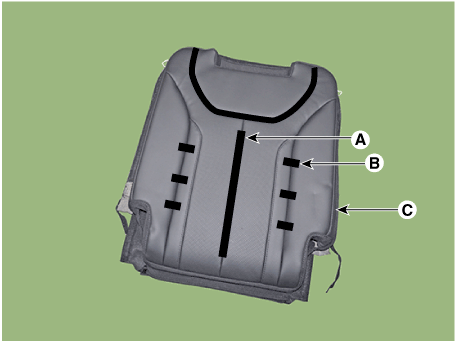
After removing the Velcro tape (A) and tie-down clips (B) inside the
rear seat back cover, remove the rear seat back cover (C).
|
|
11. |
Install in the reverse order of removal.
|
• |
Replace any damaged clips.
|
|
|
Rear Seat Cushion Cover. Components and components location
| [Second row seat assembly] |
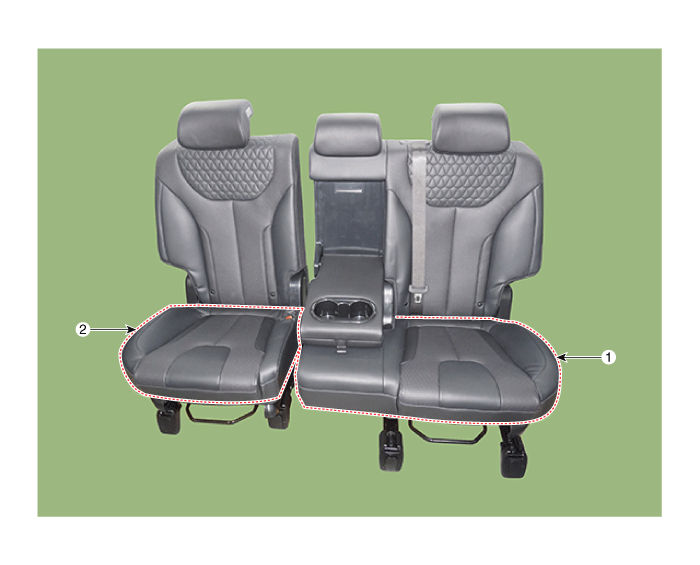
1. Rear seat
cushion cover [LH]
|
2. Rear seat
cushion cover [RH]
|
| [Third row seat assembly] |
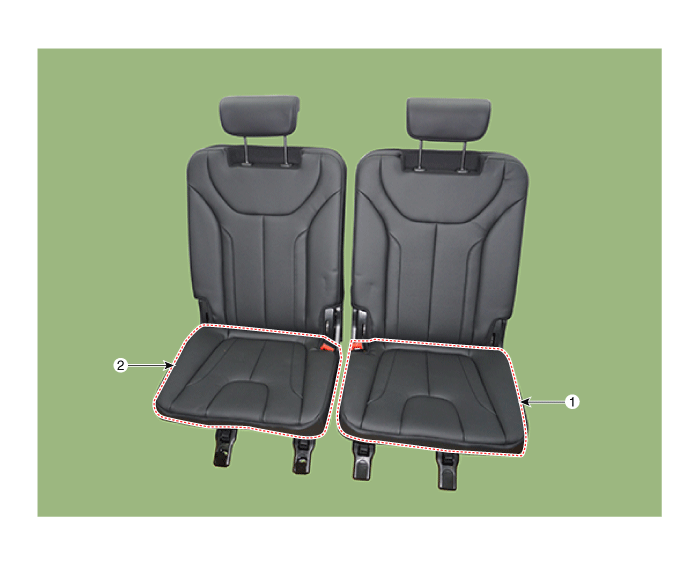
1. Rear seat
cushion cover [LH]
|
2. Rear seat
cushion cover [RH]
|
Rear Seat Cushion Cover. Repair procedures
[Second row seat assembly]
| •
|
Put on gloves to protect your hands.
|
|
| •
|
When prying with a flat-tip screwdriver, wrap it with protective
tape, and apply protective tape around the related parts, to
prevent damage.
|
| •
|
Use a plastic panel removal tool to remove interior trim pieces
to protect from marring the surface.
|
| •
|
Take care not to bend or scratch the trim and panels.
|
|
|
1. |
Remove the second row seat assembly [LH].
(Refer to Rear Seat - "Rear Seat Assembly")
|
|
2. |
Remove the protector (A) located in the bottom side of the rear seat
cushion.

|
|
3. |
After loosening the mounting screw, then remove the rear seat recliner
knob (A).

|
|
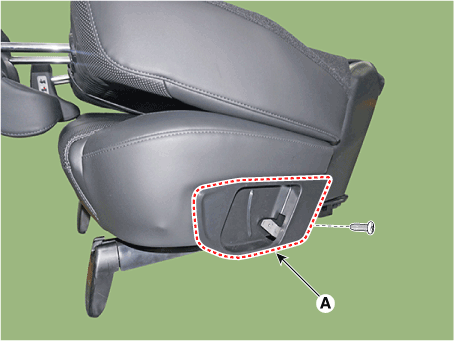
4. |
After loosening the mounting screw, then remove the rear seat recliner
cover (A).
|
|
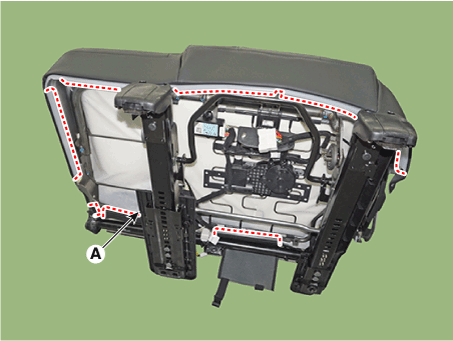
5. |
Remove the protector (A) located in the side part of the rear seat cushion.
|
|
6. |
Remove the rear seat cushion cover (A) from the rear seat cushion frame.
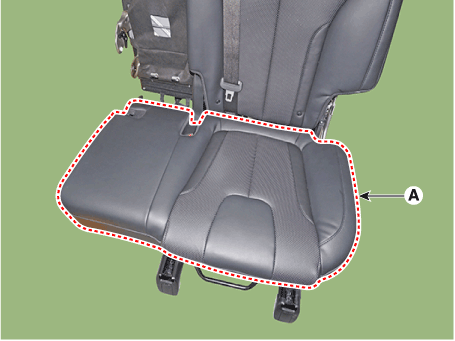
|
|
7. |
After removing the velcro tape (A) on the rear of seat cushion and remove
the rear seat cushion cover (B).
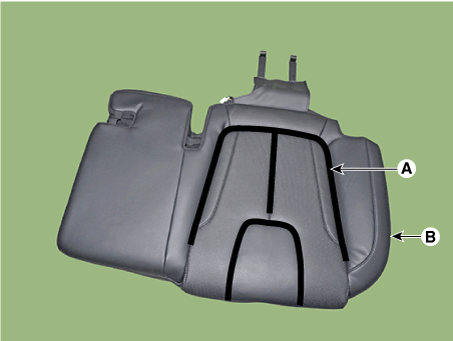
|
|
8. |
Install in the reverse order of removal.
|
• |
Replace any damaged clips.
|
|
|
| •
|
Put on gloves to protect your hands.
|
|
| •
|
When prying with a flat-tip screwdriver, wrap it with protective
tape, and apply protective tape around the related parts, to
prevent damage.
|
| •
|
Use a plastic panel removal tool to remove interior trim pieces
to protect from marring the surface.
|
| •
|
Take care not to bend or scratch the trim and panels.
|
|
|
1. |
Remove the second row seat assembly [RH].
(Refer to Rear Seat - "Rear Seat Assembly")
|
|
2. |
Remove the protector (A) located in the bottom side of the rear seat
cushion.

|
|
3. |
After loosening the mounting screw, then remove the rear seat slide
knob (A).
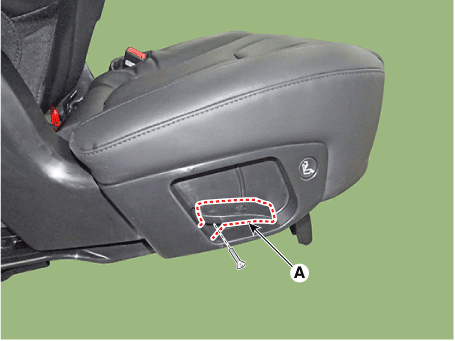
|
|
4. |
After loosening the mounting screw, then remove the rear seat slide
outer cover (A).
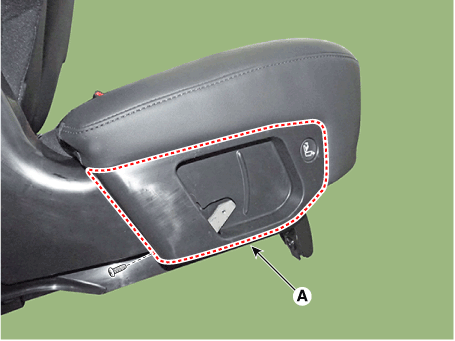
|
|
5. |
Remove the seat protector (A) from the rear seat cusion frame.
[Upper]
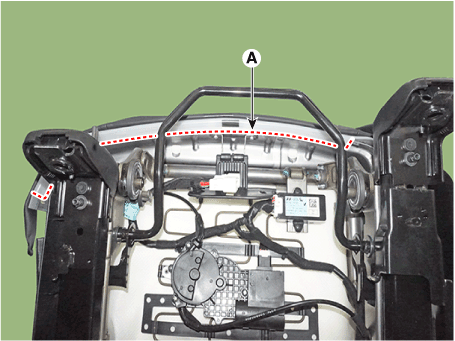
[Lower]
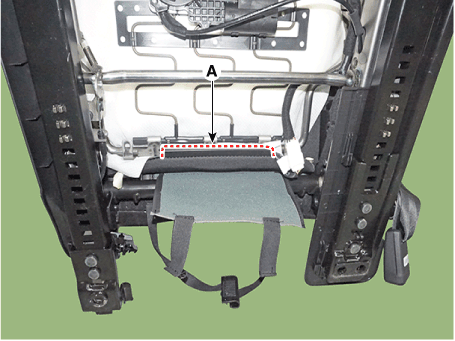
[LH]
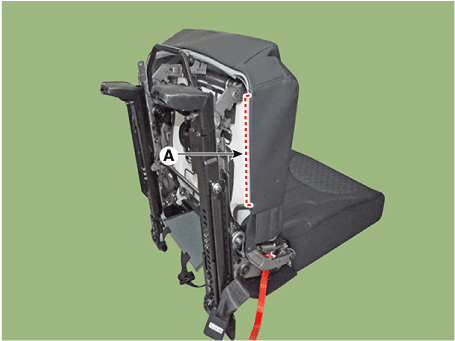
[RH]
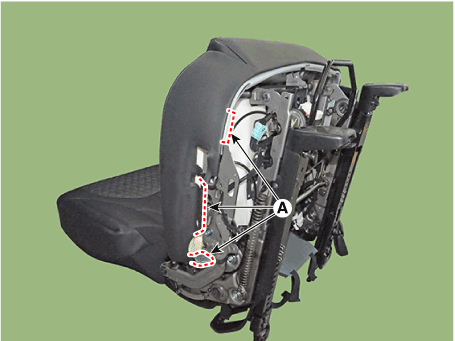
|
|
6. |
Remove the rear seat cushion cover (A) from the rear seat cushion frame.
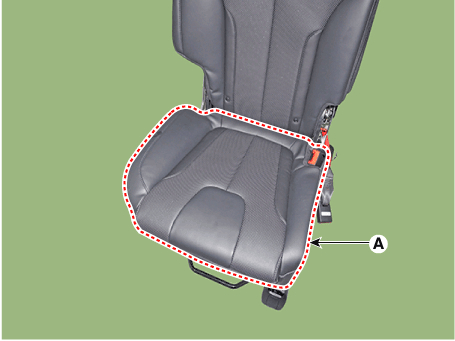
|
|
7. |
After removing the velcro tape (A) on the rear of seat cushion and remove
the rear seat cushion cover (B).
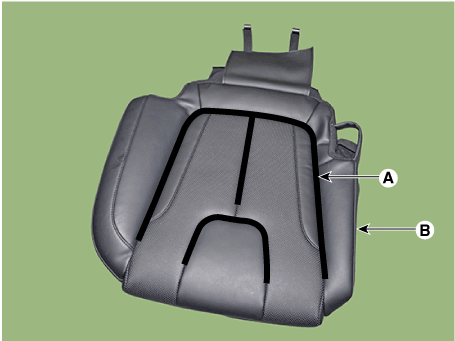
|
|
8. |
Install in the reverse order of removal.
|
• |
Replace any damaged clips.
|
|
|
[Third row seat assembly]
| •
|
Put on gloves to protect your hands.
|
|
| •
|
When prying with a flat-tip screwdriver, wrap it with protective
tape, and apply protective tape around the related parts, to
prevent damage.
|
| •
|
Use a plastic panel removal tool to remove interior trim pieces
to protect from marring the surface.
|
| •
|
Take care not to bend or scratch the trim and panels.
|
|
|
1. |
Remove the third row seat assembly.
(Refer to Rear Seat - "Rear Seat Assembly")
|
|
2. |
Remove the rear seat rear protector (A).
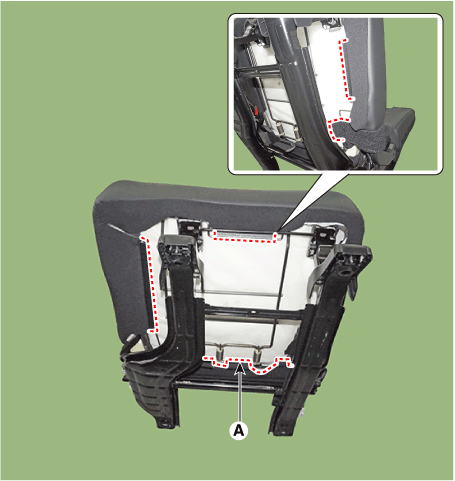
|
|
3. |
Remove the rear seat cusion cover (A) from the rear seat cusion frame.
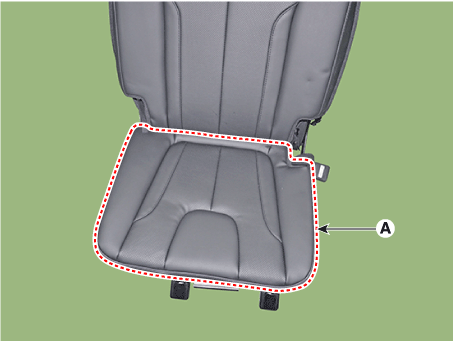
|
|
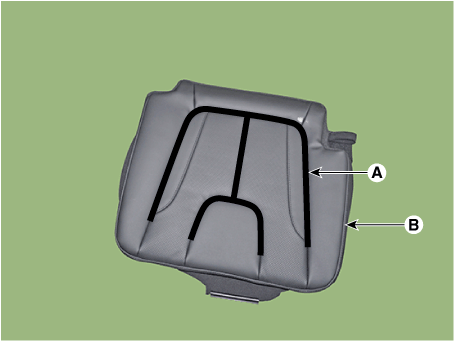
4. |
After removing the velcro tape (A) on the rear of seat cushion and remove
the rear seat cushion cover (B).
|
|
5. |
Install in the reverse order of removal.
|
• |
Replace any damaged clips.
|
|
|
Rear Seat Frame Assembly. Components and components location
[Second row seat assembly]
(LH)
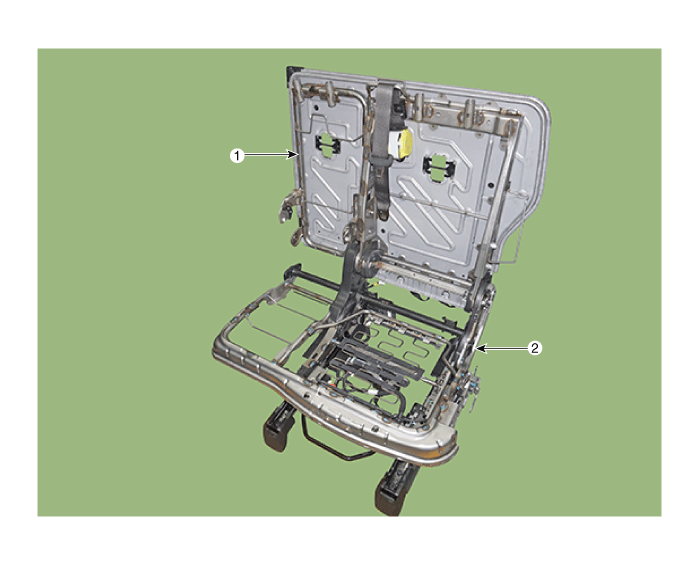
1. Rear seat
back frame assembly
|
2. Rear seat
cushion frame assembly
|
(RH)
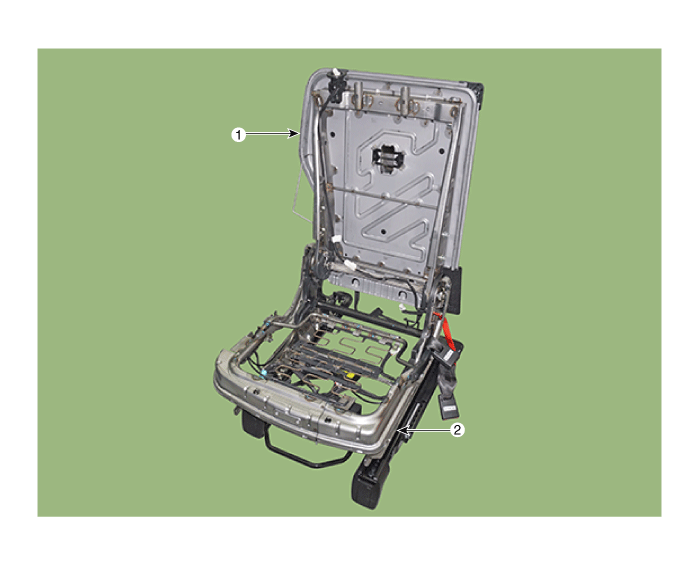
1. Rear seat
back frame assembly
|
2. Rear seat
cushion frame assembly
|
[Third row seat assembly]
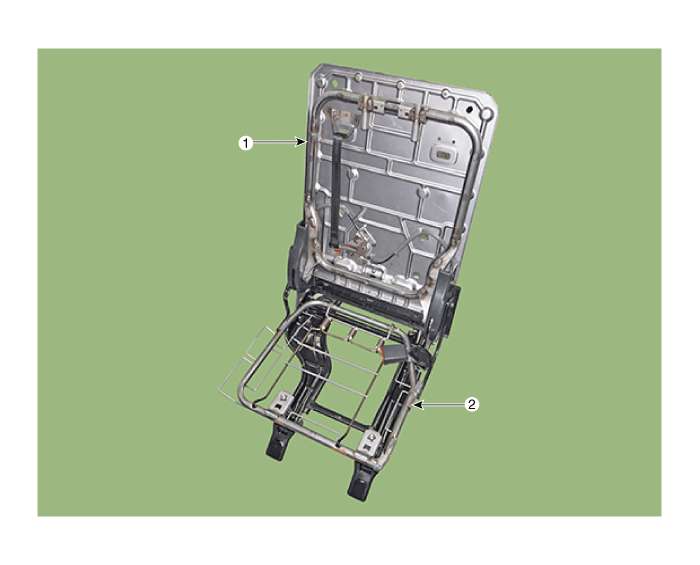
1. Rear seat
back frame assembly
|
2. Rear seat
cushion frame assembly
|
Rear Seat Frame Assembly. Repair procedures
[Second row seat assembly]
(LH)
| •
|
Put on gloves to protect your hands.
|
|
| •
|
When prying with a flat-tip screwdriver, wrap it with protective
tape, and apply protective tape around the related parts, to
prevent damage.
|
| •
|
Use a plastic panel removal tool to remove interior trim pieces
to protect from marring the surface.
|
| •
|
Take care not to bend or scratch the trim and panels.
|
|
|
1. |
Remove the rear seat back cover.
(Refer to Rear Seat - "Rear Seat Back Cover")
|
|
2. |
Remove the rear seat cushion cover.
(Refer to Rear Seat - "Rear Seat Cushion Cover")
|
|
3. |
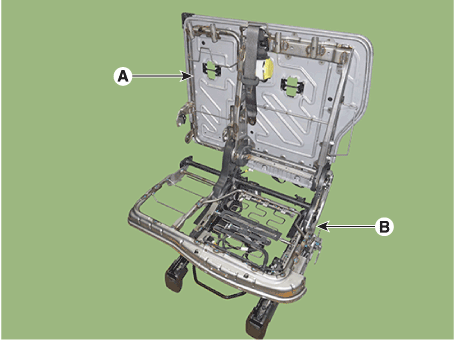
After loosening the mounting bolts, then remove the rear seat back frame
assembly (A) and rear seat cushion frame assembly (B).
|
Tightening torque :
44.1 - 53.9 N.m (4.5 - 5.5 kgf.m, 32.5 - 39.8 lb-ft)
|
|
|
4. |
Install in the reverse order of removal.
|
• |
Replace any damaged clips.
|
|
|
(RH)
| •
|
Put on gloves to protect your hands.
|
|
| •
|
When prying with a flat-tip screwdriver, wrap it with protective
tape, and apply protective tape around the related parts, to
prevent damage.
|
| •
|
Use a plastic panel removal tool to remove interior trim pieces
to protect from marring the surface.
|
| •
|
Take care not to bend or scratch the trim and panels.
|
|
|
1. |
Remove the rear seat back cover.
(Refer to Rear Seat - "Rear Seat Back Cover")
|
|
2. |
Remove the rear seat cushion cover.
(Refer to Rear Seat - "Rear Seat Cushion Cover")
|
|
3. |
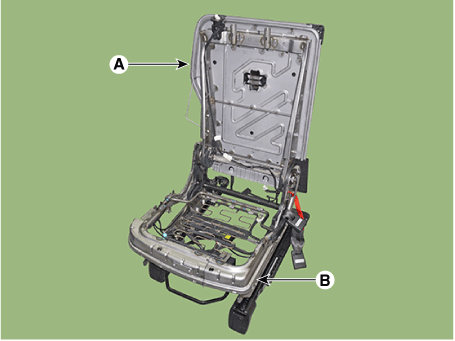
After loosening the mounting bolts, then remove the rear seat back frame
assembly (A) and rear seat cushion frame assembly (B).
|
Tightening torque :
44.1 - 53.9 N.m (4.5 - 5.5 kgf.m, 32.5 - 39.8 lb-ft)
|
|
|
4. |
Install in the reverse order of removal.
|
• |
Replace any damaged clips.
|
|
|
[Third row seat assembly]
| •
|
Put on gloves to protect your hands.
|
|
| •
|
When prying with a flat-tip screwdriver, wrap it with protective
tape, and apply protective tape around the related parts, to
prevent damage.
|
| •
|
Use a plastic panel removal tool to remove interior trim pieces
to protect from marring the surface.
|
| •
|
Take care not to bend or scratch the trim and panels.
|
|
|
1. |
Remove the rear seat back cover.
(Refer to Rear Seat - "Rear Seat Back Cover")
|
|
2. |
Remove the rear seat cushion cover.
(Refer to Rear Seat - "Rear Seat Cushion Cover")
|
|
3. |
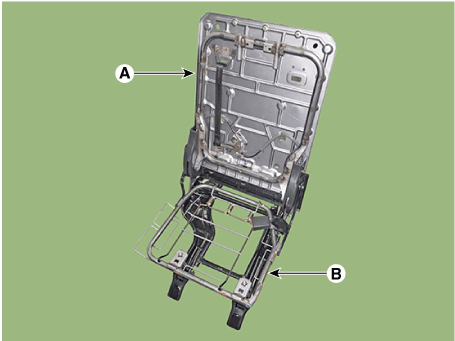
After loosening the mounting bolts, then remove the rear seat back frame
assembly (A) and rear seat cushion frame assembly (B).
|
Tightening torque :
44.1 - 53.9 N.m (4.5 - 5.5 kgf.m, 32.5 - 39.8 lb-ft)
|
|
|
4. |
Install in the reverse order of removal.
|
• |
Replace any damaged clips.
|
|
|
Front Seat Assembly. Components and components location Component Location 1. Front seat headrest 2. Front seat back cover 3. Front seat cushion cover Front Seat Assembly. Repair procedures Replacement ...
Components and components location Components 1. Front seat belt retractor 2. Second row seat belt retractor 3. Third row seat belt retractor Front Seat Belt Pretensioner. Components and components location ...
See also:
Rear Seat Frame Assembly. Repair procedures
Replacement [Second row seat assembly] (LH) • Put on gloves to protect your hands. • When prying with a flat-tip screwdriver, wrap it with protective tape, and apply protective tape around the related ...
Basic Service Symbols
Basic Service Symbols There are five primary symbols used to complement illustrations. These symbols indicate the part to apply such materials during service. Symbol Meaning Do not reuse the part. Replace ...
Components
and Components Location
Components ...
 Hyundai Santa Fe (TM): Rear Seat


 Front Seat
 Front Seat Belt


