Description and operating principle
| Description and Operation |
Wireless Power Charger System
During ACC or IG ON, battery voltage is supplied to the wireless power charger
system to transmit an output of 5 W to mobile phone.
Mobile phones certified with the wireless charging standard WPC (Qi 1.1.2) or
equipped with an exclusive wireless charging case can be used.
| •
|
WPC : Wireless Power Consortium
|
| •
|
Qi 1.1.2 : refers to certified product with the capability to
transmit power of up to 5 W and detect metal and other impurities
to prevent heating.
|
|
|
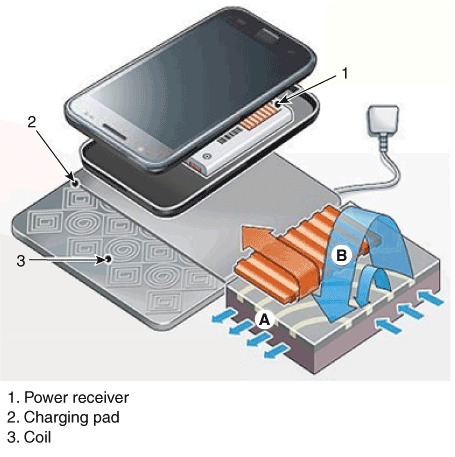
1. |
Power receiver : embedded with the secondary coil designed to receive
the induced current from the charging pad.
|
|
2. |
Charging pad : electrical coils wound inside the plastic cover.
|
|
3. |
Coil : Rectangular and circular coils generate diverse electromagnetic
fields.
| A. |
Connect power to the charging pad to generate electromagnetic
fields in the coil.
|
| B. |
Current induced from electromagnetic induction phenomenon is
sent to the power receiver to charge the battery.
|
|
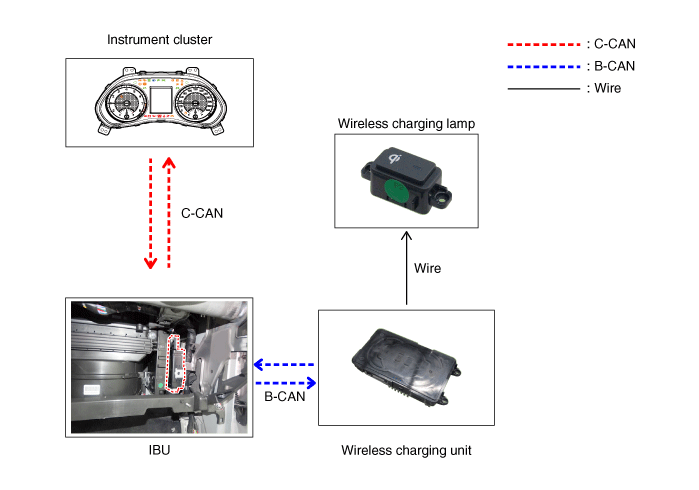
System Configuration Diagram
|
1. |
Instrument cluster : Alerts about contact with mobile phone
|
|
2. |
BCM unit : Determines contact with mobile phone
|
|
3. |
Wireless charging lamp : Displays the charging status
|
|
4. |
SMK unit : Stops charging during the activation of LF
|
Major Functions of Wireless Power Charger System
|
1. |
Charging Function
|
(1) |
Activation method
|
a. |
Close all doors of the car.
|
|
b. |
Switch vehicle power to ACC or IG ON.
|
|
c. |
Place the wireless charging-enabled mobile phone on
the tray.
|
|
|
(2) |
Charging status display
Mode
|
Charging LED display
|
Remarks
|
Stand by for charging
|
LED turned OFF
|

|
|
Charging in process
|
Amber LED turned ON
|

|
|
Charging completed
|
Green LED turned ON
|

|
|
Charging error
|
Amber LED blinks
|

|
|
– |
Blinks 10 times for 10 seconds, then LED is
turned off for 50 seconds (total 60 seconds)
|
|
|
|
|
2. |
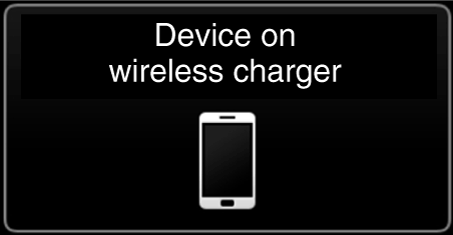
Alert for contact with mobile phone
|
(1) |
Activation method
|
a. |
Key OFF while the mobile phone is being charged.
|
|
b. |
Checks if the mobile phone is placed on the wireless
charging unit.
|
|
c. |
Alert message for contact with mobile phone is displayed
on the instrument panel (for about 4 - 5 seconds).
|
|
|
|
3. |
Overheating prevention
|
(1) |
Activation method
|
a. |
If the thermistor temperature inside the wireless charging
module rises above a certain level (158 °F (70 °C)),
charging will stop to protect the mobile phone battery.
|
• |
The amber LED of the charging display
lamp blinks 10 times for 10 seconds,
and then it is turned off for 50 seconds
(total 60 seconds).
|
|
• |
The process is repeated for every 60
seconds.
|
|
|
|
b. |
If the thermistor temperature falls below a certain
level (149 °F (65 °C)), charging will restart.
|
When the charging function is restarted, the
amber LED of the charging display lamp will
be turned on.
|
|
|
|
|
4. |
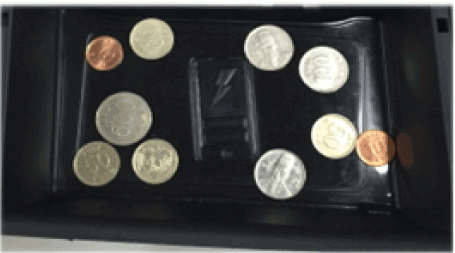
Foreign matter detection
|
(1) |
Charging will be stopped if there is a coin or other metallic
object between the wireless charging unit and the mobile phone.
[Foreign matter]
|
• |
Foreign matter : All metallic objects such as
coins, clips, and precious metals
|
|
• |
The amber LED of the charging display lamp blinks
10 times for 10 seconds, and then it is turned
off for 50 seconds (total 60 seconds).
|
|
• |
The process is repeated for every 60 seconds.
|
|
|
Be careful as touching the foreign matter by hand may
cause burns.
|
|
|
(2) |
After the system has detected foreign matter and stopped charging
the mobile phone, the charging will resume in about 60 seconds
once the foreign matter has been removed.
|
When the charging function is restarted, the amber LED
of the charging display lamp will be turned on.
|
|
|
|
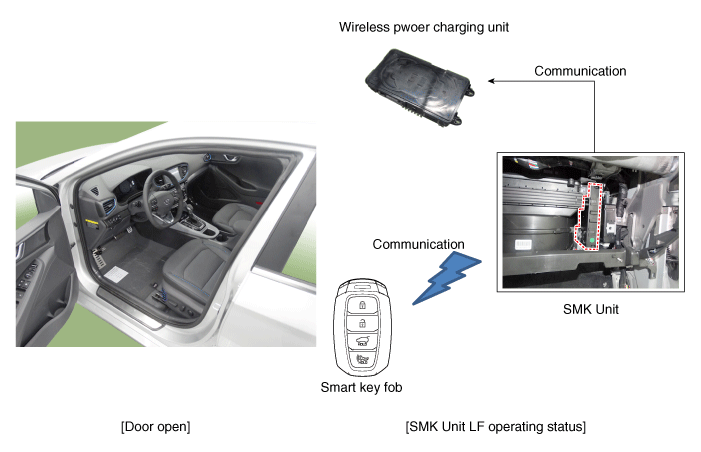
5. |
SMK unit LF frequency interference prevention
This function prevents interference between the wireless charging frequency
and smart key unit frequency band.
|
(1) |
Wireless charging is stopped when the door is open or the SMK
unit is in LF mode (searching for smart key).
e.g. Wireless charging function is stopped if the driver carries
the smart key out of the vehicle during IG ON.
|
Charging will stop and the amber LED of the charging
display lamp will turn off.
|
|
|
(2) |
It will return to normal operating status when the LF mode of
the SMK unit is completed.
|
|
|
6. |
Turn the wireless charging function ON/OFF with USM.
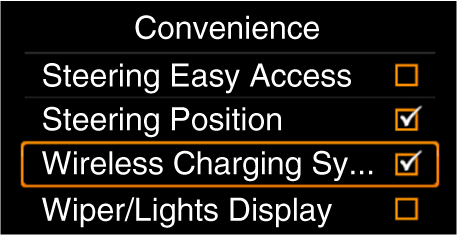
※ Tailgate applies to RV vehicle models.
|
Protection of Wireless Power Charger System
Item
|
Condition
|
Status
|
Protects against low/high voltage
|
Protects and stops charging under 7.0 V and over 16.5 V
|
LED OFF
(Stops operation)
|
Charges over 7.5 V and under 16.0 V
|
Protects against reverse voltage
|
Protects and stops charging in case of reverse voltage
|
LED OFF
(Stops operation)
|
Protects against overcurrent
|
Protects and stops charging in case of detecting 4.5 A
|
Amber LED blinks
|
Protects against overheating
|
Protects and stops charging in case of detecting 158°F (70°C) by internal
temperature sensor of wireless charging module
|
Amber LED blinks
|
Resumes under 149°F (65°C)
|
Foreign matter
(Coins, clips, precious metals, etc.)
|
Protects and stops charging in case of detecting foreign matter (overheating
prevention)
|
Amber LED blinks
|
Prevents frequency interference
|
Protects and stops charging by activating SMK in case door or tailgate is
open
|
LED OFF
(Stops operation)
|
Resumes in 3.5 seconds after all doors and tailgate are closed and SMK operation
is completed
|
Alert for contact with mobile phone
|
During key-off with contact with mobile phone
|
Displays warning message on the instrument panel (for about 4-5 seconds)
|
※ Tailgate applies to RV vehicle models.
Components and positions
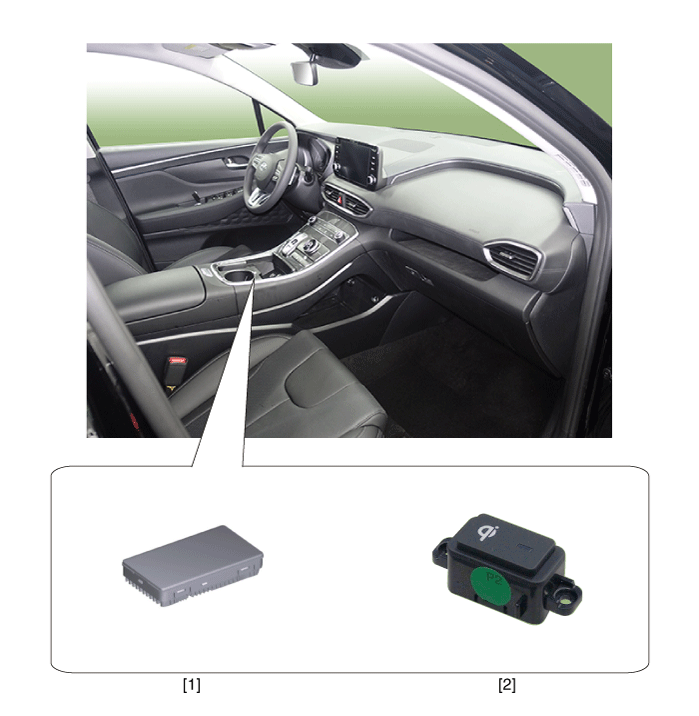
1. Wireless power
charging unit
|
2. Wireless power
charging lamp
|
Troubleshooting
Wireless Power Charger System Troubleshooting
Trouble status
|
Inspection item
|
Inspection
|
Not charged
|
Check the mobile phone status
|
R-1
|
Amber LED blinks
|
Overcurrent
|
R-2
|
Overheating
|
R-2
|
Foreign matter
|
R-2
|
R-1. Check the wireless power charger system operation
|
1. |
If the placement of a mobile phone is not detected
|
(1) |
If the internal temperature of the mobile phone battery is high,
the mobile phone itself turns "OFF" the power.
|
The temperature at which the power is automatically
turned "OFF" differs by mobile phone model.
|
|
|
(2) |
If the mobile phone was placed outside the charging range
|
|
(3) |
If the mobile phone was placed by its LCD side on the charging
pad surface (if the phone was placed upside down)
|
|
(4) |
If the mobile phone was turned 180°
|
|
|
2. |
Check that the amber LED of the wireless charging lamp turns on when
the mobile phone is in normal condition and is correctly placed.
|
R-2. Check for overcurrent, overheating and foreign matter
|
1. |
Overcurrent : Charging stops in overcurrent of over 4.5 A
|
(1) |
The overcurrent error status will be reset when the current
falls under 4.5 A or when ACC is turned off and on.
|
|
|
2. |
Overheating : The unit will be automatically turned "OFF" when the internal
temperature of the wireless charging unit is over 158°F (70°C).
|
(1) |
The error status will be reset when the internal temperature
of the wirelss charging unit falls under 149°F (65°C).
|
|
|
3. |
Foreign matter : When metallic objects such as coins, clips and precious
metals are detected, charging will be stopped to prevent overheating.
|
(1) |
Error status will be reset when foreign matter is removed.
|
|
• |
The amber LED of the charging display lamp blinks 10
times for 10 seconds, and then it is turned off for
50 seconds (total 60 seconds).
|
|
• |
The process is repeated for every 60 seconds.
|
|
• |
Turning ACC OFF/ON resets the error status and returns
to normal operation.
|
|
|
Specification
Item
|
Specification
|
Rated voltage
|
DC 12V
|
Operating voltage
|
DC 9.0 - 16.0V
|
Operating temperature
|
-86 to 167°F (-30 to 75°C)
|
Dark current
|
MAX 1mA
|
Output power
|
5 W
|
Output frequency
|
110 ± 5 kHz
|
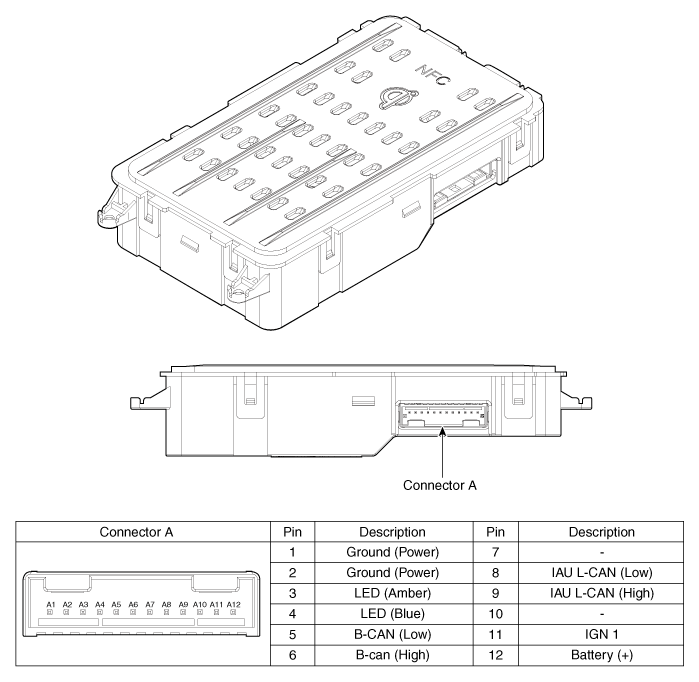
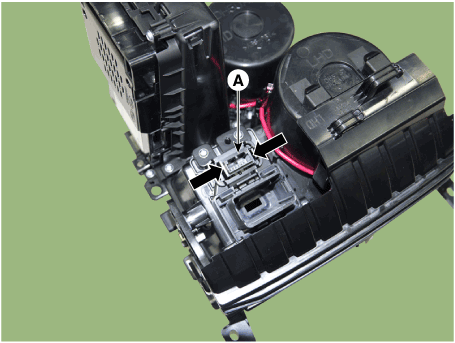
Wireless Power Charging Unit. Components and positions
Wireless Power Charging Unit. Circuit diagram

Wireless Power Charging Unit. Repair procedures
|
Handling wireless charging system parts by wet hands may cause electric
shock.
|
|
1. |
Disconnect the negative (-) battery terminal.
|
|
2. |
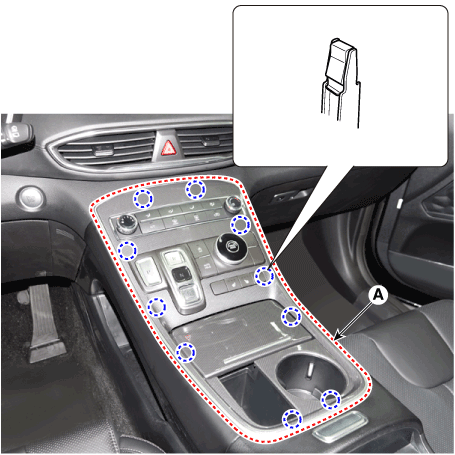
Remove the console upper cover (A).
|
|
3. |
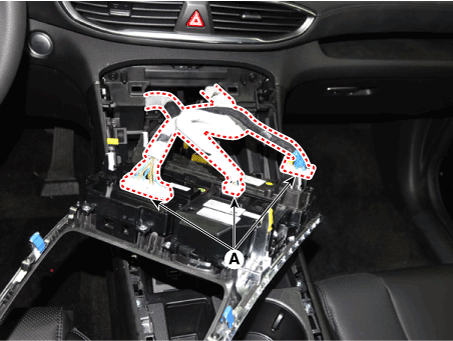
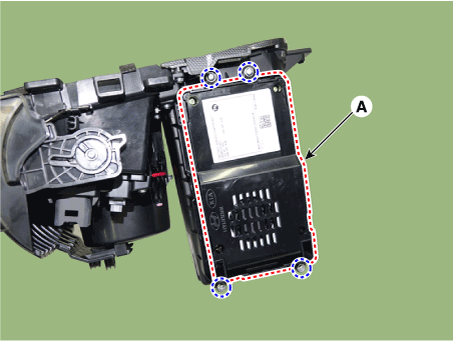
Press the lock pin, separate the connectors (A).
|
|
4. |
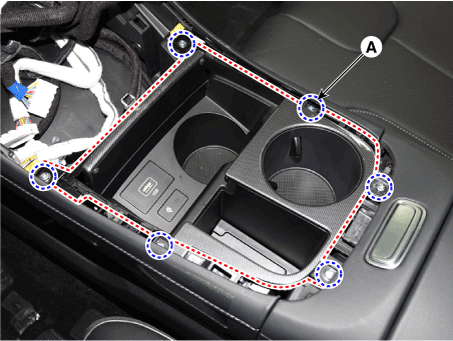
Remove the cup holder assembly (A) after loosening mounting screws.
|
|
5. |
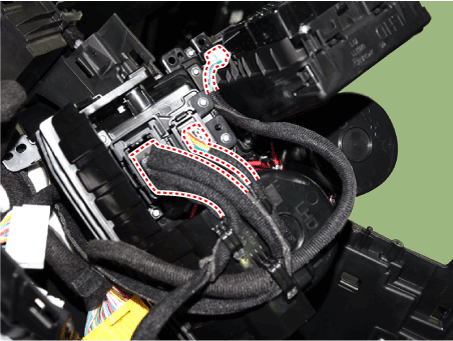
Disconnect WPC, USB, WPC lamp connectors.
|
|
6. |
Remove the wireless power charging unit (A) after loosening mounting
screws.
|
|
1. |
Install the wireless power charging unit.
|
|
2. |
Install the cup holder assembly.
|
|
3. |
Install the floor console upper cover.
|
|
4. |
Connect the negative (-) terminal
|
| [Diagnosis With Diagnostic
Tool] |
|
1. |
In the body electrical system, failure can be quickly diagnosed by using
the vehicle diagnostic system (diagnostic tool).
The diagnostic system(diagnostic tool) provides the following information.
|
(1) |
Fault Code Searching : Checking failure and code number (DTC)
|
|
(2) |
Data Analysis : Checking the system input/output data state
|
|
(3) |
Actuation test : Checking the system operation condition
|
|
(4) |
S/W Management : Controlling other features including system
option setting and zero point adjustment
|
|
|
2. |
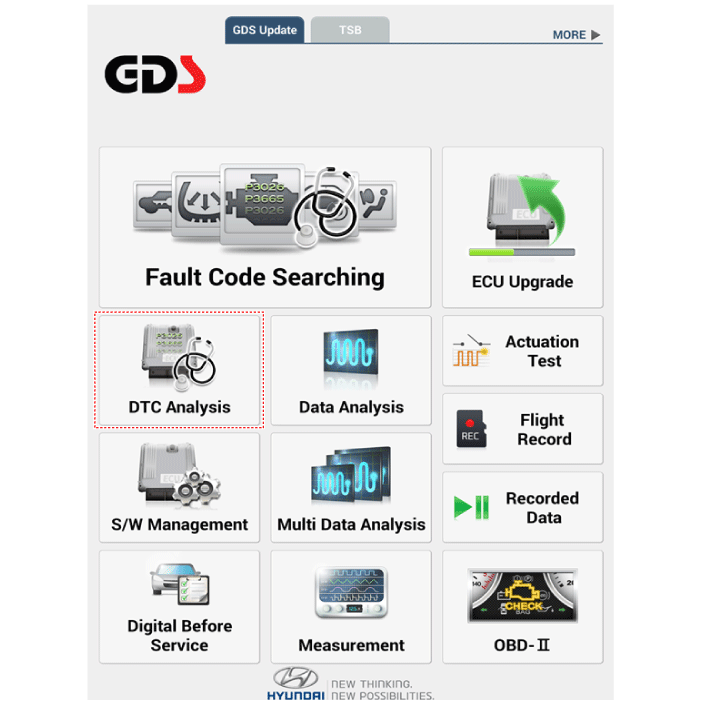
If diagnose the vehicle by diagnostic tool, select "DTC Analysis" and
"Vehicle".
|
|
3. |
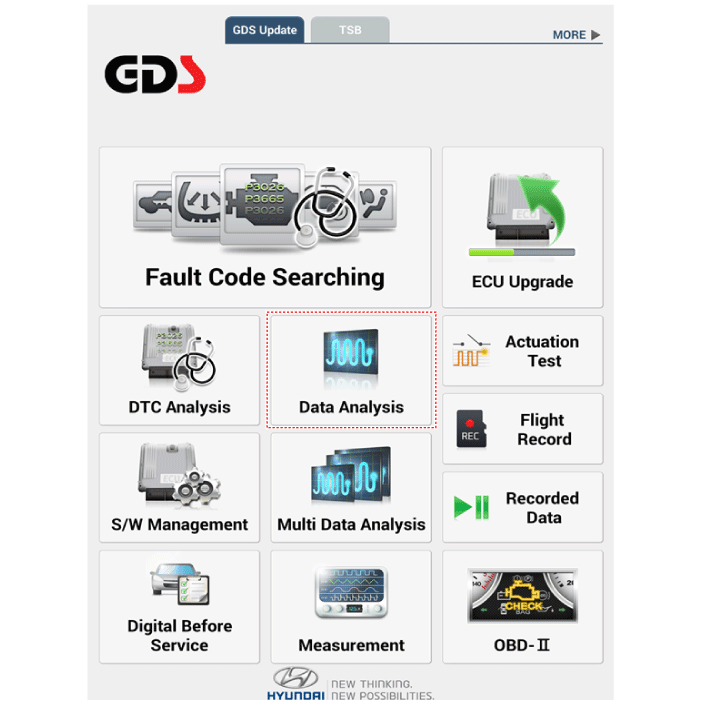
If check current status, select the "Data Analysis" .
|
|
4. |
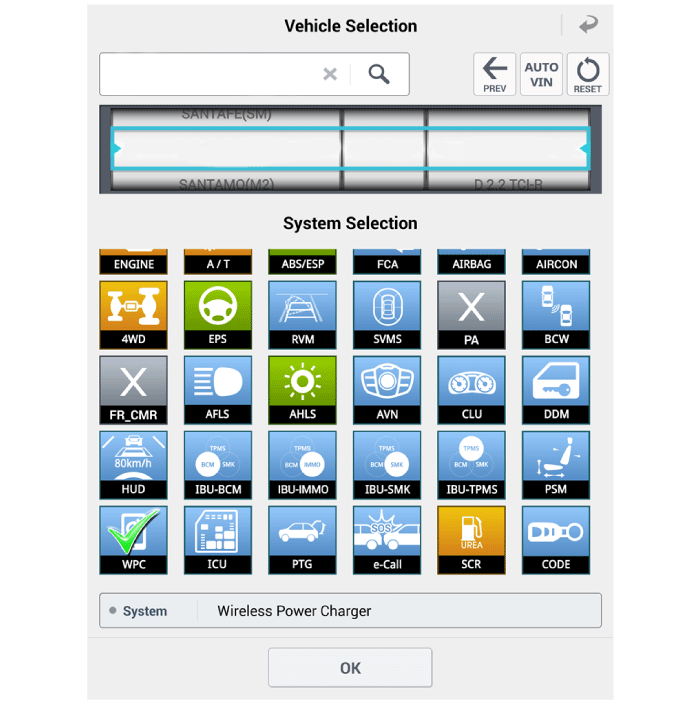
Select the 'WPC' to search the current state of the input/output data.
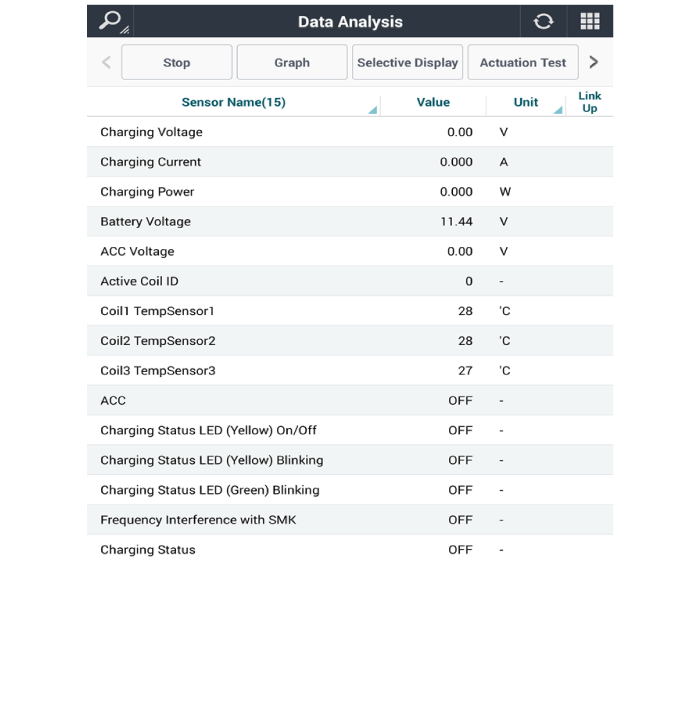
|
|
5. |
To forcibly actuate the input value of the module to be checked, select
option 'Actuation Test'.
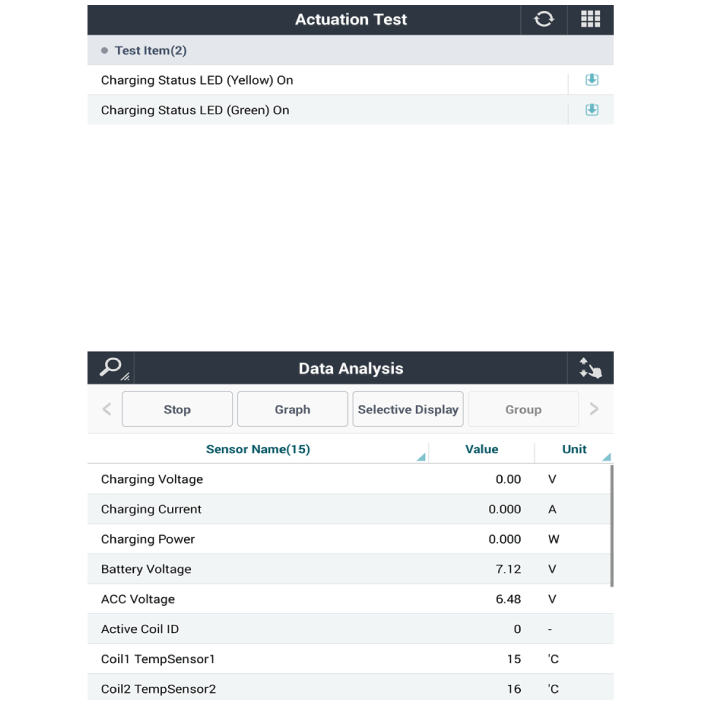
|
Wireless Charging Lamp. Components and positions
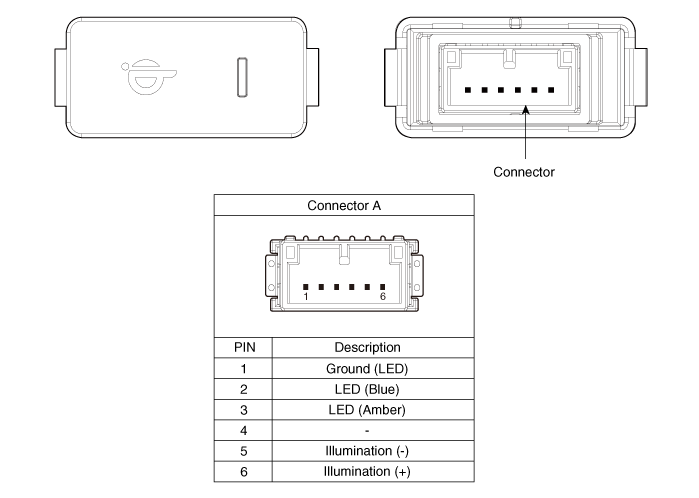
Wireless Charging Lamp. Repair procedures
|
Handling wireless charging system parts by wet hands may cause electric
shock.
|
|
1. |
Disconnect the negative (-) battery terminal.
|
|
2. |
Remove the console upper cover (A).
|
|
3. |
Press the lock pin, separate the connectors (A).
|
|
4. |
Remove the cup holder assembly (A) after loosening mounting screws.
|
|
5. |
Disconnect WPC, USB, WPC lamp connectors.
|
|
6. |
Remove the wireless charging lamp (A) by pushing the fixed clip in the
direction of the arrow as lillustration below
|
|
1. |
Install the wireless charging lamp.
|
|
2. |
Connect the wireless charging lamp connector.
|
|
3. |
Install the floor console upper cover assembly.
|
|
4. |
Connect the negative (-) battery terminal.
|
Description and operation Description An inverter is a device that transforms the DC voltage from the battery into an AC voltage (220 V). The inverter can power various electrical devices that consume ...
See also:
Rear Oil Seal. Repair procedures
Removal 1. Remove the automatic transaxle. 2. Remove the drive plate. 3. Rmove the rear oil sela(A). Installation 1. Install rear oil seal. (1) Apply engine oil to a new oil seal lip. (2) Using SST(09231-H1100, ...
Tires and wheels
Tire care For proper maintenance, safety, and maximum fuel economy, you must always maintain recommended tire inflation pressures and stay within the load limits and weight distribution recommended for ...
Front Radar System
General safety information and caution General Safety Information and Caution 1. Be careful when driving the vehicle using the smart cruise control system as follows. (1) On curves or inclines/declines ...
 Hyundai Santa Fe (TM): Wireless Power Charger System

 AC Inverter System
