Driver Airbag (DAB) Module and Clock Spring. Description and operation
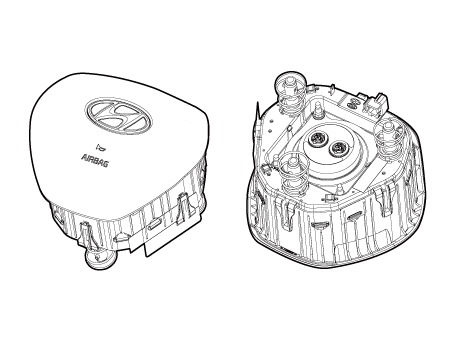
The Driver Airbag (DAB) is installed in the steering wheel and electrically
connected to SRSCM via the clock spring. It protects the driver by deploying
the airbag when frontal crash occurs. The SRSCM determines deployment of the
Driver Airbag (DAB).
| •
|
Never attempt to measure the circuit resistance of the airbag
module (squib) even if you are using the specified tester. If
the circuit resistance is measured with a tester, accidental
airbag deployment will result in serious personal injury.
|
|
Driver Airbag (DAB) Module and Clock Spring. Components and components location
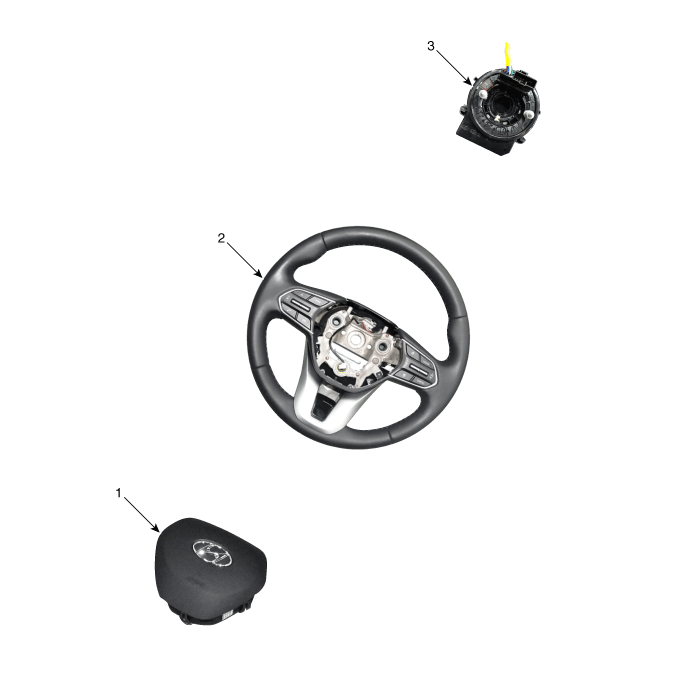
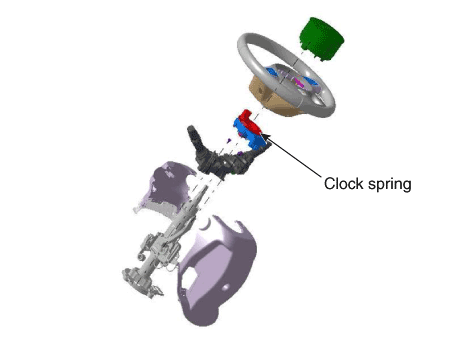
1. Driver Airbag
(DAB)
2. Steering Wheel
|
3. Clock Spring
|
Driver Airbag (DAB) Module and Clock Spring. Repair procedures
|
1. |
Disconnect the battery negative cable and wait for at least three minutes
before beginning work.
|
|
2. |
Put a flat tool (Ø5mm) into a guide hole located in the bottom of steering
wheel and press a spring.
|
• |
When put a tool into a hole, make sure not to damage
an airbag cusion by a tool.
|
|
|
|
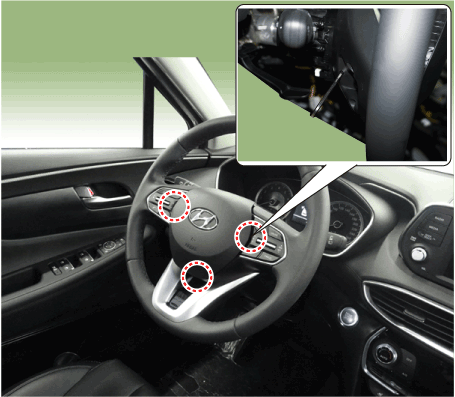
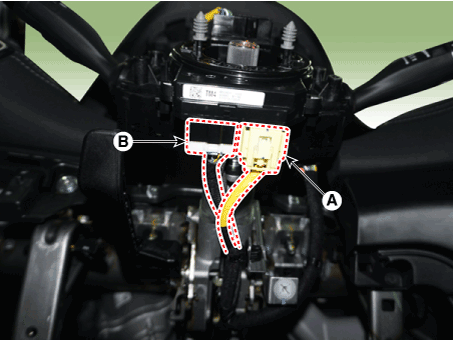
3. |
Release the connector locking (A), then disconnect the driver airbag
module connector (C) and horn connector (B).
|
|
4. |
Remove the steering wheel.
(Refer to Steering System - "Steering Column and Shaft")
|
|
5. |
Loosen the steering wheel column shroud panel.
(Refer to Body - "Steering Wheel Column Shroud Panel")
|
|
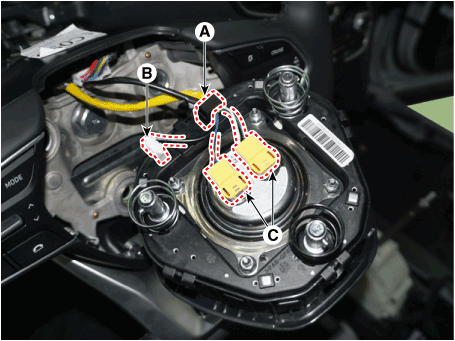
6. |
Disconnect the clock spring (A) and horn connector (B), then remove
the clock spring.
|
Driver Airbag (DAB)
If any improper parts are found during the following inspection, replace the
airbag module with a new one.
| •
|
Never attempt to measure the circuit resistance of the airbag
module (squib) even if you are using a specified tester. If
the circuit resistance is measured with a tester, accidental
airbag deployment will result in serious personal injury.
|
|
|
1. |
Check pad cover for dents, cracks or deformities.
|
|
2. |
Check the airbag module for denting, cracking or deformation.
|
|
3. |
Check hooks and connectors for damage, terminals for deformities, and
harness for binds.
|
|
4. |
Check airbag inflator case for dents, cracks or deformities.
|
Clock Spring
|
1. |
If any improper parts are found during inspection, replace the clock
spring with a new one.
|
|
2. |
Check connectors and protective tube for damage, and terminals for deformities.
|
|
1. |
Set the front tires straight-ahead.
|
|
2. |
Turn the ignition switch OFF.
|
|
3. |
Disconnect the battery negative cable from the battery and wait for
at least three minutes before beginning the work.
|
|
4. |
Connect the clock spring harness connector and horn harness connector
to the clock spring.
|
|
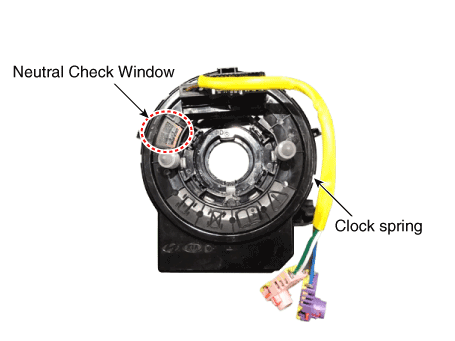
5. |
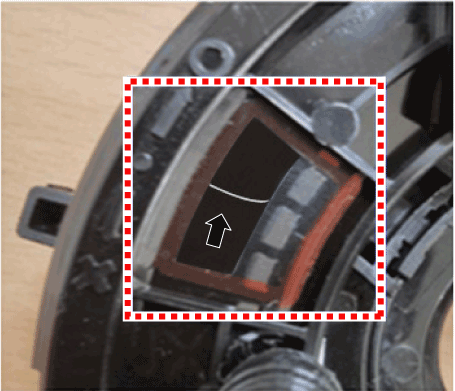
Factory setting for the clock spring is neutral.
| 1) |
If white cable is visible through the product's 10 O' Clock
Neutral Check Window, then the spring is at neutral.
|
| 2) |
If white cable is not visible through the product's 10 O' Clock
Neutral Check Window, then manually adjust the setting to neutral.
|
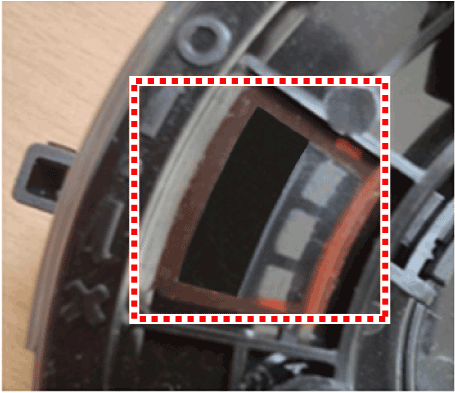
Neutral Check Window : Normal
|
Neutral Check Window : Fault
|
|
|
White cable is visible through 10 O' Clock Neutral Check Window
|
White cable is not visible through 10 O' Clock Neutral Check Window
|
|
|
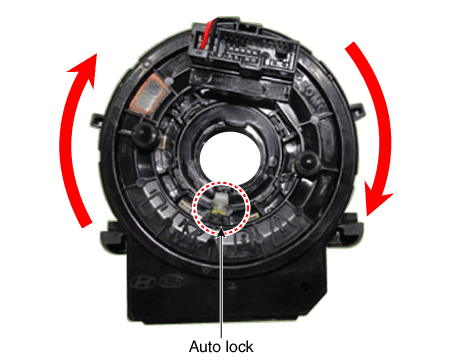
6. |
Clock spring manual neutral setting procedure.
|
(1) |
Press the Auto Lock at 6 O' Clock and turn clockwise 3 rotations.
|
|
(2) |
Press the Auto Lock at 6 O' Clock and turn counter-clockwise
3 rotations.
|
|
(3) |
If white cable is visible through the 10 O' Clock Neutral Check
Window, then the spring is set to neutral.

|
|
|
7. |
Install the steering wheel column shroud and the steering wheel.
(Refer to Steering System - "Steering Column and Shaft")
|
|
8. |
Connect the Driver Airbag (DAB) module connector and horn connector,
and then install the Driver Airbag (DAB) module on the steering wheel.
|
|
9. |
Connect the battery negative cable.
|
|
10. |
After installing the airbag, confirm proper system operation :
| •
|
Turn the ignition switch ON; the SRS indicator light should
be turned on for about six seconds and then go off.
|
| •
|
Make sure horn button works.
|
|
Passenger Airbag (PAB) Module. Description and operation
The passenger airbag (PAB) is installed inside the crash pad and protects the
front passenger in the event of a frontal crash. The SRSCM determines if and
when to deploy the PAB.
| •
|
Never attempt to measure the circuit resistance of the airbag
module (squib) even if you are using a specified tester. If
the circuit resistance is measured with a tester, accidental
airbag deployment will result in serious personal injury.
|
|
Passenger Airbag (PAB) Module. Components and components location
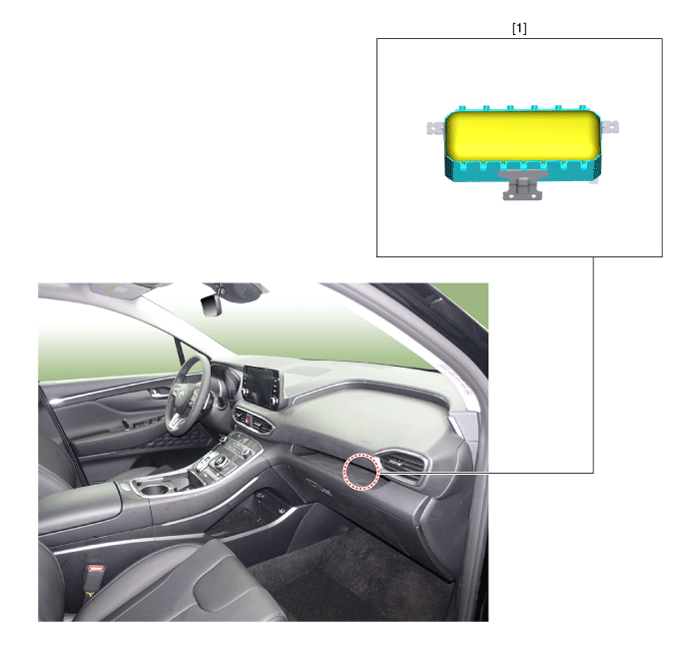
1. Passenger
airbag (PAB)
|
|
Passenger Airbag (PAB) Module. Repair procedures
|
1. |
Disconnect the battery negative cable and wait for at least three minutes
before beginning work.
|
|
2. |
Remove the glove box housing.
(Refer to Body - "Glove Box Housing")
|
|
3. |
Disconnect the passenger airbag connector (A) & (B).

|
|
4. |
Remove the main crash pad.
(Refer to Body - "Main Crash Pad Assembly")
|
• |
Replace the crash pad which is damaged while PAB is
deployed.
|
|
|
|
5. |
Loosen the mounting bolt and then remove the PAB.
|
• |
The removed airbag module should be stored in a clean,
dry place with the airbag cushion up.
|
|
|
|
1. |
Disconnect the battery negative cable from battery and wait for at least
three minutes before beginning work.
|
|
2. |
Place a passenger airbag on the crash pad and tighten the passenger
airbag mounting bolts (A).
|
Tightening torque :
3.9 - 5.9 N.m (0.4 - 0.6 kgf.m, 2.9 - 4.3 lb-ft)
|
|
|
3. |
Install the main crash pad.
(Refer to Body - "Main Crash Pad Assembly")
|
|
4. |
Tighten the passenger airbag mounting bolts and then connect the passenger
airbag harness connector.
|
Tightening torque :
7.8 - 11.8 N.m (0.8 - 1.2 kgf.m, 5.8 - 8.7 lb-.ft)
|
|
|
5. |
install the Glove box housing
(Reper Body - "Glove Box" )
|
|
6. |
Reconnect the battery cable(-)
|
|
7. |
After installing the passenger airbag, confirm proper system operation:
Turn the ignition switch ON; the SRS indicator light should turn on
for about six seconds and then go off.
|
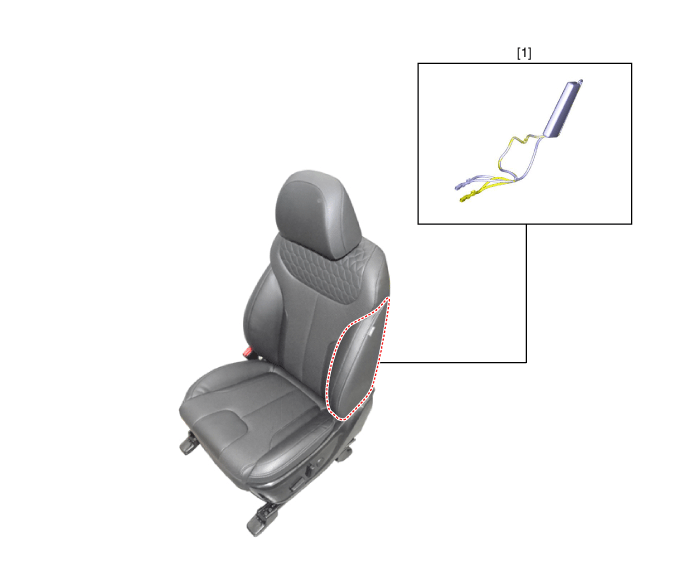
Side Airbag (SAB) Module. Description and operation
The Side Airbags (SAB) are installed inside the front seat and protects the
driver and passenger from danger when a side crash occurs. The SRSCM determines
deployment of the side airbag by using the Side Impact Sensor (SIS) signal.
| •
|
Never attempt to measure the circuit resistance of the airbag
module (squib) even if you are using a specified tester. If
the circuit resistance is measured with a tester, accidental
airbag deployment will result in serious personal injury.
|
|
Side Airbag (SAB) Module. Components and components location
Side Airbag (SAB) Module. Repair procedures
|
1. |
Disconnect the battery negative cable and wait for at least 3 minutes
before beginning work.
|
|
2. |
Remove the front seat assembly.
(Refer to Body - "Front Seat Assembly")
|
|
3. |
Remove the seat back cover.
(Refer to Body - "Front Seat Back Cover")
|
• |
When the front side airbag has deployed after a collision,
replace the seat back as an assembly.
|
|
|
|
4. |
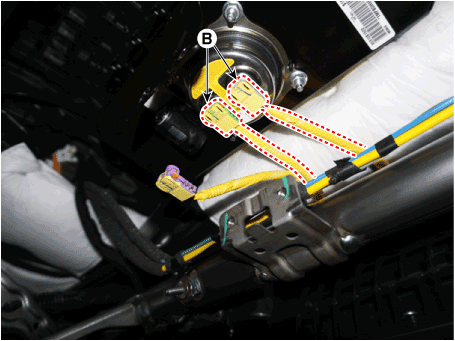
Loosen the SAB mounting nuts and remove the SAB module (A).
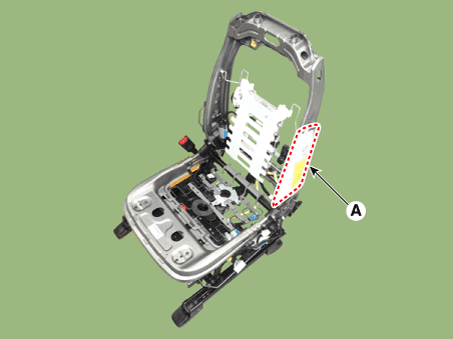
|
• |
The removed airbag module should be stored in a clean
and dry place with the cushion side up.
|
|
|
| •
|
Be sure to install the harness wires so they will not pinch
or interfere with other parts.
|
|
| •
|
Do not open the lid of the side airbag cover.
|
| •
|
Make sure that the airbag assembly cover is installed properly.
Improper installation may prevent a proper deployment.
|
|
|
1. |
Disconnect the battery negative cable and wait for at least three minutes.
|
|
2. |
Place a side airbag on the side airbag frame and tighten the side airbag
mounting bolts.
|
Tightening torque :
7.8 - 11.8 N.m (0.8 - 1.2 kgf.m, 5.7 - 8.7 lb-ft)
|
|
|
3. |
Install a new seat back cover.
(Refer to Body - "Front Seat Back Cover")
|
|
4. |
Install the front seat assembly, and then connect the side airbag harness
connector.
|
|
5. |
After installing the side airbag (SAB), confirm proper system operation:
Turn the ignition switch ON; the SRS indicator light should turn on
for about six seconds and then go off.
|
|
6. |
Install a front seat assembly.
(Refer to Body - "Front Seat Assembly")
|
|
7. |
Recline and slide the front seat forward fully, make sure the harness
wires are not pinched or interfered by other parts.
|
|
8. |
Reconnect the battery negative cable.
|
Curtain Airbag (CAB) Module. Description and operation
Curtain airbags are installed inside the headliner (LH and RH) and protect the
driver and passenger from danger when a side crash occurs. The SRSCM determines
deployment of the curtain airbag by using the side impact sensor (SIS) signal.
| •
|
Never attempt to measure the circuit resistance of the airbag
module even if you are using a specified tester. If the circuit
resistance is measured with a tester, accidental airbag deployment
will result in serious personal injury.
|
|
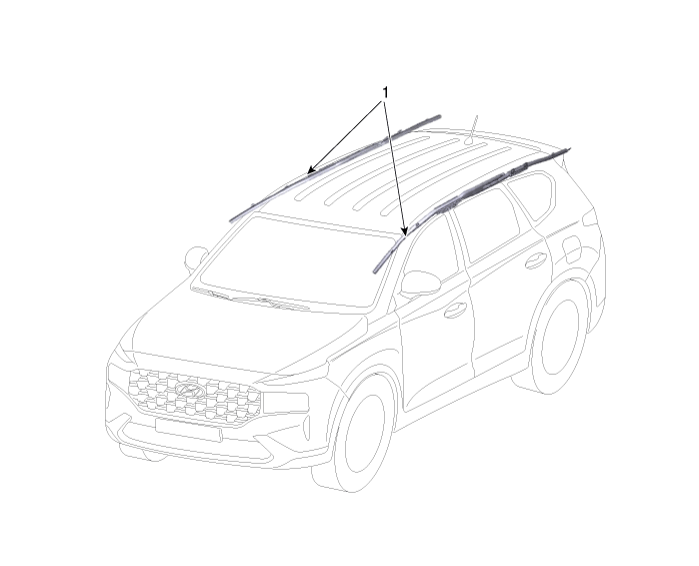
Curtain Airbag (CAB) Module. Components and components location
Curtain Airbag (CAB) Module. Repair procedures
|
1. |
Disconnect the battery negative cable and wait for at least 3 minutes
before beginning work.
|
|
2. |
Remove the roof trim assembly.
(Refer to Body - "Roof Trim Assembly")
|
|
3. |
Disconnect the curtain airbag connector.
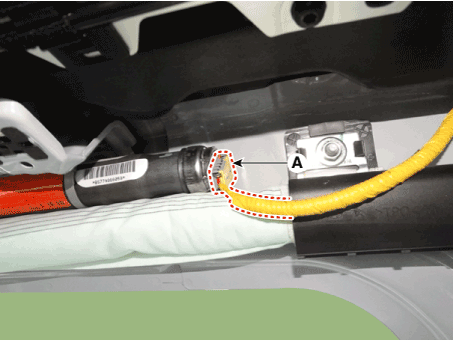
|
|
4. |
After loosening the mounting bolts & nuts remove the curtain airbag.
|
|
1. |
Turn the ignition switch OFF.
|
|
2. |
Disconnect the battery negative cable and wait for at least three minutes.
|
|
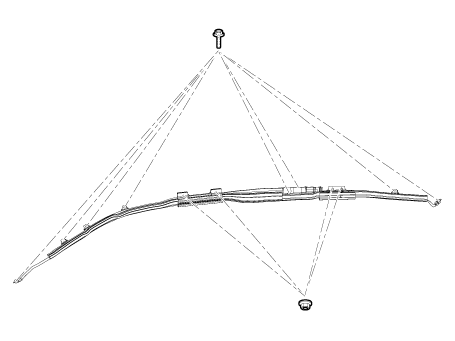
3. |
Tighten the curtain airbag mounting bolts.
|
Tightening torque
Bolts : 7.8 - 11.8 N.m (0.8 - 1.2 kgf.m, 5.8 - 8.7 lb-ft)
Nuts : 3.9 - 5.9 N.m (0.4 - 0.6 kgf.m, 2.9 - 4.3 lb-ft)
|
|
• |
Never twist the airbag module when installing it. If
the module is twisted, the airbag module may operate
abnormally.
|
|
|
|
4. |
Connect the curtain airbag connector.
|
|
5. |
Install the roof trim assembly.
(Refer to Body - "Roof Trim Assembly")
|
|
6. |
Reconnect the battery negative cable.
|
|
7. |
After installing the curtain airbag (CAB), confirm proper system operation:
Turn the ignition switch ON; the SRS indicator light should turn on
for about six seconds and then go off.
|
Airbag Module Disposal. Description and operation
When you scrap a vehicle equipped with an airbag, you must deploy it first.
When you deploy an airbag, you need to have a skilled mechanic do the work.
The used airbag should not be reinstalled in another vehicle for reuse.
| •
|
Upon deployment, the explosion will create a loud noise, so
you have to do it in a proper place not to disturb others.
|
| •
|
When you deploy an airbag, use a specially designated tool and
select a place where there is no electric noise.
|
| •
|
When operating the airbag deployment tool, you must be at least
5 meters away from the airbag.
|
| •
|
Upon deployment, the airbag gives off an intense heat. So wait
for 30 minutes or so before touching it.
|
| •
|
Make sure to use gloves and safety goggles when you deal with
the deployed airbag.
|
| •
|
Do not spread water over the deployed airbag.
|
| •
|
Always wash your hands after the deployment work is completed.
|
|
Deploying Airbags in the Vehicle
|
1. |
Turn the ignition switch OFF, and disconnect the battery negative cable
and wait at least three minutes.
|
|
2. |
Confirm that each airbag or side airbag is securely mounted.
|
|
3. |
Confirm that the special tool is functioning properly by following the
check procedure.
|
(1) |
Disconnect the 2P connector between the airbag and wire harness.
|
|
(2) |
Install the SST
|
• |
For the driver airbag, separate the 2-pin connector
from it and connect the deployment adapter to reattach
it on the steerin-g wheel.
|
|
|
|
4. |
Locate the airbag deployment tool at a place at least 5 meters away
from the airbag.
|
|
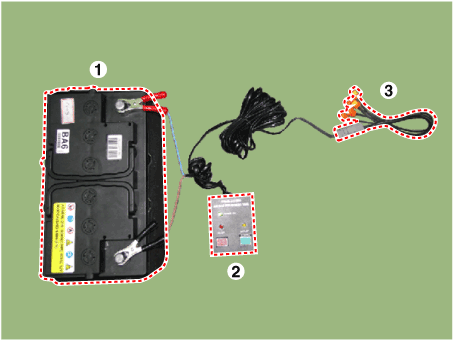
5. |
After connecting the deployment adapter with the deployment tool (0957A-34100A),
connect it to the external battery for deployment.
|
(2) |
Deployment tool (0957A-34100A)
|
|
(3) |
Deployment adapter
|
– |
DAB, PAB, CAB, BPT (0957A-AL140)
|
|
|
|
6. |
Switch on the deployment tool to proceed with deployment.
|
(1) |
If the battery is connected, the POWER ON (1) light will be
on.
|
|
(2) |
Press and hold READY (2) until it is on, and then press DEPLOY
(3) to deploy the airbag.
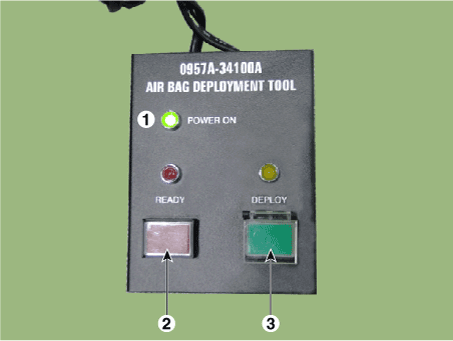
|
• |
Upon deployment, the airbag will create a loud
noise and you can see it suddenly expand and
contract slowly.
|
|
|
|
|
7. |
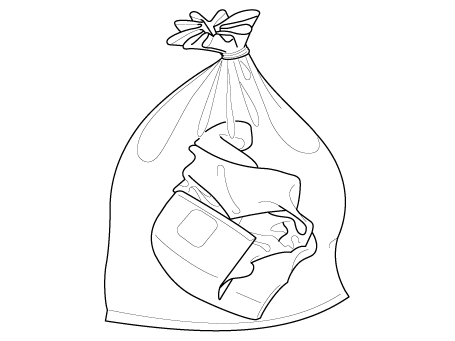
Dispose of the complete airbag. No parts can be reused. Place it in
a sturdy plastic bag and seal it securely.
|
Deploying the Airbag Out of the Vehicle
In case the airbag is separated from a scrapped car, or when you find defects
or damages on it, you have to deploy it as follows :
|
1. |
Place the airbag deployment module face upward on a flat surface outdoor.
|
• |
If the airbag deployment module were face downward,
the airbag will pop up and cause damage to people around
it.
|
|
|
|
2. |
Get ready to deploy the airbag as follows:
|
(1) |
Separate the 2-pin connecter of the airbag from the vehicle.
|
|
(2) |
Connect the deployment adapter.
|
• |
For the driver airbag, separate the 2-pin connector
from it and connect the deployment adapter to reattach
it on the steering wheel.
|
|
|
|
3. |
Locate the airbag deployment tool at a place at least 5 meters away
from the airbag.
|
|
4. |
After connecting the deployment adapter (0957A-AL140, 0957A-AL150, 0957A-3T200)
with the deployment tool (0957A-34100A), connect it to the external
battery (12V) for deployment.
|
(2) |
Airbag Deploy (0957A-34100A)
|
|
(3) |
Deployment adapter
|
– |
DAB, PAB, CAB, BPT (0957A-AL140)
|
|
• |
When EFD are deployed, broken parts are exploded
and scattered.
|
|
• |
EFD (Emergency Fastening Device) must be placed
in the piled up 5 tires to avoid exploded broken
parts.
|
|
• |
Technicians should wear an eye protector and
extremely be cautions of exploded broken parts.
|
|
|
|
|
5. |
Switch on the deployment tool to proceed with deployment.
|
(1) |
If the battery is connected, the POWER ON (1) light will be
on.
|
|
(2) |
Press and hold READY (2) until it is on, and then press DEPLOY
(3) to deploy the airbag.
|
|
|
6. |
Dispose of the complete airbag. No parts can be reused. Place it in
a sturdy plastic bag and seal it securely.
|
Disposal of Damaged Airbag (Not Deployed Airbag)
|
1. |
Turn the ignition switch OFF, and disconnect the battery negative cable
and wait at least three minutes.
|
|
2. |
If installed airbags in a vehicle, follow the removal procedure of damaged
airbag.
|
|
3. |
If the removed parts have a lead wire, make a short circuit by twisting
together the two airbag inflator wires.
|
|
4. |
Package the airbag in exactly the same packing that the new replacement
part come in.
|
|
5. |
Mark the outside of the box "DAMAGED AIRBAG NOT DEPLOYED" so it does
not get confused with your parts stock.
|
Components and components location Components 1. Supplemental Restraint System Control Module (SRSCM) 2. Gravity side impact sensor (G-SIS) _ C pillar 3. Gravity side impact sensor (G-SIS) _ B pillar 4. ...
Seat Belt Pretensioner (BPT). Description and operation Description The Seat Belt Pretensioners (BPT) are installed inside center pillar (LH & RH). When a vehicle crashes with a certain degree of frontal ...
See also:
Special service tools
Special Service Tools Tool Name / Number Illustration Description LKA Compensator (09890-3V100) Used for compensating front view camera unit Vertical measuring instrument (09964-C1200) Used to measure ...
Outside Rear View Components and Components Location
Component Location 1. Outside rear view mirror ...
Alternator. Repair procedures
Removal 1. Disconnect the battery negative terminal. 2. Disconnect the air compressor connector (A) and the alternator connector (B), and remove the cable from alternator "B" terminal (C). 3. ...
 Hyundai Santa Fe (TM): Airbag Module


 SRSCM
SRSCM Seat Belt Pretensioner