Components and components location
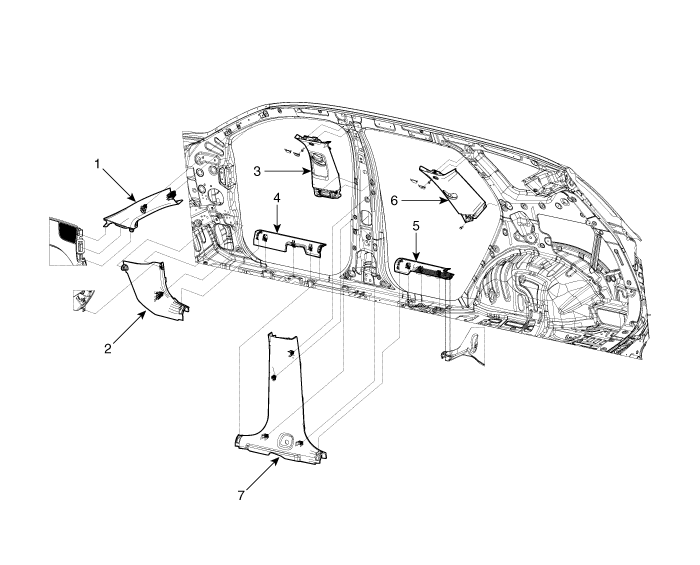
1. Front pillar
trim
2. Cowl side trim
3. Center pillar upper trim
4. Front door scuff trim
|
5. Rear door
scuff trim
6. Rear pillar trim
7. Center pillar lower trim
|
Door Scuff Trim. Components and components location
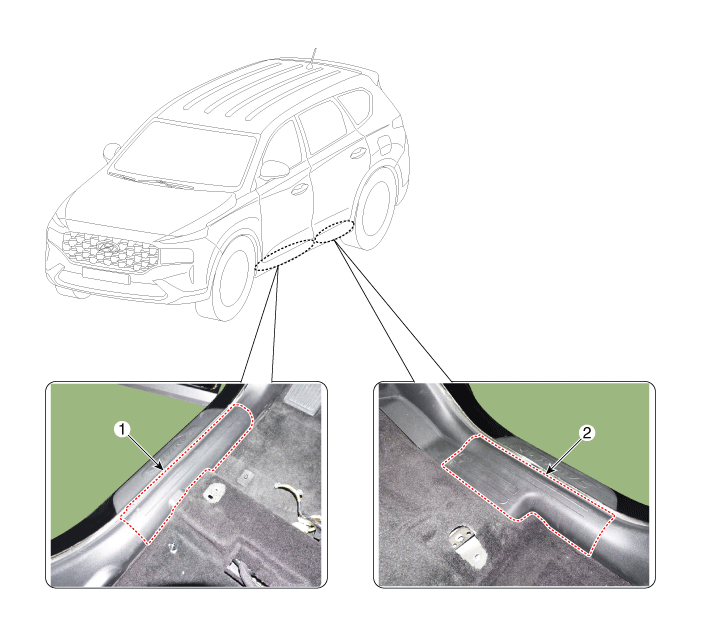
1. Front Door
Scuff Trim
|
2. Rear Door
Scuff Trim
|
Door Scuff Trim. Repair procedures
| •
|
Put on gloves to prevent hand injuries.
|
|
| •
|
When removing with a flat-tip screwdriver or remover, wrap protective
tape around the tools to prevent damage to components.
|
| •
|
When removing the interior trim pieces, use a plastic panel
removal tool not to damage the surface.
|
| •
|
Take care not to bend or scratch the trim and panels.
|
|
[Front]
|
1. |
Remove the front door body side weatherstrip.
|
|
2. |
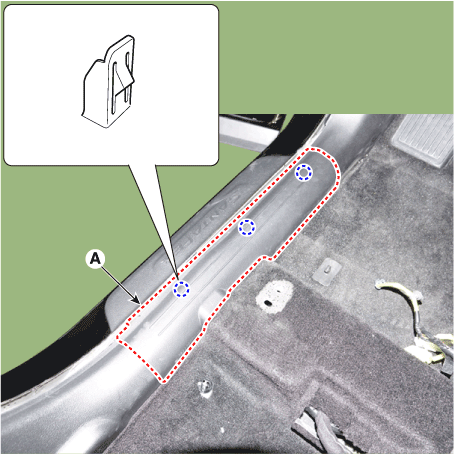
Using a screwdriver or remover and remove the front door scuff trim
(A).
|
|
3. |
To install, reverse removal procedure.
|
• |
Replace any damaged clips (or pin-type retainers).
|
|
|
[Rear]
|
1. |
Remove the rear door body side weatherstrip.
|
|
2. |
Remove the rear seat cusion assembly.
(Refer to Rear seat -"Rear Seat Assembly")
|
|
3. |
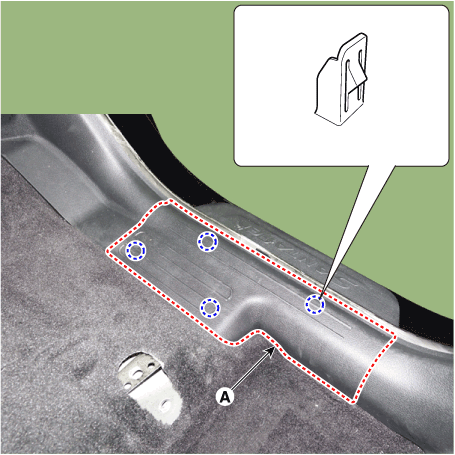
Using a screwdriver and remove the rear door scuff trim (A).
|
|
4. |
To install, reverse removal procedure.
|
• |
Replace any damaged clips (or pin-type retainers).
|
|
|
Door Step Trim. Components and components location
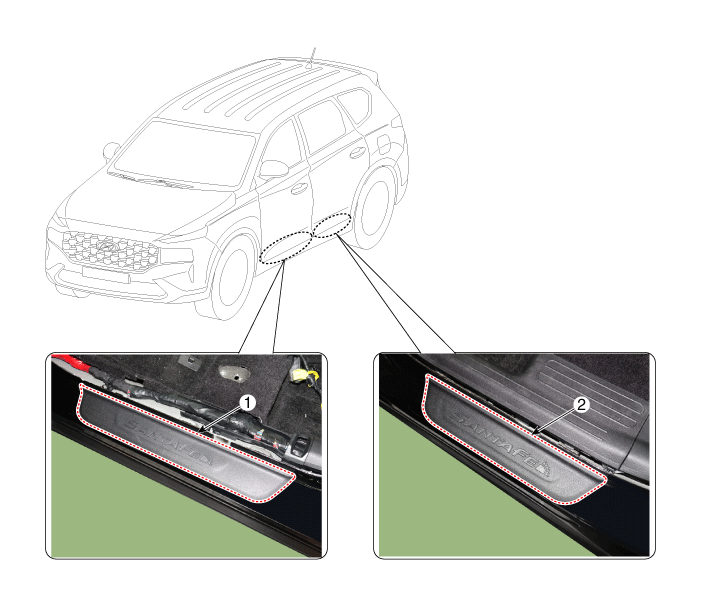
1. Front Door
Step Trim
|
2. Rear Door
Step Trim
|
Door Step Trim. Repair procedures
| •
|
Put on gloves to protect your hands.
|
|
| •
|
When prying with a flat-tip screwdriver, wrap it with protective
tape, and apply protective tape around the related parts, to
prevent damage.
|
| •
|
Use a plastic panel removal tool to remove interior trim pieces
to protect from marring the surface.
|
| •
|
Take care not to bend or scratch the trim and panels.
|
|
|
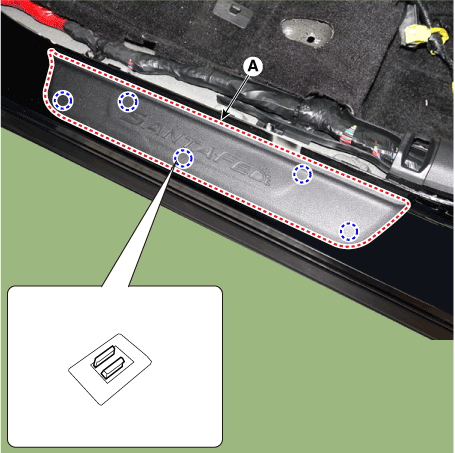
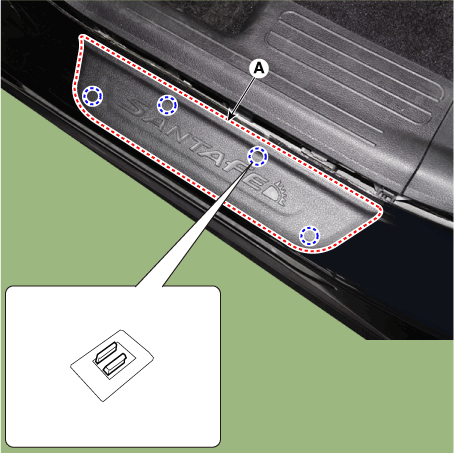
1. |
Using a screwdriver or remover and remove the front door step trim (A).
[Front]
[Rear]
|
|
2. |
To install, reverse removal procedure.
|
• |
Replace any damaged clips.
|
|
|
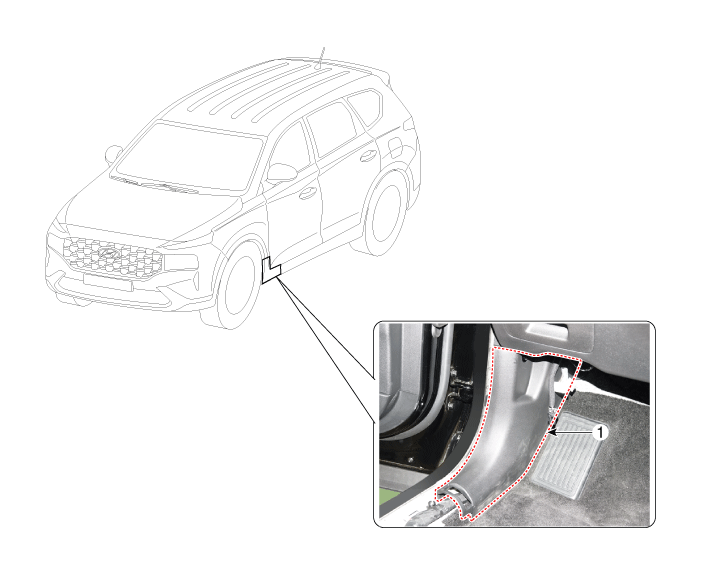
Cowl Side Trim. Components and components location
Cowl Side Trim. Repair procedures
| •
|
Put on gloves to prevent hand injuries.
|
|
| •
|
When removing with a flat-tip screwdriver or remover, wrap protective
tape around the tools to prevent damage to components.
|
| •
|
When removing the interior trim pieces, use a plastic panel
removal tool not to damage the surface.
|
| •
|
Take care not to bend or scratch the trim and panels.
|
|
|
1. |
Remove the front door scuff trim.
(Refer to Interior Trim - "Door Scuff Trim")
|
|
2. |
Remove the hood latch release handle.
(Refer to Hood - "Hood Latch Release Handle")
|
|
3. |
Carefully remove the front door body side weatherstrip.
|
|
4. |
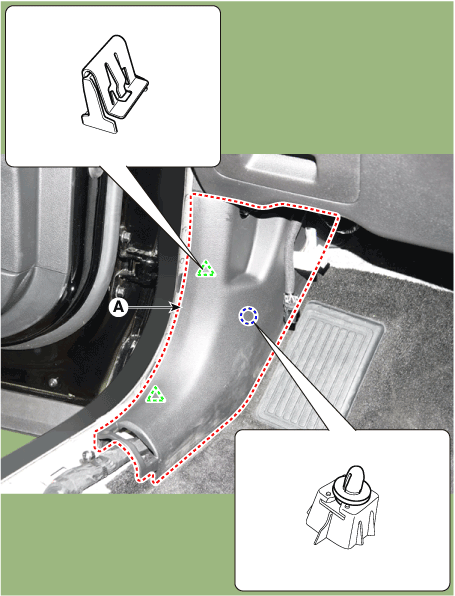
Using a screwdriver or remover, remove the cowl side trim (A).
|
|
5. |
To install, reverse removal procedure.
|
• |
Replace any damaged clips (or pin-type retainers).
|
|
|
Front Pillar Trim. Components and components location
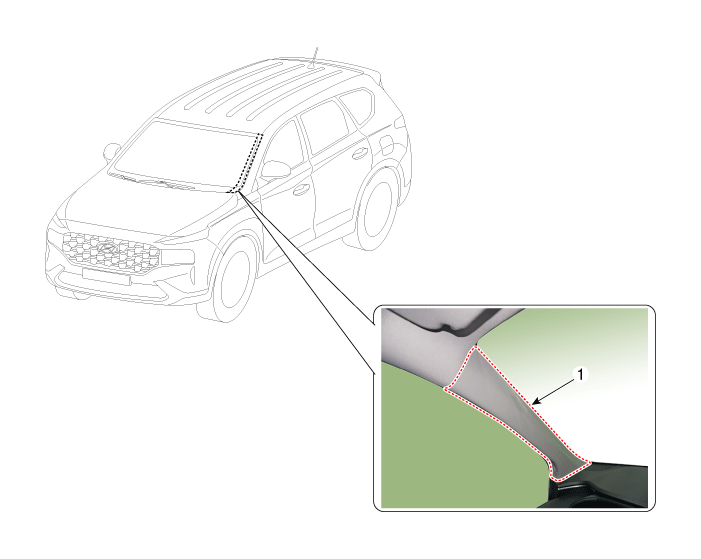
Front Pillar Trim. Repair procedures
| •
|
Put on gloves to prevent hand injuries.
|
|
| •
|
When removing with a flat-tip screwdriver or remover, wrap protective
tape around the tools to prevent damage to components.
|
| •
|
When removing the interior trim pieces, use a plastic panel
removal tool not to damage the surface.
|
| •
|
Take care not to bend or scratch the trim and panels.
|
|
|
1. |
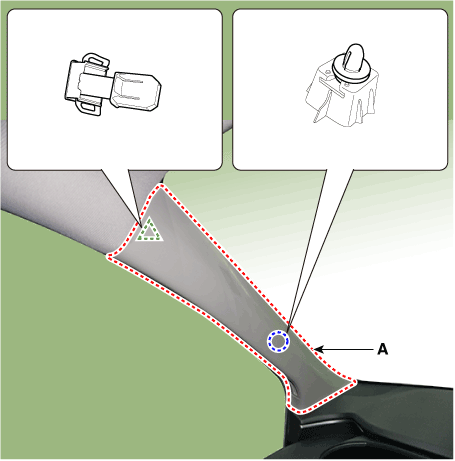
Remove the front pillar trim.
|
(1) |
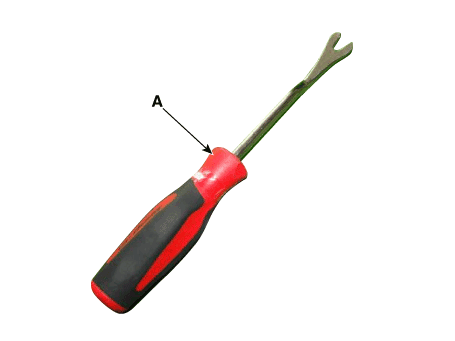
To remove the front pillar trim, the fastener remover (A) below
must be used.
|
|
(2) |
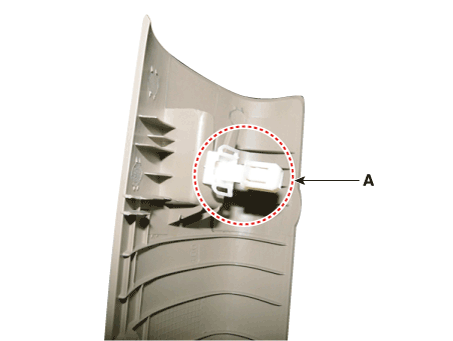
After slightly lifting up the front pillar trim and putting
the tool in, remove the mounting clip (A) by pulling it.
|
• |
Once the front pillar trim is removed, be sure
to replace the clips with new ones.
|
|
|
|
(3) |
Remove the front pillar trim (A).
|
|
|
2. |
To install, reverse removal procedure.
|
• |
Replace any damaged clips (or pin-type retainers).
|
|
|
Center Pillar Trim. Components and components location
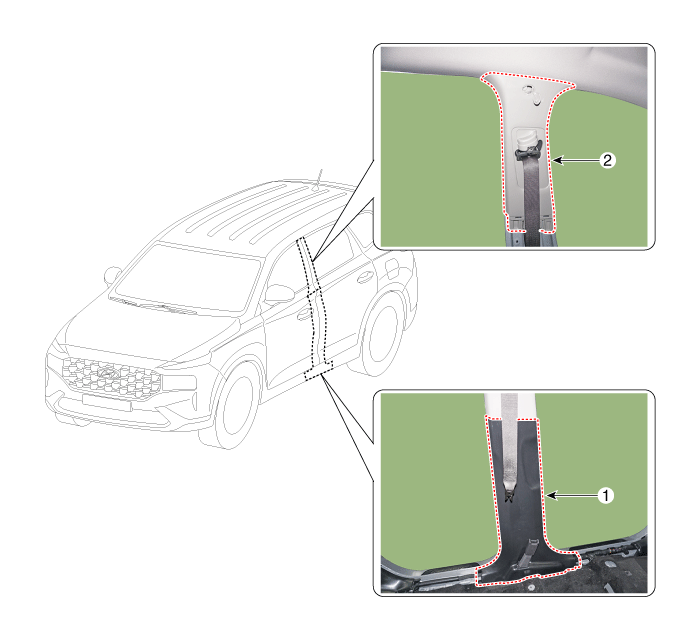
1. Center Pillar
Lower Trim
|
2. Center Pillar
Upper Trim
|
Center Pillar Trim. Repair procedures
[Center pillar lower trim]
| •
|
Put on gloves to prevent hand injuries.
|
|
| •
|
When removing with a flat-tip screwdriver or remover, wrap protective
tape around the tools to prevent damage to components.
|
| •
|
When removing the interior trim pieces, use a plastic panel
removal tool not to damage the surface.
|
| •
|
Take care not to bend or scratch the trim and panels.
|
|
|
1. |
Remove the front door scuff trim.
(Refer to Interior Trim -"Door Scuff Trim")
|
|
2. |
Remove the rear door scuff trim.
(Refer to Interior Trim -"Rear Scuff Trim")
|
|
3. |
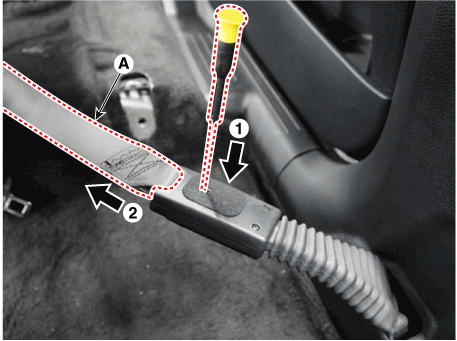
Remove the front seat belt anchor (A).
|
• |
When installing the connector, be sure to insert it
to the anchor pretensioner until "Click" sound is heard
and then check it for secure installation by pulling
it.
|
|
|
|
4. |
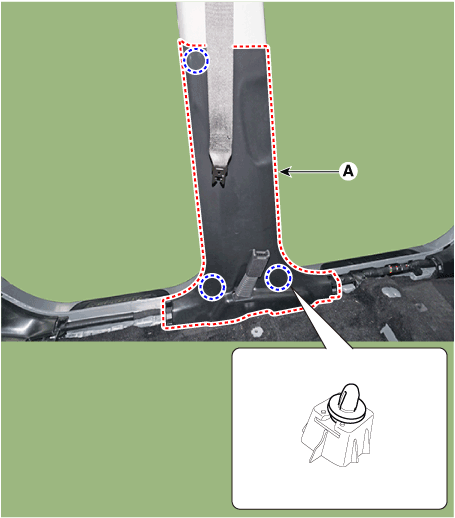
Using a remover and remove the center pillar lower trim (A)
|
|
5. |
To install, reverse removal procedure.
|
• |
Replace any damaged clips (or pin-type retainers).
|
|
|
[Center pillar upper trim]
| •
|
Put on gloves to prevent hand injuries.
|
|
| •
|
When removing with a flat-tip screwdriver or remover, wrap protective
tape around the tools to prevent damage to components.
|
| •
|
When removing the interior trim pieces, use a plastic panel
removal tool not to damage the surface.
|
| •
|
Take care not to bend or scratch the trim and panels.
|
|
|
1. |
Remove the center pillar lower trim.
(Refer to Interior Trim -"Center Pillar Lower Trim")
|
|
2. |
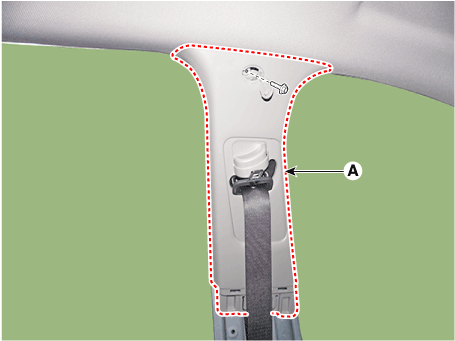
Loosen the mounting bolt and remove the center pillar upper trim (A).
|
|
3. |
To install, reverse removal procedure.
|
• |
Replace any damaged clips (or pin-type retainers).
|
|
|
Rear Pillar Trim. Components and components location
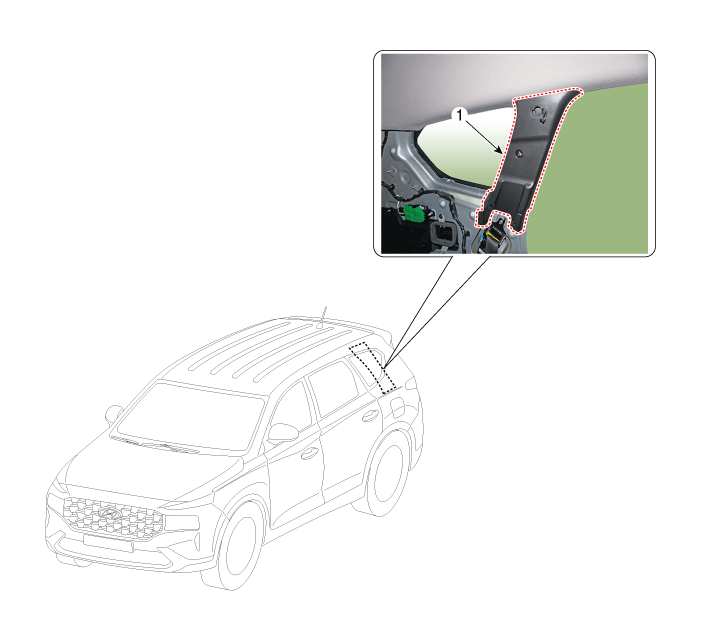
Rear Pillar Trim. Repair procedures
| •
|
Put on gloves to prevent hand injuries.
|
|
| •
|
When removing with a flat-tip screwdriver or remover, wrap protective
tape around the tools to prevent damage to components.
|
| •
|
When removing the interior trim pieces, use a plastic panel
removal tool not to damage the surface.
|
| •
|
Take care not to bend or scratch the trim and panels.
|
| •
|
Once the rear pillar trim is removed, be sure to replace the
clips with new ones.
|
|
|
1. |
Remove the luggage side trim.
(Refer to Interior Trim - "Luggage Side Trim")
|
|
2. |
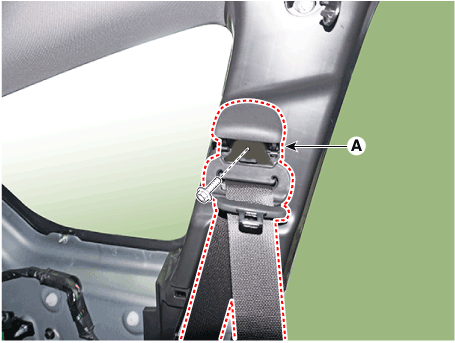
After loosening the mounting bolt and remove the second row seat belt
upper anchor (A).
|
|
3. |
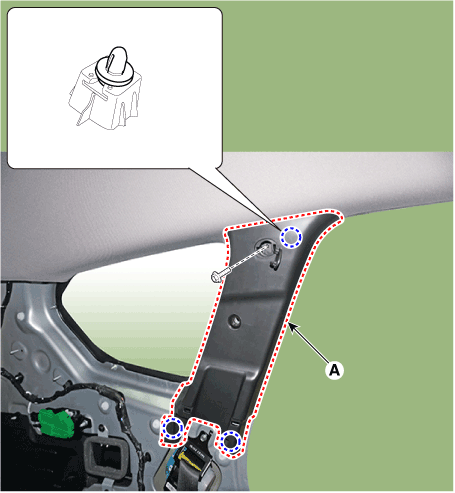
After loosening the mounting bolts, remove the rear pillar trim (A).
|
|
4. |
To install, reverse removal procedure.
|
• |
Replace any damaged clips (or pin-type retainers).
|
|
• |
Once the front pillar trim is removed, be sure to replace
the clip (B) with new ones.
|
|
|
Components and components location Components [General Type] 1. Sunvisor 2. Roof trim Components [Panorama Sunroof Type] 1. Sunvisor 2. Roof trim Sunvisor. Components and components location Component ...
Components and components location Components [5 seat vehicle] 1. Luggage side trim [LH] 2. Luggage side trim [RH] 3. Rear transverse trim 4. Cargo screen 5. Luggage floor tray 6. Luggage board 7. Luggage ...
See also:
California perchlorate notice
Perchlorate Material-special handling may apply, See www.dtsc.ca.gov/hazardouswaste/ perchlorate. Notice to California Vehicle Dismantlers: Perchlorate containing materials, such as air bag inflators, ...
Headlamp bulb
WARNING - Halogen bulbs Halogen bulbs contain pressurized gas that will produce flying pieces of glass if broken. Always handle them carefully, and avoid scratches and abrasions. If the bulbs are lit, ...
How to use this manual
We want to help you get the greatest possible driving experience from your vehicle. Your Owner’s Manual can assist you in many ways. We strongly recommend that you read the entire manual. In order to ...
 Hyundai Santa Fe (TM): Interior Trim


 Roof Trim
 Trunk Trim


