 Hyundai Santa Fe (TM): Lighting System
Components and components location
| Component Location |

| 1. Head lamp
(Low) 2. Head lamp (High) 3. Daytime running light (DRL)/Positioning lamp 4. Turn signal lamp 5. Head lamp (ADD Low) |
6. Side repeater
lamp 7. Overhead console lamp 8. Vanity lamp 9. Room lamp 10. Luggage lamp |
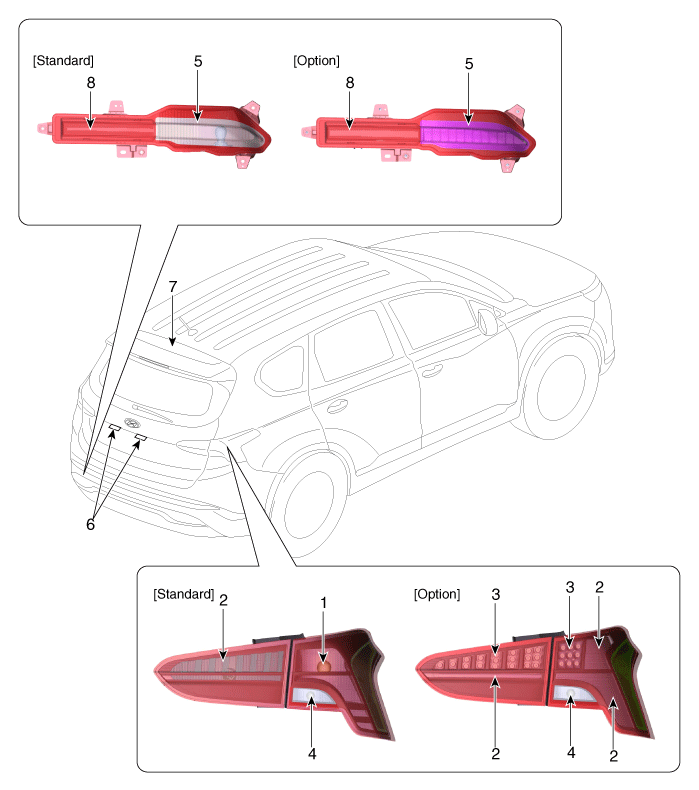
| 1. Stop/Tail
lamp 2. Tail lamp 3. Stop lamp 4. Back up lamp |
5. Turn signal
lamp 6. License plate lamp 7. High mounting stop lamp 8. Rear fog lamp |
Troubleshooting
| Troubleshooting |
|
Symptom |
Possible cause |
Remedy |
|
One lamp does not light (all exterior) |
Bulb burned out |
Replace bulb |
|
Socket, wiring or ground faulty |
Repair if necessary |
|
|
Head lamps do not light |
Bulb burned out |
Replace bulb |
|
Ignition fuse (LOW:10A, HIGH:20A) blown |
Check for short and replace fuse |
|
|
Head lamp fuse (15A) blown |
Check for short and replace fuse |
|
|
Head lamp relay faulty |
Check relay |
|
|
Lighting switch faulty |
Check switch |
|
|
Wiring or ground faulty |
Repair if necessary |
|
|
Tail lamps and license plate lamps do not light |
Bulb burned out |
Replace bulb |
|
Tail lamp fuse (10A) blown |
Check for short and replace fuse |
|
|
Tail lamp relay faulty |
Check relay |
|
|
Lighting switch faulty |
Check switch |
|
|
Wiring or ground faulty |
Repair if necessary |
|
|
Stop lamps do not light |
Bulb burned out |
Replace bulb |
|
Stop lamp fuse (15A) blown |
Check for short and replace fuse |
|
|
Stop lamp switch faulty |
Adjust or replace switch |
|
|
Wiring or ground faulty |
Repair if necessary |
|
|
Stop lamps do not turn off |
Stop lamp switch faulty |
Repair or replace switch |
|
Instrument lamps do not light (Tail lamps light) |
Rheostat faulty |
Check rheostat |
|
Wiring or ground faulty |
Repair if necessary |
|
|
Turn signal lamp does not flash on one side |
Bulb burned out |
Replace bulb |
|
Turn signal switch faulty |
Check switch |
|
|
Wiring or ground faulty |
Repair if necessary |
|
|
Turn signal lamps do not light |
Bulb burned out |
Replace bulb |
|
Turn signal lamp fuse (10A) blown |
Check for short and replace fuse |
|
|
Flasher unit faulty |
Check flasher unit |
|
|
Turn signal switch faulty |
Check switch |
|
|
Wiring or ground faulty |
Repair if necessary |
|
|
Hazard warning lamps do not light |
Bulb burned out |
Replace bulb |
|
Hazard warning lamp fuse (15A) blown |
Check for short and replace fuse |
|
|
Flasher unit faulty |
Check flasher unit |
|
|
Hazard switch faulty |
Check switch |
|
|
Wiring or ground faulty |
Repair if necessary |
|
|
Flasher rate too slow or too fast |
Lamps' wattages are smaller or larger than specified |
Replace lamps |
|
Flasher unit faulty |
Check flasher unit |
|
|
Back up lamps do not light |
Bulb burned out |
Replace bulb |
|
Back up lamp fuse (10A) blown |
Check for short and replace fuse |
|
|
Back up lamp switch (M/T) faulty |
Check switch |
|
|
Transaxle range switch (A/T) faulty |
Check switch |
|
|
Wiring or ground faulty |
Repair if necessary |
|
|
Room lamp does not light |
Bulb burned out |
Replace bulb |
|
Room lamp fuse (10A) blown |
Check for short and replace fuse |
|
|
Room lamp switch faulty |
Check switch |
|
|
Wiring or ground faulty |
Repair if necessary |
|
|
Rear fog lamps do not light |
Bulb burned out |
Replace bulb |
|
Rear fog lamp fuse blown |
Check for short and replace fuse |
|
|
Rear fog lamp relay faulty |
Check relay |
|
|
Rear fog lamp switch faulty |
Check switch |
|
|
Wiring or ground faulty |
Repair if necessary |
|
|
Wiring or ground faulty |
Repair if necessary |
|
|
Map lamp does not light |
Bulb burned out |
Replace bulb |
|
Room lamp fuse (10A) blown |
Check for short and replace fuse |
|
|
Map lamp switch faulty |
Check switch |
|
|
Wiring or ground faulty |
Repair if necessary |
|
|
Trunk room lamp does not light |
Bulb burned out |
Replace bulb |
|
Room lamp fuse (10A) blown |
Check for short and replace fuse |
|
|
Trunk room lamp switch faulty |
Check switch |
|
|
Wiring or ground faulty |
Repair if necessary |
Specifications
| Specifications |
|
Items |
Bulb Type |
Bulb Wattage (W) |
||
|
Front |
Head lamp (STD) |
Low |
LED |
LED |
|
High |
LED |
LED |
||
|
Head lamp (Option) |
Low |
LED |
LED |
|
|
High |
LED |
LED |
||
|
Turn signal lamp (STD) |
PY21W |
21 |
||
|
Turn signal lamp |
Standard |
PY21W |
21 |
|
|
Option |
LED |
LED |
||
|
Position lamp |
LED |
LED |
||
|
Daytime Running Lamp (DRL) |
LED |
LED |
||
|
Door mirror turn signal lamp |
LED |
LED |
||
|
Rear |
High mounted stop lamp |
LED |
LED |
|
|
Rear combination lamp (STD) |
Stop/ Tail lamp |
PY21/5W |
21 |
|
|
Tail lamp |
W5W |
5 |
||
|
Rear combination lamp (Option) |
Stop |
LED |
LED |
|
|
Tail lamp |
LED |
LED |
||
|
Turn signal lamp |
PY21W |
21 |
||
|
Rear fog lamp |
LED |
LED |
||
|
Back up lamp |
W16W |
16 |
||
|
License plate lamp |
W5W |
5 |
||
|
Cargo lamp |
FESTOON |
5 |
||
|
Map lamp |
FESTOON |
STD : 10 / LED |
||
|
Room lamp |
FESTOON |
10 |
||
|
Vanity lamp |
FESTOON |
5 |
||
Head Lamps. Repair procedures
| Removal |
Head lamps become very hot during use; do not touch them or any attaching
hardware immediately after they have been turned off.
|

The headlamp bulb should not be removed from the headlamp assembly until
just before a new bulb is installed.
Removing bulb for an extended period of time may affect headlamp bulb
performance.
Contaminants may enter the headlamp assembly where they can settle on
the lens and reflector.
Never turn on the head lamps with the bulb removed from the headlamp
assembly.
|

| 1. |
Disconnect the negative (-) battery terminal.
|
| 2. |
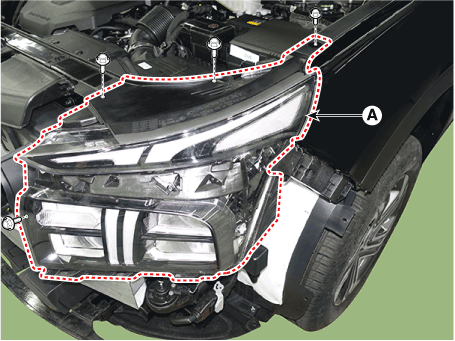
Remove the front bumper cover.
(Refer to Body - "Front Bumper Cover")
|
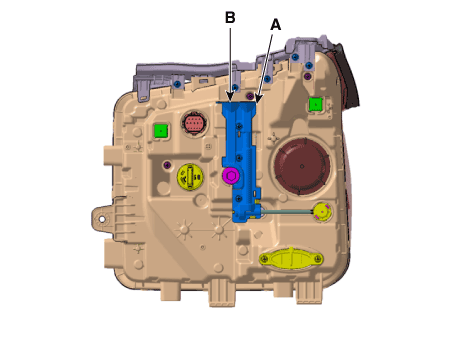
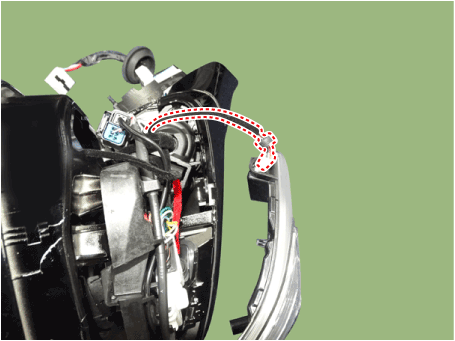
| 3. |
Disconnecting the lamp connectors (A).
|

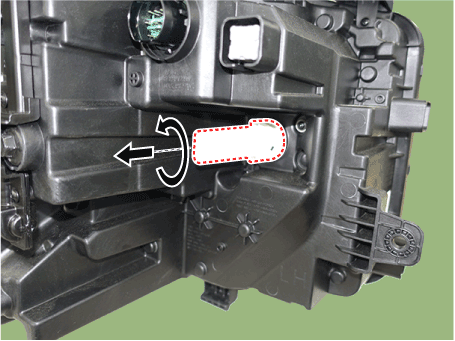
| 4. |
Loosen the mounting bolts and then remove the head lamp assembly (A).
|
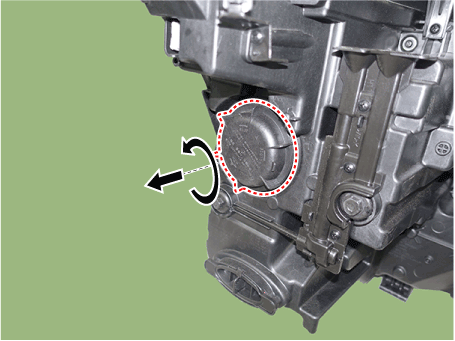
| 5. |
Disconnect the connector and then remove the bulb.
|
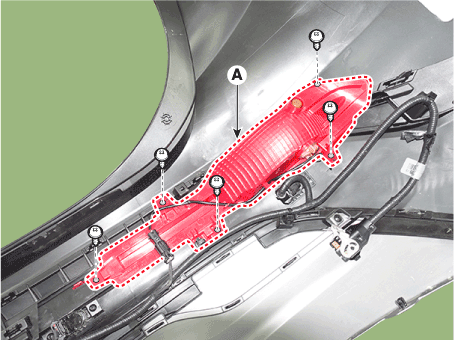
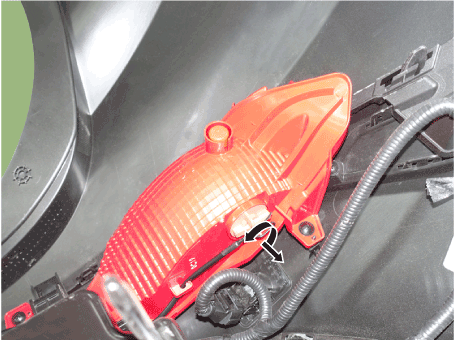
[Moisture absorbent of the head lamp]
| 1. |
Unfasten the screws and then replace the moisture-absorbing agent .
|
| Installation |
| 1. |
Install the head lamp bulbs.
|
| 2. |
Reassemble the head lamp bulb covers.
|
| 3. |
Reassemble the head lamp assembly after connecting the lamp connector.
|
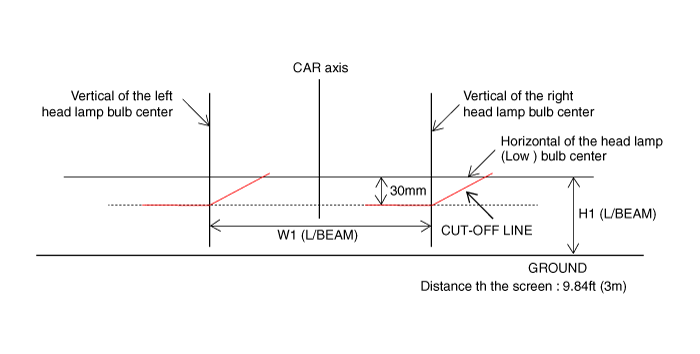
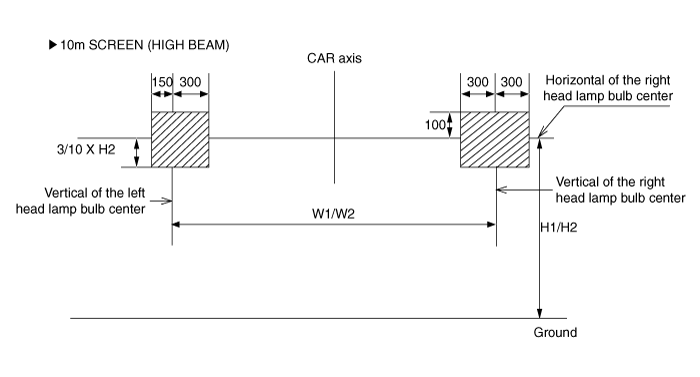
| Head Lamp Aiming Instructions |
| 1. |
Alternately turn the adjusting gear to adjust the head lamp aiming.
If beam-setting equipment is not available, proceed as follows :
|
| 2. |
The vehicle should be placed on a flat ground.s
|
| 3. |
Draw vertical lines (Vertical lines passing through respective head
lamp centers) and a horizontal line (Horizontal line passing through
center of head lamps) on the screen.
|
| 4. |
With the head lamp and battery in normal condition, aim the head lamps
so the brightest portion falls on the horizontal and vertical lines.
A : Horizontal (Low beam)
B : Vertical (High beam / Low beam)
STD (LED MFR)
OPT (LED PROJ)
|
Head Lamp And Fog Lamp Aiming Point
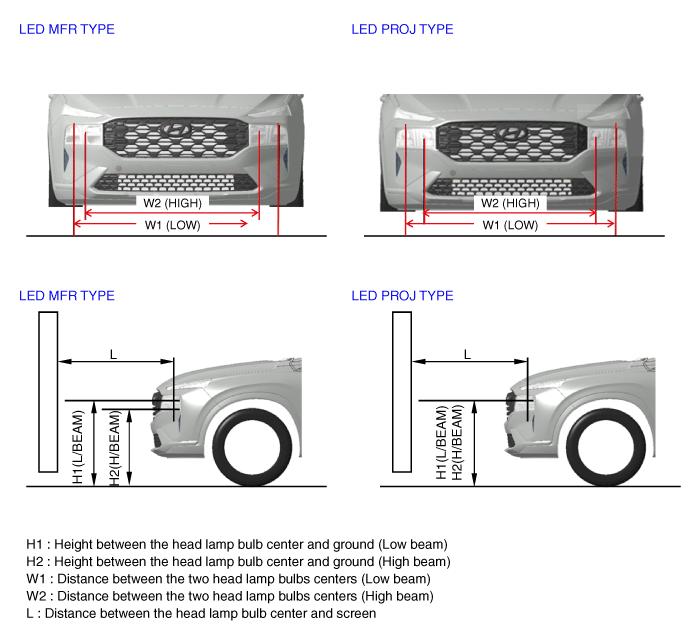
|
Option |
Vehicle Condition |
H1 |
H2 |
W1 |
W2 |
L |
|
LED MFR |
Without driver |
788.6 |
718 |
1518 |
1209 |
Refer to aiming condition |
|
With driver |
783.6 |
713 |
||||
|
LED Projection |
Without driver |
775.6 |
774.9 |
1524 |
1216 |
|
|
With driver |
770.6 |
769.9 |
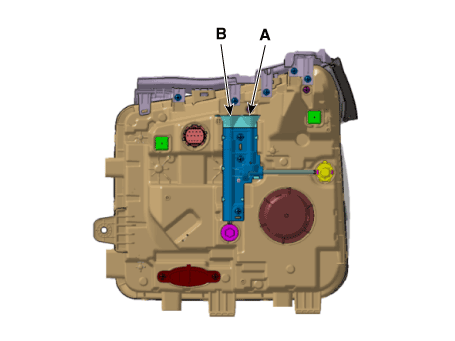
| 1. |
Head Lamp (Low beam)
|
| 2. |
Head Lamp (High Beam)
|
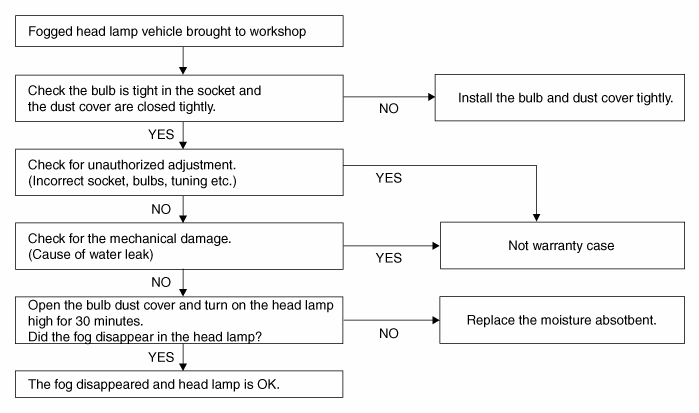
Head lamp fogging
Check the below instruction procedure when the head lamp is fogged.
Turn Signal Lamp. Repair procedures
| Removal |
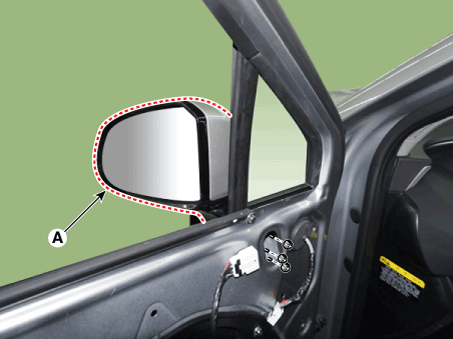
Outside Rear View Mirror
|
| 1. |
Disconnect the negative (-) battery terminal.
|
| 2. |
Remove the front door trim.
(Refer to Body - "Front Door Trim")
|
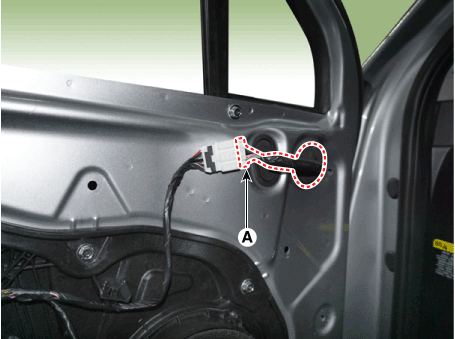
| 3. |
Disconnect the rear view mirror connector (A).
|
| 4. |
Remove the rear view mirror cap (A).
|
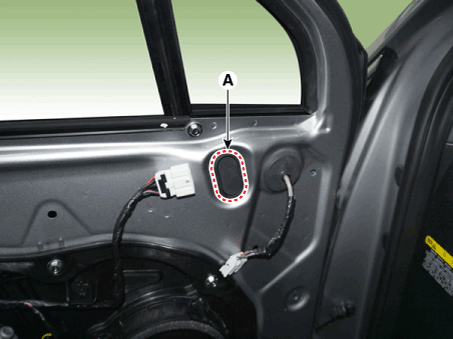
| 5. |
Loosen the mounting nuts and then remove the outside rear view mirror
(A).
|
| 6. |
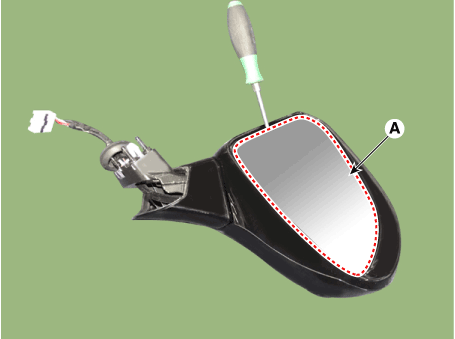
Remove mirror (A) to the direction as shown in the picture using (-)
screw driver.
|
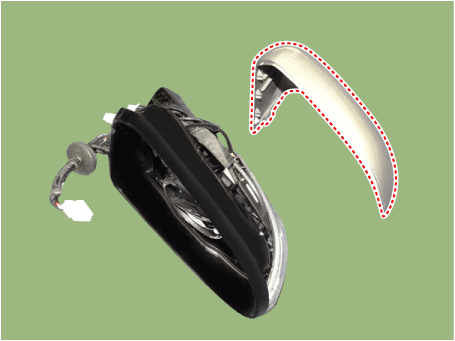
| 7. |
Remove the mirror cover.
|
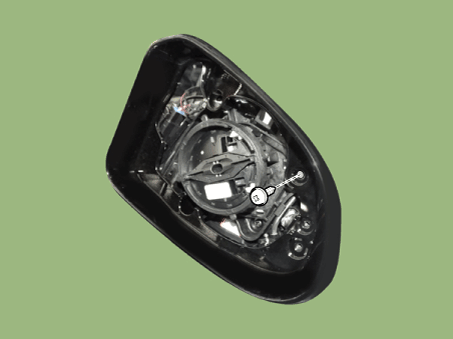
| 8. |
Loosen the outside rear view mirror mounting screw.
|
| 9. |
Remove the side repeater lamp
|
Front Turn Signal Lamp
| 1. |
Disconnect the negative (-) battery terminal.
|
| 2. |
Remove the turn signal lamp after turning in the counterclockwise direction.
|
Rear Turn Signal Lamp
| 1. |
Disconnect the negative (-) battery terminal.
|
| 2. |
Remove the rear bumper.
(Refer to Body - "Rear Bumper Cover")
|
| 3. |
Loosent the mounting screw and then remove the rear turn signal lamp.
|
| 4. |
Remove the bulb after turning in the counterclockwise direction.
|
| Installation |
Outside Rear View Mirror Turn Signal Lamp
| 1. |
Install the side repeater lamp.
|
| 2. |
Install the mirror cover.
|
| 3. |
Install the mirror.
|
| 4. |
Connect the negative (-) battery terminal.
|
Front/Rear Turn Signal Lamp
| 1. |
Install the front/rear turn signal lamp.
|
| 2. |
Install the front/rear bumper cover.
|
| 3. |
Connect the negative (-) battery terminal.
|
Room Lamp. Repair procedures
| Inspection |
| 1. |
Remove the room lamp assembly then check for continuity between terminals.
|
| Removal |
| 1. |
Disconnect the negative (-) battery terminal.
|
| 2. |
Detach the lamp lens (A) from the room lamp with a flat-tip screwdriver.
|
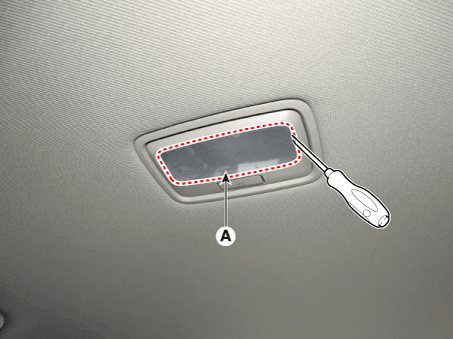
| 3. |
Separate the room lamp (A) from the roof trim after loosening the screws
(2EA).
|
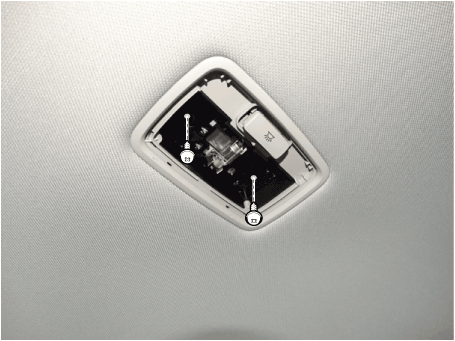
| 4. |
Remove the room lamp (B) after disconnecting the connector (A).
|
| 5. |
If it is necessary replace the room lamp bulb (A).
|
| Installation |
| 1. |
Install the room lamp assembly after connecting the lamp connector.
|
| 2. |
Install the lamp lens after assembling the bulb.
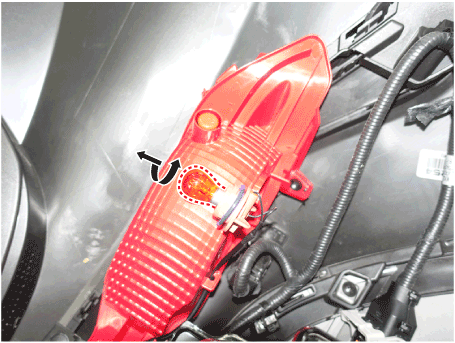
|
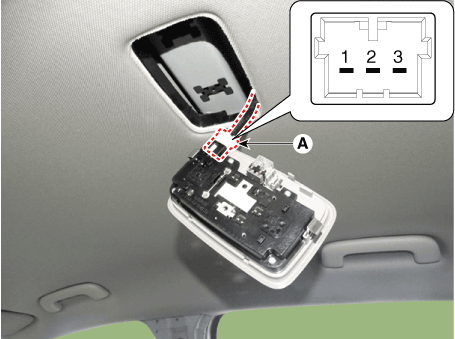
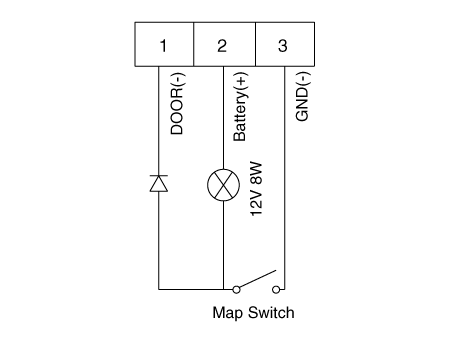
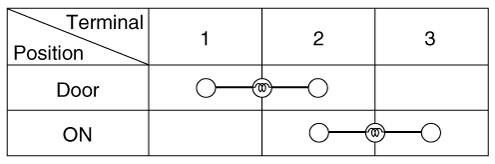
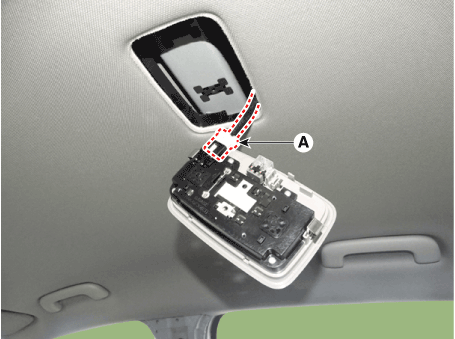
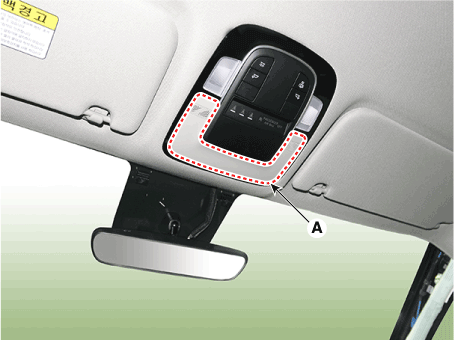
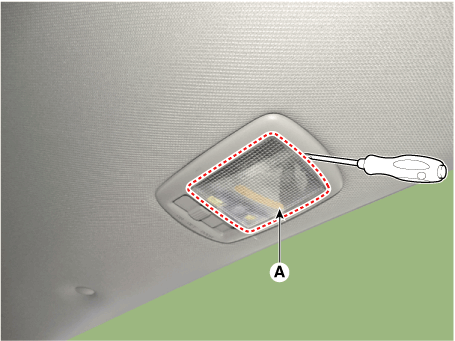
Overhead Console Lamp. Repair procedures
| Inspection |
| 1. |
Remove the overhead console lamp assembly then check for continuity
between terminals. If the continuity is not as specified, replace the
map lamp switch.
|
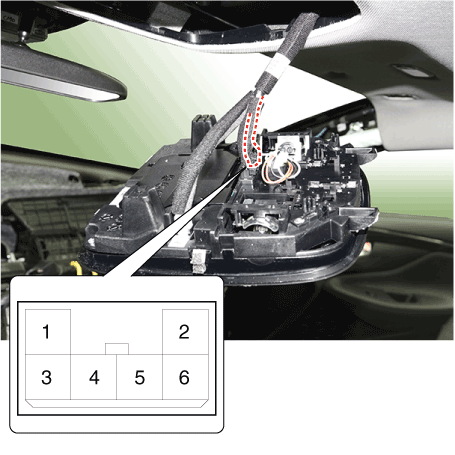
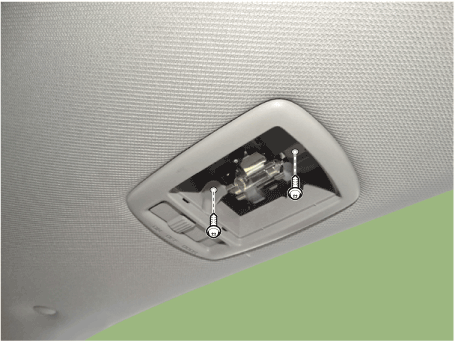
| Removal |
| 1. |
Disconnect the negative (-) battery terminal.
|
| 2. |
Remove the overhead console cover (A).
|
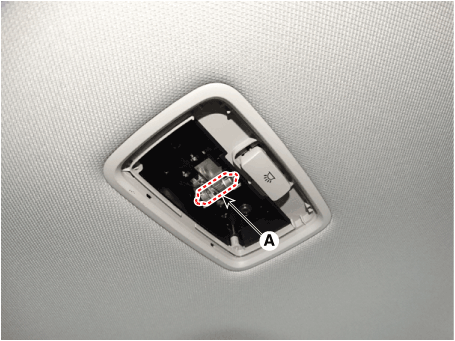
| 3. |
Remove the mounting screws (2EA).
And then remove the overhead console (A).
|
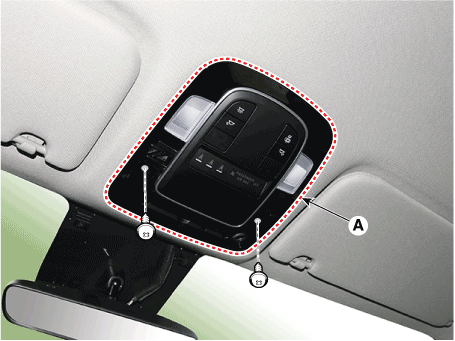
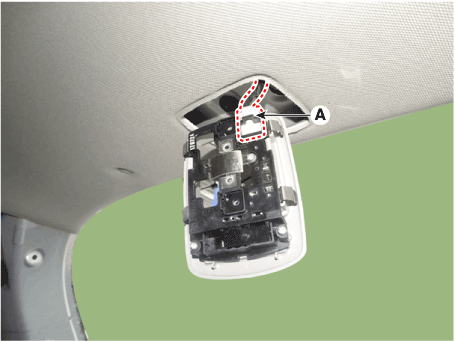
| 4. |
Remove the overhead console after disconnect the connector (A).
|
| Installation |
| 1. |
Install the overhead console lamp after connecting the connector.
|
| 2. |
Install the lens after tightening 2 screws.
|
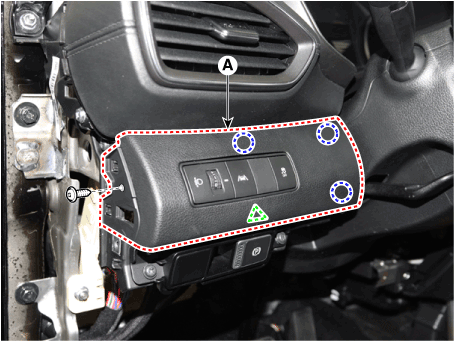
Hazard Lamp Switch. Repair procedures
| Removal |
| 1. |
Disconnct the negative (-) battery terminal.
|
| 2. |
Remove the A/C contrrol unit.
(Refer to Heating, Ventilation and Air Conditioning - "Controller")
|
| 3. |
Remove the hazzard lamp switch.
|

| 4. |
Disconnect the connector and then remove the hazzard lamp switch.
|

| Installation |
| 1. |
Install the hazzard lamp switch.
|
| 2. |
Connect the negative (-) battery terminal.
|
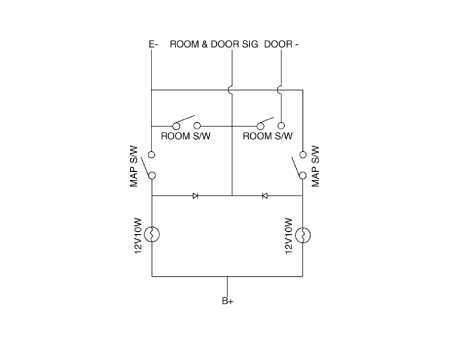
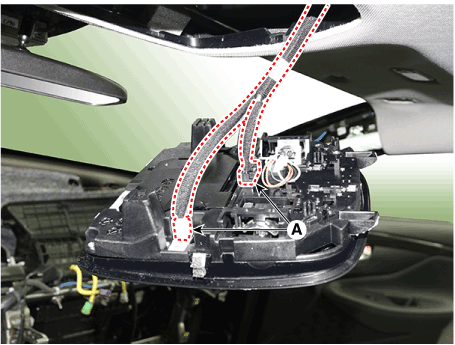
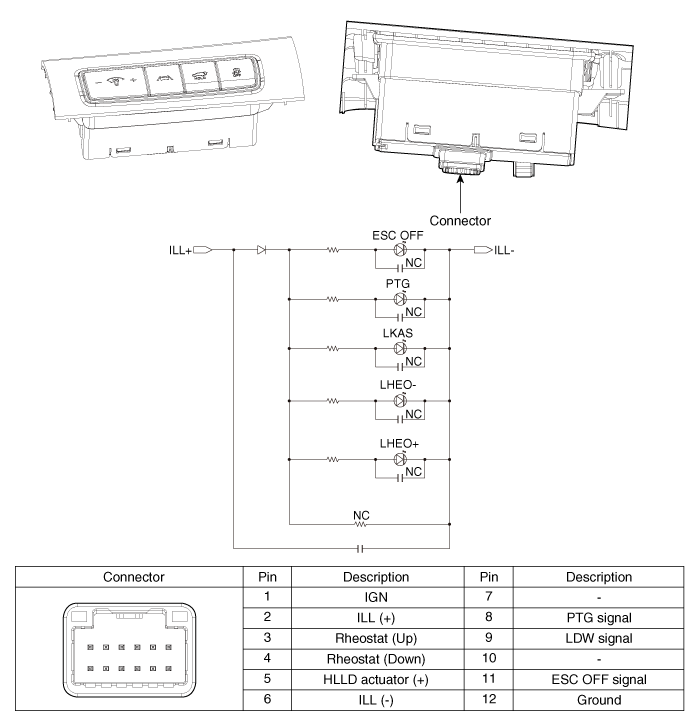
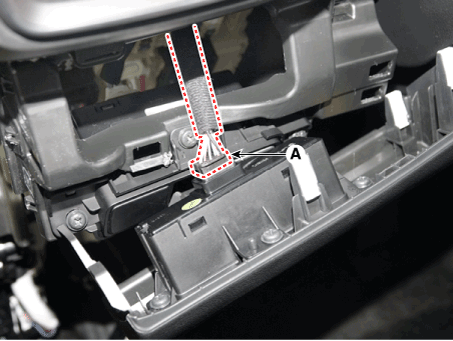
Rheostat. Components and components location
| Components |
Rheostat. Repair procedures
| Inspection |
| 1. |
Disconnect the negative (-) battery terminal.
|
| 2. |
Remove the crash pad lower panel.
(Refer to Body - "Crash Pad Lower Panel")
|
| 3. |
Loosen the mounting screw, remove the crash pad garnish [LH] (A).
|
| 4. |
Press the lock pin, separate the connector (A).
|
| 5. |
Remove the rheostat switch (A) after loosening mounting screws.
|
| Installation |
| 1. |
Install the rheostat switch.
|
| 2. |
Install the crash pad garnish [LH]
|
| 3. |
Connect the negative (-) battery terminal.
|
License Lamps. Repair procedures
| Removal |
| 1. |
Disconnect the negative (-) battery terminal.
|
| 2. |
Remove the license lamp lens (A) from the panel after loosening a screw.
|
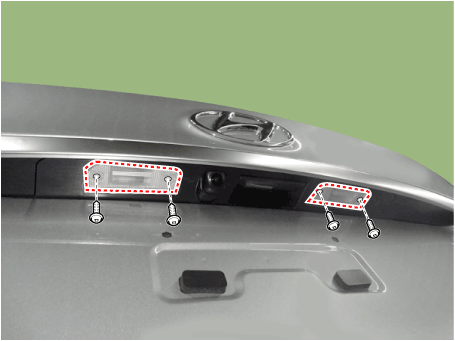
| 3. |
Replace the bulb (B) after removing the license lamp (A).
|


| Installation |
| 1. |
Install the bulb.
|
| 2. |
Install the license lamp lens.
|
High Mounted Stop Lamp. Repair procedures
| Removal |
| High Mounted Stop Lamp |
| 1. |
Disconnect the negative (-) battery terminal.
|
| 2. |
Remove the rear spoiler.
(Refer to Body - "Rear Spoiler")
|
| 3. |
Remove the high mounted stop lamp cover (A).
|

| 4. |
Remove the high mounted stop lamp assembly (A) after loosening screws
(4EA).
|
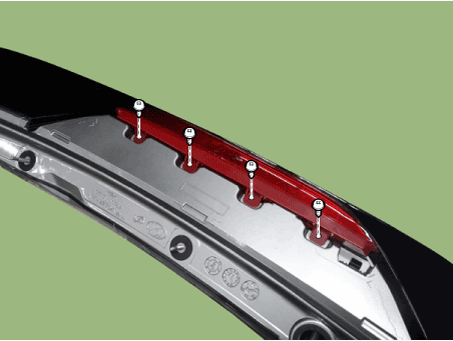
| Installation |
| 1. |
Install the high mounted stop lamp.
|
| 2. |
Install the rear spoiler.
|
| 3. |
Connect the negative (-) battery terminal.
|
Luggage Room Lamp. Repair procedures
| Removal |
| 1. |
Disconnect the negative (-) battery terminal.
|
| 2. |
Remove the luggage room lamp lens (A) with a flat-tip screwdriver.
|
| 3. |
Remove the luggage room lamp bulb.
|
| 4. |
Remove the luggage room lamp assembly after disconnecting the connector
(A).
|
| 5. |
If it is necessary to replace the bulb, replace the luggage room lamp
bulb.
|
| Installation |
| 1. |
Install the luggage room lamp assembly after connecting the lamp connector.
|
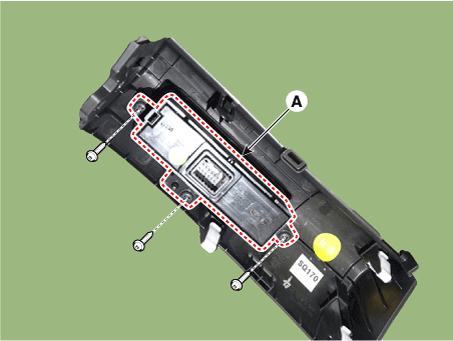
Rear Combination Lamp. Repair procedures
| Removal |
| 1. |
Disconnect the negative (-) battery terminal.
|
| 2. |
Remove the rear combination lamp mounting cap (A).
|
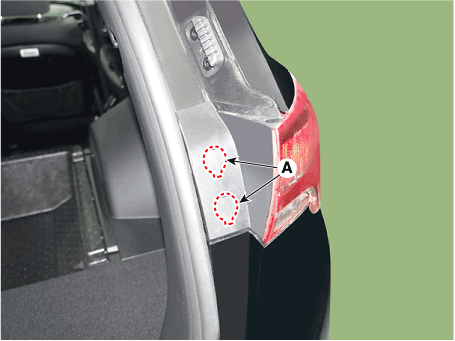
| 3. |
Loosen the mounting bolts then remove the outside rear combination lamp
(A).
|
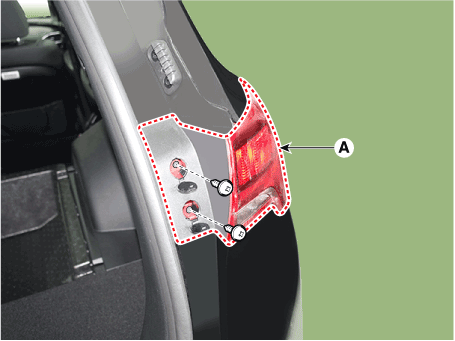
| 4. |
Disconnect the rear combination lamp connector (A).
|
| 5. |
Remove the bulb after turning it in the counter clock-wise direction.
|

| 6. |
Remove the rear combination cover (A).
|
| 7. |
Remove the inside rear combination lamp assembly after loosening the
nuts and disconnecting the connector.
|
| 8. |
Remove the bulb after disconnecting the connector.
|
| Installation |
| 1. |
Install the tailgate combination lamp assembly after assembling the
bulb.
|
| 2. |
Install the lamp cover to the tailgate after connecting the lamp connector.
|
| 3. |
Install the rear combination lamp assembly after assembling the bulbs
and connecting the lamp connector.
|
Center Garnish Lamp. Repair procedures
| Removal |
|
| 1. |
Disconnect the negative (-) battery terminal.
|
| 2. |
Remove the rear combination cover (A).
|
| 3. |
Remove the inside rear combination lamp assembly after loosening the
nuts and disconnecting the connector.
|
| 4. |
Remove the center garnish lamp (A) after loosening mounting nuts.
|
| Installation |
| 1. |
Install the center garnish lamp.
|
| 2. |
Install the inside rear combination lamp.
|
| 3. |
Connect the negative (-) battery terminal.
|
 Panorama Sunroof
Components and components location Component Location 1. Panorama sunroof 2. Panorama sunroof switch 3. Panorama sunroof motor & controller 4. Roller blind motor & slave controller Schematic diagrams ...
 Auto Lighting Control System
Description and operation Description It's a system that uses illumination sensor to automatically turn ON the tail lamp and head lamp based on the change in surrounding environment's illumination ...
See also:
Assist Handle. Components and Components Location
Component Location 1. Assist handle ...
General Tightening Torque Table
Tightening Torque Table of Standard Parts BOLT (Nominal diameter) NUT (Nominal diameter) BOLT/NUT Normal screw Torque Nm (kg.m, Ib-ft) Nominal diameter. (mm) Pitch [mm (in.) ] 4T 8T 10T M5 0.8 (0.031) ...
ESC OFF Switch. Description and Operation
Description 1. The ESC OFF switch is for the user to turn off the ESC system. 2. The ESC OFF lamp is on when ESC OFF switch is engaged. ...
