 Hyundai Santa Fe (TM): Power Tailgate Module
Description and operation
| Description |
Power tailgate is an electro-mechanical system designed to provide power opening
and closing of the tailgate through the push of a button of a remote key (fob),
console switch, inner switch or an outside handle switch of the tailgate.
The power tailgate will reverse direction of travel if resistance to movement
is detected while the tailgate is being opened or closed.
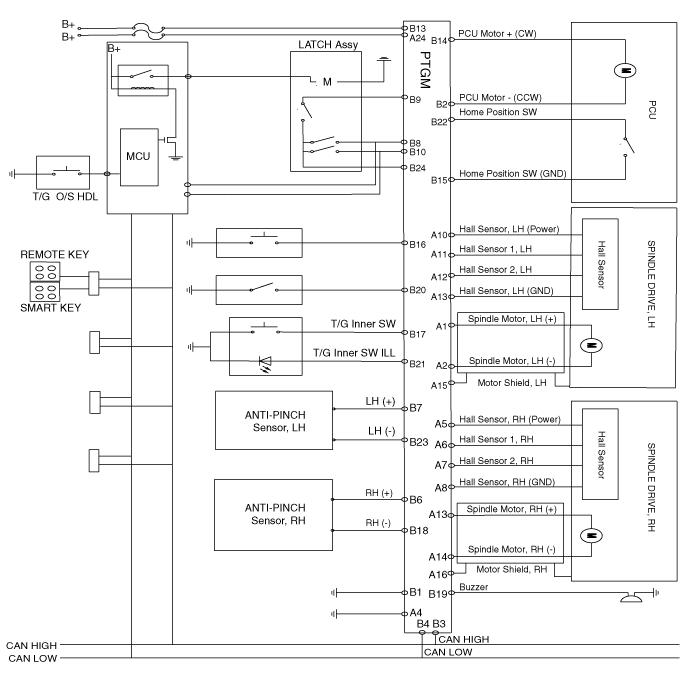
Tailgate Position And Direction
The PTG system will measure the Tailgate position via an integrated hall sensor
inside the Spindle drive unit motor.
The moving direction of tailgate will be detected by analyzing the direction
of the drive unit motor.
The hall sensor pulse counting (position detection) is active during power and
manual operation mode.
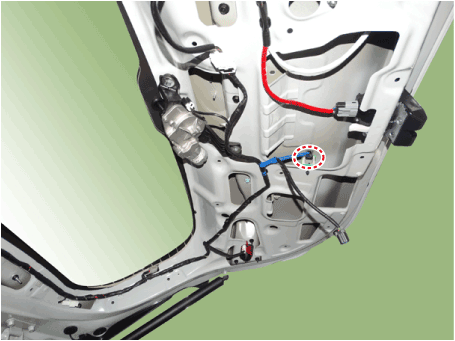
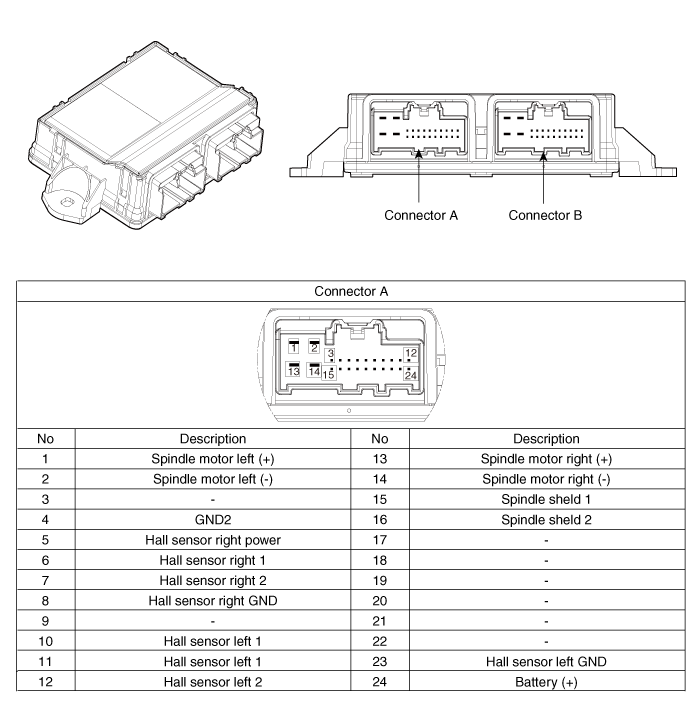
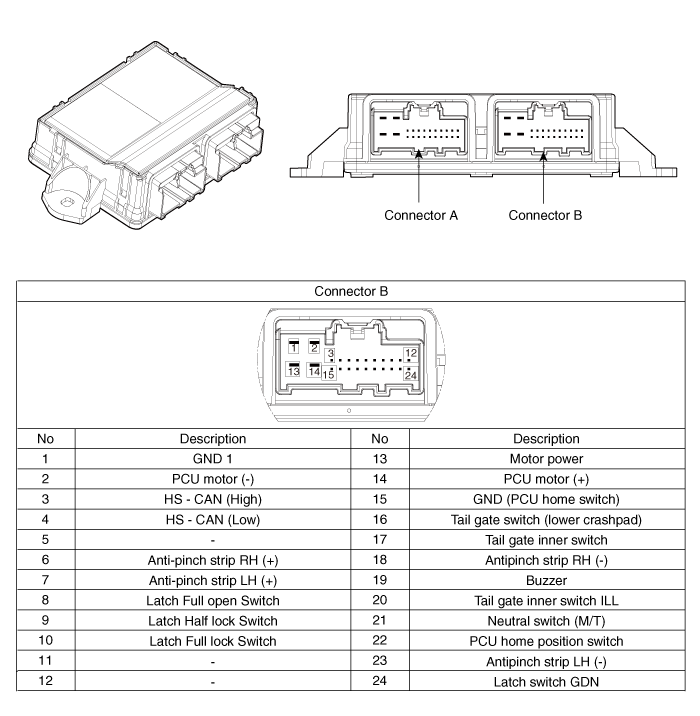
System Components
| 1. |
PTG Unit
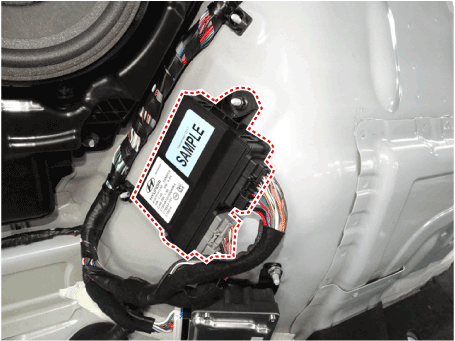
PTG unit is located in rear left luggage side trim.
PTG drive unit drive the two actuators (Spindles) by measuring the driving
motors.
PTG unit also controls anti trap functions by hall sensor analysis in
the anti-pinch strip.
|
| 2. |
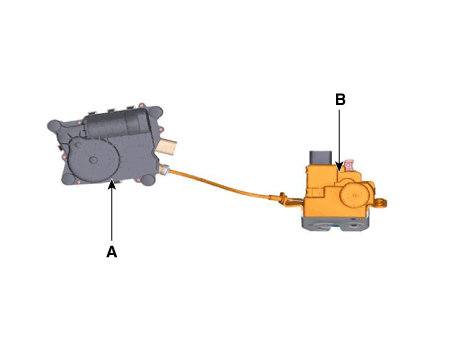
PTG Latch Assembly
PTG latch assembly is consist of Power Latch (A) and Power Closeing
Unit (B).
Power latch is located in the lower part of tail gate panel.
|
| 3. |
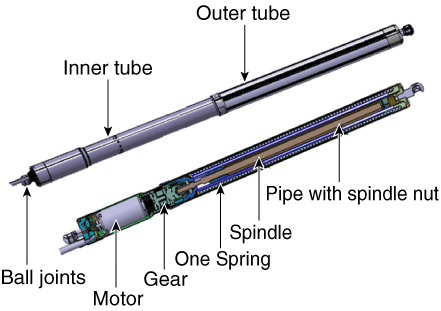
PTG Spindle
PTG spindle open and close the tailgate by driving the motor.
|
| 4. |
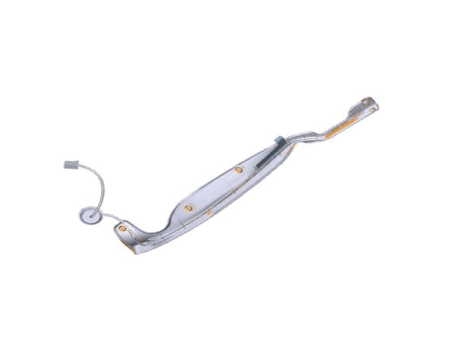
Anti-Pinch Strip
During power closing or cinching, the PTG system shall reverse to full
open if an anti-pinch strip signal is received. However, the anti-pinch
strips will not work when the Tailgate is idle in the full closed, full
open, or stopped positions.
|
| 5. |
SMK (Smart key)
Push the power tailgate open of the SMK more than 0.5s to open the power
tailgate. Power Open operation shall be reversed when an additional
Open/Close signal is received during power opening.
|
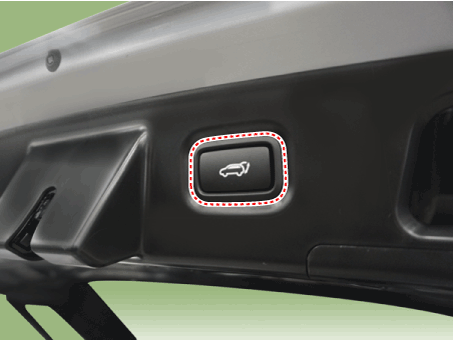
| 6. |
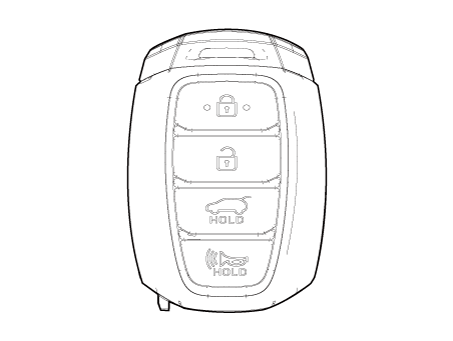
Tailgate inner switch
|
| 7. |
Tailgate buzzer
When a power operation cannot be performed as requested or an obstacle
has been detected.
|
| Operation |
Power Tailgate Opening
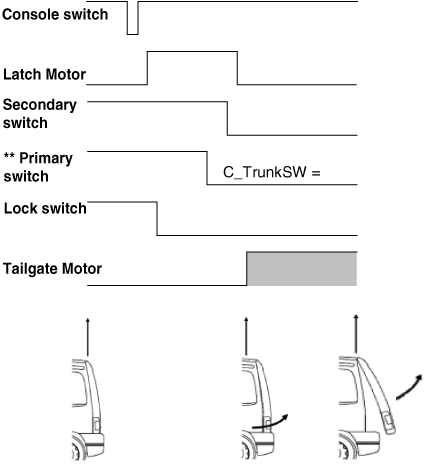
** - Primary switch signal received by PTGM via CAN bus (sent by SJB)
PTGM Opening procedure:
| 1. |
Opening can be triggered after a signal is received from, driver-console
switch, outside handle switch, remote Key (FOB)
|
| 2. |
The latch will be released (by SJB) by actuation of latch motor.
|
| 3. |
On latch release, the tailgate latch pops out of the striker.
|
| 4. |
PTG module controls the tailgate motor in order to open the tailgate.
|
| 5. |
The rotating speed of the tailgate motor can be hall sensor that is
built in the motor.
|
| 6. |
Opening angle of the tailgate is calculated by counting the input pulse
signals from Hall sensor.
|

Power Tailgate Closing
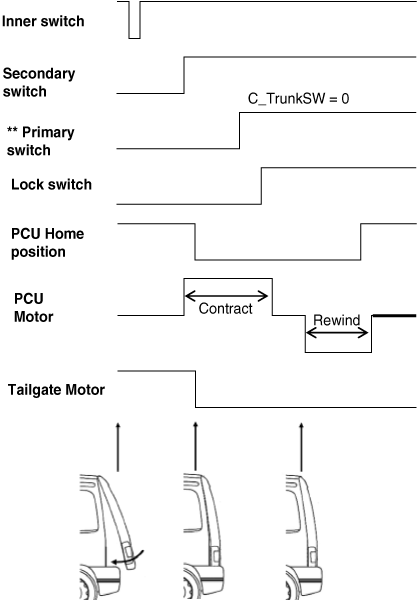
PTGM Closing procedure:
| 1. |
Closing can be triggered after receiving a signal from, console (driver)
switch, ouside handle switch, remote key (FOB), inner switch
|
| 2. |
PTG module controls the tailgate motor in order to close the tailgate
|
| 3. |
Closing angle of the tailgate is calculated by counting the input pulse
signlas from hall sensor
|
| 4. |
The rotating speed of the tailgate motor can be hall sensor that is
built in the motor
|
| 5. |
The tailgate latch engages with the striker and the latch is locked
mechanically (Latch unlock → Latch lock)
|
| 6. |
PTGM stops the tailgate motor operation after detecting the tailgate
latch's secondary signal
|
| 7. |
On detecting the latch's secondary signal, the power close unit (PCU)
starts the contract (cinch) operation and stops after the latch lock
signal is detected
|
| 8. |
After contract operation is stopped, PCU is rewound until the PCU home
position is reached
|
| 9. |
The tailgate is completely closed and latch is fully locked
|
Learned/Calculated/Programmed positions
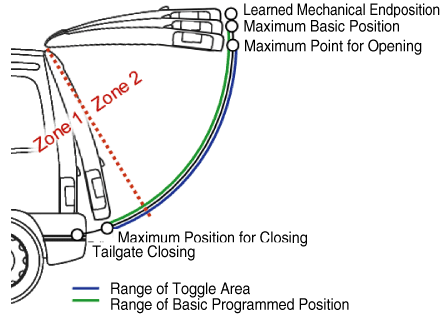
| 1. |
Maximum Point for Opening
Above this position a start in opening direction could make the tailgate
move beyond the Maximum Basic Position and overload the mechanical system
(hinges).
Therefore the start of an opening action above this point is disabled.
Anyway the tailgate moves beyond this point, if it has been started
at a lower position.
|
| 2. |
Learned Mechanical End Position
This is the mechanical block position while opening and is considered
to be 100% opening. During the first tailgate opening this position
is learned.
After learning, the tailgate will not move beyond the Maximum Basic
Position, which is defined by the Learned Mechanical Position – Security
Distance.
All positions are defined by parameters in the ECU or programmed by
the user (Basic Programmed Position)
|
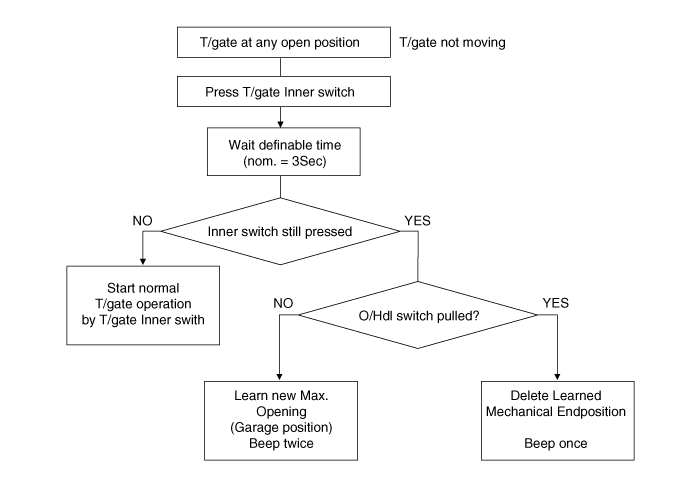
Programming the max. T/gate opening (Garage Position)
| 1. |
The customizable Programmed Basic Position is set equal to the Maximum
Basic Position after the Learned Mechanical End Position is learned.
|
System Parameterization
Due to mechanical tolerances and adjustments in vehicle production and assembly
the power operated tailgate needs calibration of the maximum movement range
before proper operation can be ensured.
The tailgate’s maximum movement range is represented by the number of Hall-pulses
received by the ECU from the actuators’ speed / position sensors during a tailgate
movement from the fully closed position (closure unit in fully latched position)
to the upper end position limited by mechanical constraints (e.g. upper bump
stops, spindle length or similar).
Calibration Mode
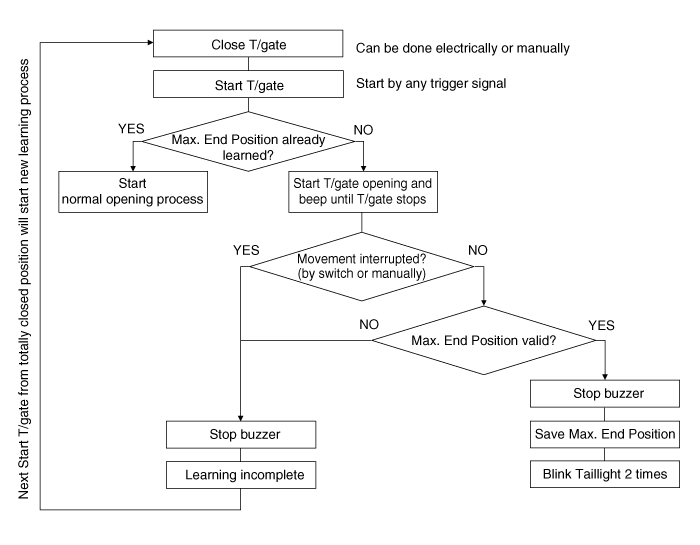
Manual De-calibration Mode
Buzzer operation is defined in the following chart
|
|
BUZZER |
LAMP *) |
Remark |
|
T/gate start |
2 times |
2 times |
When T/gate is triggered by Remote Contol or T/gate Console Switch |
|
T/gate start |
n.a. |
n.a. |
When T/gate is triggered by T/gate Inner Switch or T/gate Outer Handle Switch |
|
T/gate stop |
n.a. |
n.a. |
|
|
System error |
3 Times |
- |
PCU/Tailgate antiplay active, 0ver-/undervoltage condition, Endposition-/position
error, spindle error, CAN error, Latch closed when Tailgate open |
|
T/gate not closed |
10 times |
10 times |
Latch Lock Switch not present |
|
During Calibration run |
Continuous ON-OFF beeping |
n.a. |
Activate buzzer but not C_PTHazard |
|
Max. End Position learned |
n.a. |
2 times |
Buzzer confirms learning finished |
|
Max. End Position deleted |
1 time |
n.a. |
Buzzer confirms "position deleted" |
|
Car is moving with open T/gate |
10 times |
n.a. |
T/gate open AND Speed >3km/h |
|
Garage Position saved |
2 times |
n.a. |
Buzzer confirms "New Garage Position" |
*) Lamp will be synchronized by sending C_PTHazard simultaneously to Buzzer
signal
Components and components location
| Component Location (1) |
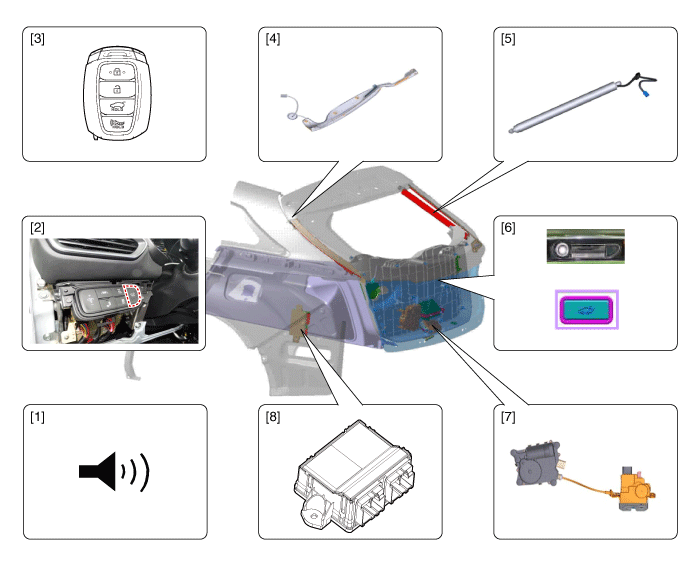
| 1. Buzzer 2. Console S/W 3. RKE 4. Anti Pinch Strip |
5. Spindle Drive 6. Tailgate Trim Switch 7. Power Latch 8. PTG Control Module |
Inspection
| Inspection |
Tailgate normal operation transmit / receive process
|

â‘ Press the power tailgate open switch
② Transmit / receive power tailgate open signal via CAN communication and wiring
③ Power tailgate open
|
PTG Inspection Flow Chart
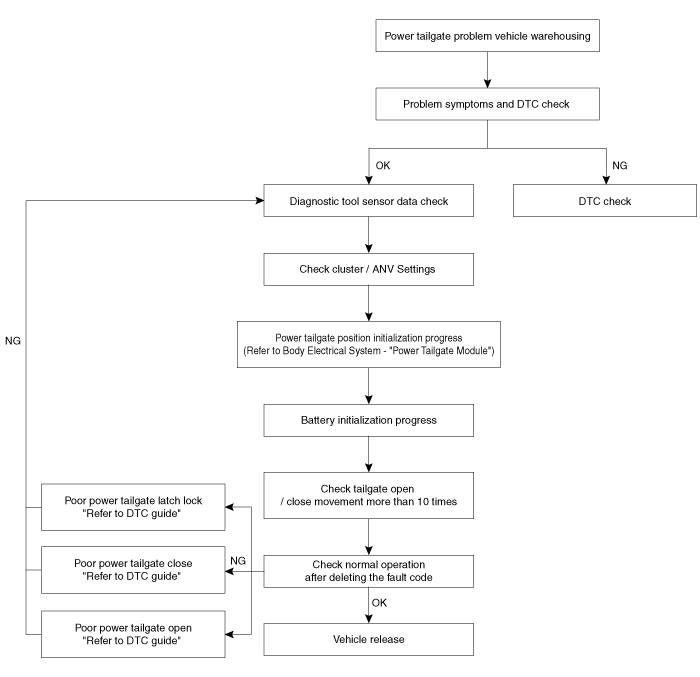
Power Tailgate NG List
|
List |
Solution |
|
CAN BUS OFF |
Check CAN Line |
|
Power Tailgate Module Inline Mode Not Deactivated |
1. S/W Management - Disable Inline Mode |
|
2. Disable inline mode by driving (5 km/h↑) |
|
|
PTG Unlatch Error |
1. Check latch connector plugged in properly |
|
2. Check latch wiring |
|
|
3. Check latch assembly |
|
|
PTG Spindle Hall Sensor Error, LH |
1. Check spindle connector plugged in properly - LH |
|
2. Check spindle wiring - LH |
|
|
3. Check spindle assembly - LH |
|
|
PTG Spindle Hall Sensor Error, RH |
1. Check spindle connector plugged in properly - RH |
|
2. Check spindle wiring - RH |
|
|
3. Check spindle assembly - RH |
|
|
PTG Anti-Pinch Sensor Error, LH |
1. Check anti-pinch sensor connector plugged in properly - LH |
|
2. Check anti-pinch sensor wiring - LH |
|
|
3. Check anti-pinch sensor assembly - LH |
|
|
PTG Anti-Pinch Sensor Error, RH |
1. Check anti-pinch sensor connector plugged in properly - RH |
|
2. Check anti-pinch sensor wiring - RH |
|
|
3. Check anti-pinch sensor assembly - RH |
|
|
PTG Latch Cinching Rewinding Fail Max |
1. Check latch connector plugged in properly |
|
2. Check latch wiring |
|
|
3. Check latch assembly |
|
|
PTG Integrated Latch Home Position Switch Error |
1. Check latch connector plugged in properly |
|
2. Check latch wiring |
|
|
3. Check latch internal switch signal |
|
|
4. Check latch assembly |
|
|
PTG Integrated Latch Switch Combination Error |
1. Check latch connector plugged in properly |
|
2. Check latch wiring |
|
|
3. Check latch internal switch signal |
|
|
4. Check latch assembly |
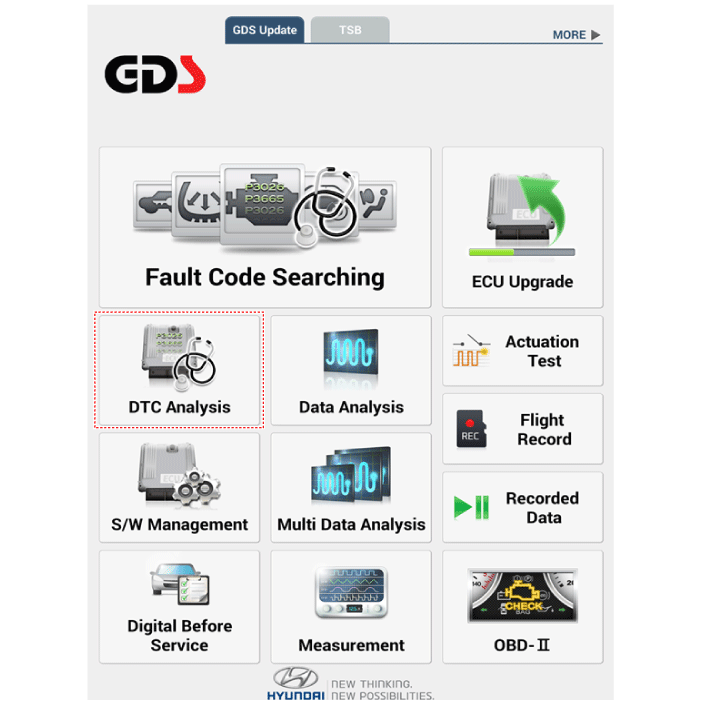
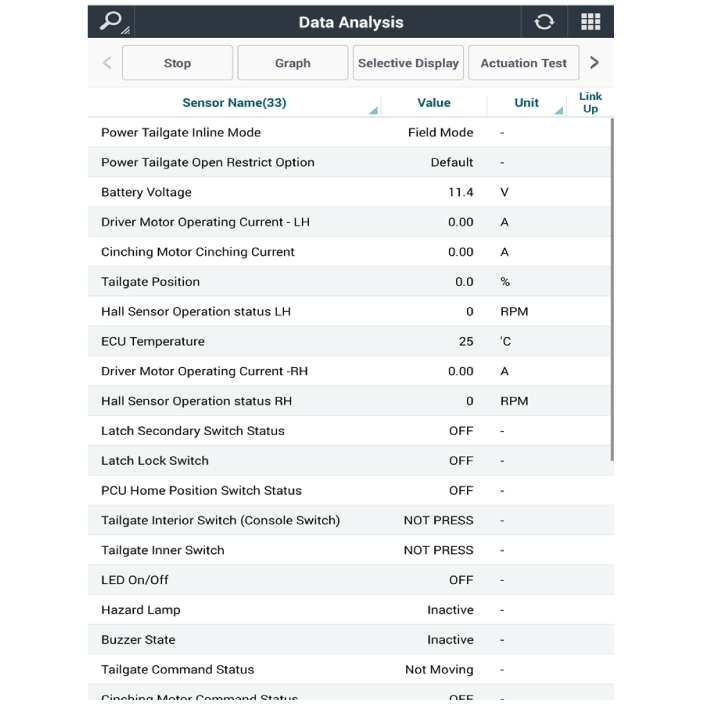
Sensor Data Diagnosis With Diagnostic Tool
| 1. |
Select the 'Data Analysis'.
|
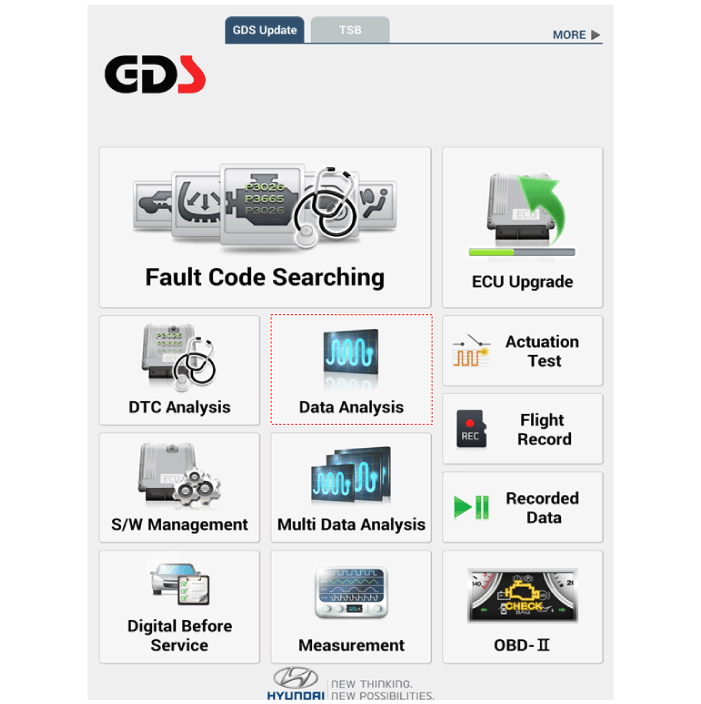
| 2. |
Select the 'PTG'.
|
| 3. |
Check the sensor data.
|
Troubleshooting
| Failure Inspection |
Diagnosis with diagnostic tool
| 1. |
In the body electrical system, failure can be quickly diagnosed by using
the vehicle diagnostic system (diagnostic tool).
The diagnostic system (diagnostic tool) provides the following information.
|
| 2. |
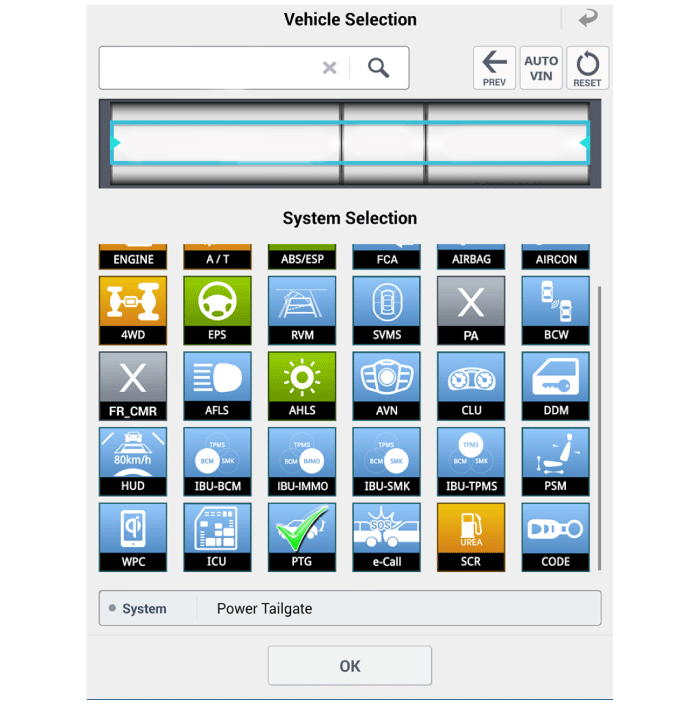
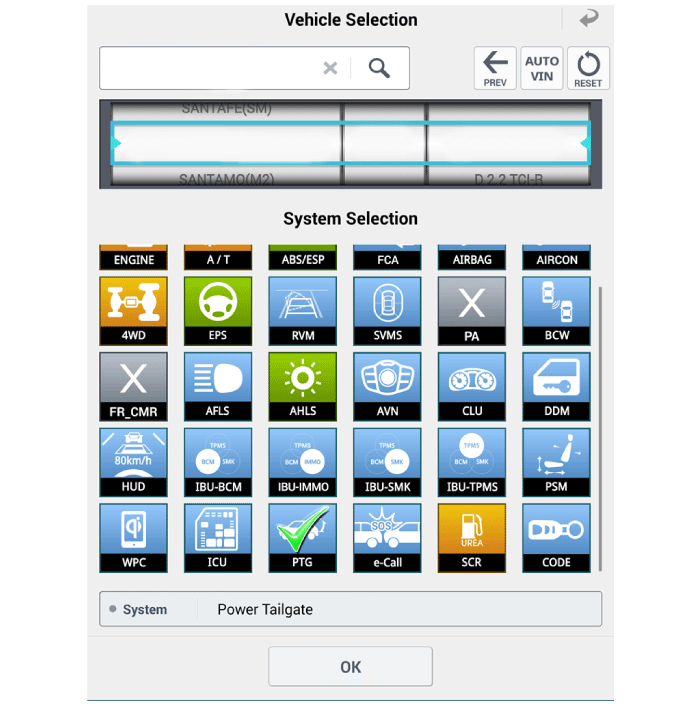
If diagnose the vehicle by diagnostic tool, select "DTC Analysis" and
"Vehicle".
|
| 3. |
Select the 'Data Analysis'.
|

| 4. |
Select the 'PTG' to search the current state of the input/output data.
|
Mode Change (Power Tailgate System)
| 1. |
After replacing with a new power tailgate module, check for DTC code
at all times.
If DTC code B24B0 exists, perform power tailgate mode change.
|
| 2. |
After connecting the diagnostic tool, Select the 'S/W Management' and
'Car model'.
|
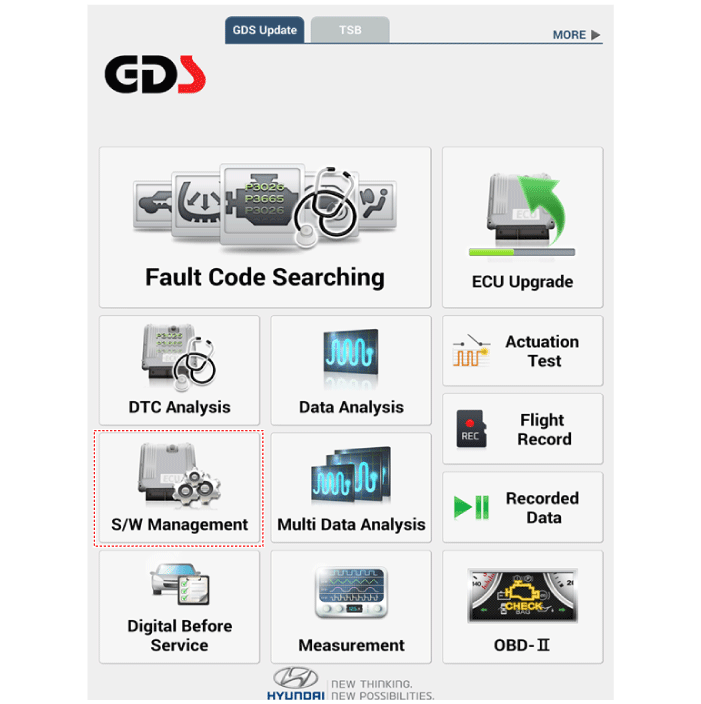
| 3. |
Select the "Power Tailgate" and Power Tailgate Mode Configuration" procedure.
|
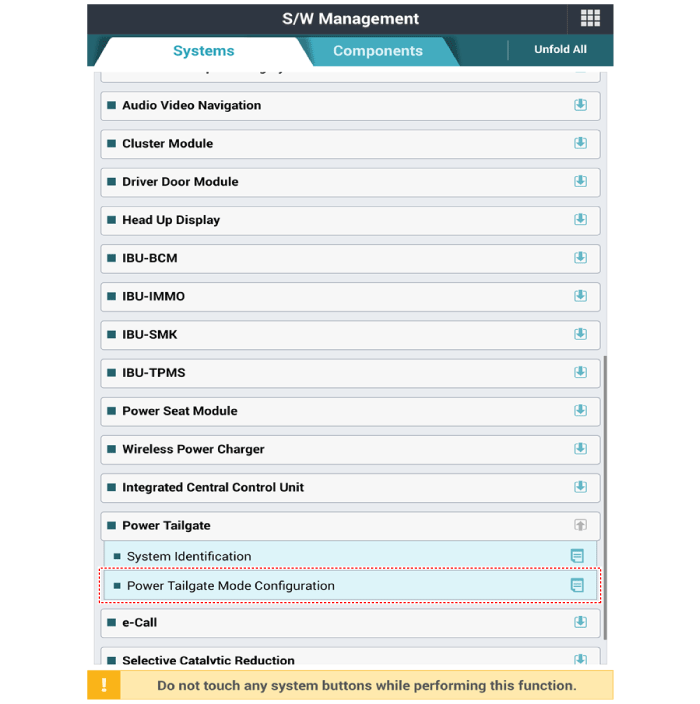
| 4. |
Perform the "Power Tailgate Mode Configuration" procedure according
to the diagnostic tool screen message.
|
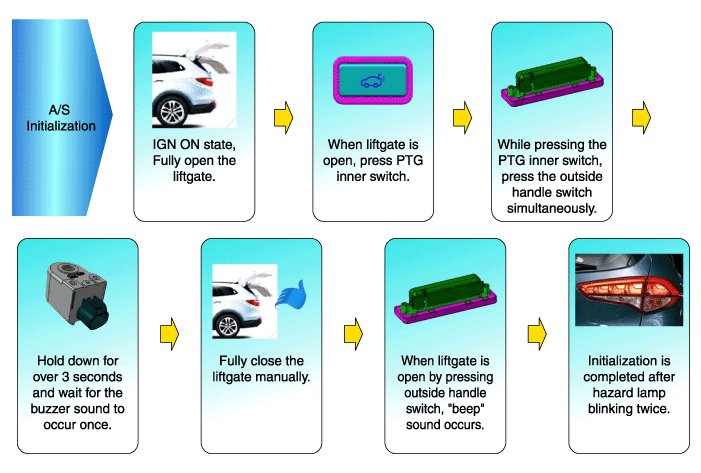
System Initialization
System initialization is needed to recognize the closing position of the tailgate
to power tailgate module.
The initialization process after battery power reset, system initialization
is needed to recognize the maximum opening and closing tailgate position exactly.
The power tailgate operates normally after system initialization is completed.
Procedure :
Inspection and Test - Power Tailgate System
Power Tailgate system is a complex system that consists of several components.
To get an accurate test result, the control module of the Power Tailgate must
be inspected.
The most trustworthy, effective and accurate method is using diagnostic tool
required by power tailgate.
diagnostic tool helps technicians when inspecting a disabled switch, and enables
to check the current status record of the switch ofPower Tailgate control module.
The battery must be fully charged before conducting all of the test on power
tailgate, and all of the interfering elements of the system must be shown and
understood. (refer to the explanation of smart tailgate) Refer to the analysis
reference table when inspecting and testing the smart tailgate.
|
Status |
Cause |
Solution |
|
Sudden opening of tailgate |
Activation by mistake or malfunction of open/close switch |
Check for short or malfunction of short circuit of switch |
|
Latch assembly failure |
Check for wiring connection |
|
|
Check for failure code, and replace the latch if needed |
||
|
Failure of Smart Tailgate or the body control module |
Reset the module fuse or reconnect the battery. If it does not operate properly,
check the wiring connection and analyze manual. |
|
|
Unable to power open and close the tailgate |
False indication, or not parked status |
Check a switch status using analyzing device |
|
Low voltage of the Power Tailgate module battery |
Check for proper voltage of the Power Tailgate |
|
|
Battery charged |
||
|
Swelling of the fuse |
Check if the fuse is swollen |
|
|
Malfunction of PTG spindle |
Check for PTG spindle status |
|
|
Critical code failure at BCM/tailgate control module |
Check for code status using diagnostic tool |
|
|
Latch assembly failure |
Check if the wiring connection of fuse are swollen. |
|
|
Check if there's any alien object interfering with the operation of latch
assembly. |
||
|
Unable to open and close of the tailegate |
Failure in motor assembly |
Check for motor assembly |
|
Interference of the consisting components |
Replace the needed parts or reset the affected position. |
|
|
Wiring problem (system or vehicle) |
Resolve the problem using the wiring map. |
|
|
Refer to wiring diagram. |
||
|
Loss of electricity during the tailgate operation |
Wiring problem (system or vehicle) |
Resolve the problem using the wiring map. |
|
Refer to wiring diagram. |
||
|
Low voltage of vehicle battery |
Check for proper voltage of PTGM. |
|
|
Charge the battery |
||
|
Failure in Power Tailgate or BCM |
Check for failure code using analyzing device |
|
|
Failure in motor assembly |
Test the motor assembly |
|
|
Power latching unable at Primary/Secondary position |
Latch assembly failure |
Check if the wiring connection of fuse are swollen. |
|
Check for failure code using analyzing device |
||
|
Resolve the problem using a vehicle analyzing manual. |
||
|
Replace the latch assembly if needed. |
||
|
Interference of the consisting components |
Replace the needed parts or reset the affected position. |
|
|
Failure in Power Tailgate or BCM |
Check for failure code using analyzing device |
|
|
Excessive sealing force of the tailgate |
Check for shock on sealing, assembly failure, alien object or other possible
factors. |
|
|
Failure in motor assembly |
Check the motor assembly |
|
|
Unable to unlock the latch at Primary position |
False indication, or not parked status |
Check switch status using analyzing device |
|
Low voltage of the Power Tailgate module battery |
Check for proper voltage of the Power Tailgate |
|
|
Battery charged |
||
|
Swelling of the fuse |
Check if the fuse is swollen |
|
|
Latch assembly failure |
Check switch status using analyzing device |
|
|
Check for alien object interfering with the latch assembly operation or
shock on components. |
||
|
Resolve the problem using a vehicle analyzing manual. |
||
|
Remove the latch assembly if needed. |
||
|
Failure in outside handle connection |
Check for handle joint and wiring connection. |
|
|
Failure of Power Tailgate or the body control module |
Check for the failure code or cycle using analyzing device. |
|
|
Interference of the consisting components |
Replace the needed parts or reset the affected position. |
|
|
Tailgate operation using pop/console switch unavailable. |
Swelling of the fuse |
Check if the fuse is swollen |
|
Low voltage of PTGM |
Check for proper voltage of PTGM. |
|
|
Charge the battery |
||
|
Unable to unlock the electric lock |
Failure on the latch assembly |
Check for alien object interfering with the latch assembly operation or
shock on components. |
|
Check for the failure code or cycle using analyzing device. |
||
|
Check for pole/latch switch using analyzing device. |
||
|
Resolve the problem using the vehicle inspection manual |
||
|
Unable to unlock the electric lock |
Failure of Power Tailgate module |
Resolve the problem using the vehicle inspection manual |
|
Failure of Body Control Module (BCM) |
Resolve the problem using the vehicle inspection manual |
|
|
Replace BCM if needed |
||
|
Malfunctioning of wireless remote control key |
Rewrite the wireless remote control key program |
|
|
Replace the wireless remote control key |
||
|
Malfunctioning of the tailgate motor assembly |
Check for alien object interfering with the motor assembly operation. |
|
|
Check for wiring connection |
||
|
Change the assembly if motor clutch is not operable |
||
|
Replace the switch if the full opening switch is not working |
||
|
Resolve the problem using the vehicle inspection manual |
||
|
Replace the motor if needed |
||
|
Unable to maintain opened status of the tailgate |
Failure on PTG spindle |
Replace PTG spindle |
|
Check if attached objects are damaged |
||
|
Excessive operating force when opening and closing |
Failure on PTG spindle |
Replace PTG spindle |
|
Check if attached objects are damaged |
||
|
Interference of the consisting components |
Replace the needed parts or reset the affected position. |
|
|
When tailgate keeps cinching lock mode |
Failure on the latch assembly |
Check if wiring connection and fuse are swollen |
|
Check the switch with analyzing device |
||
|
When tailgate keeps electric lock mode |
Failure on the latch assembly |
Check for wiring connection |
|
Check for any alien object |
||
|
Resolve the problem using the vehicle inspection manual |
||
|
Malfunctioning of the control module |
Check for failure code using analyzing device |
|
|
Wiring problem (system or vehicle) |
Resolve the problem, referring an electric circuit |
|
|
Refer to wiring diagram. |
||
|
Check for the vehicle inspection manual for detailed process |
||
|
Failure of the motor assembly |
Check for operating environments constantly |
|
|
Wiring problem (system or vehicle) |
Resolve the problem, referring an electric circuit |
|
|
Refer to wiring diagram. |
||
|
Very slow opening of the tailgate |
Vehicle battery voltage too low |
Check for proper voltage of PTGM. |
|
Charge the battery |
||
|
Malfunctioning of the tailgate PTG spindle |
Replace the tailgate PTG spindle if needed |
|
|
Interference of the consisting components |
Replace the needed parts or reset the affected position. |
|
|
Vehicle angle too steep for electric operation |
Operate the tailgate manually |
|
|
Malfunctioning of the tailgate motor assembly |
Replace the motor assembly if needed |
|
|
Rattling or squeaky sound |
Alien object jammed in tailgate components |
Remove the alien object |
|
Excessive tightening or loosening of the components |
Resolve the excessive tightness or looseness |
Power Tailgate Unit. Components and components location
| Components |
Power Tailgate Unit. Schematic diagrams
| Circuit Diagram |
Power Tailgate Unit. Repair procedures
| Removal |
|

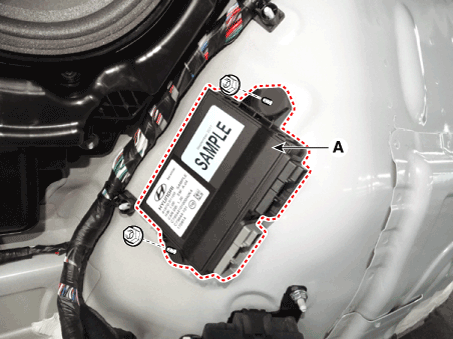
| 1. |
Disconnect the negative (-) battery terminal.
|
| 2. |
Remove the rear left luggage side trim.
(Refer to Body - "Luggage Side Trim")
|
| 3. |
Remove the power tailgate unit connectors (A).
|
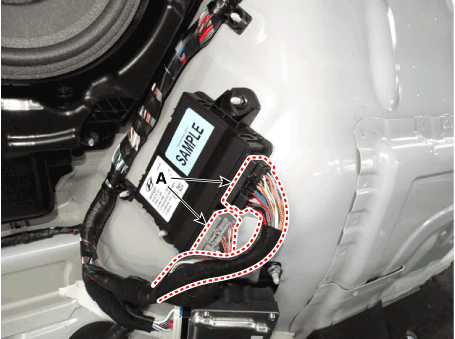
| 4. |
Remove the power tailgate unit (A).
|
| Installation |
| 1. |
Install the power tailgate unit.
|
| 2. |
Install the rear left luggage side trim.
|
| 3. |
Connect the negative (-) battery terminal.
|
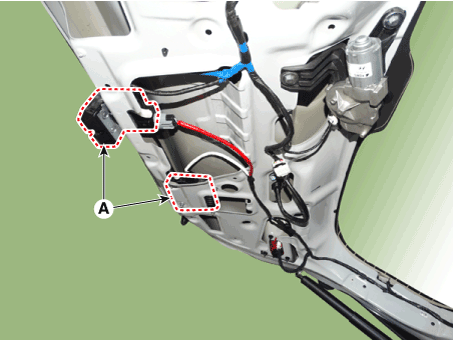
Power Tailgate Latch. Repair procedures
| Removal |
| 1. |
Disconnect the negative (-) battery terminal.
|
| 2. |
Remove the tailgate trim.
(Refer to Body - "Tailgate Trim")
|
| 3. |
Remove the tail gate latch and PCU (A) after loosening the mounting
bolts.
|
| Installation |
| 1. |
Install the power tailgate latch & PCU assembly.
|
| 2. |
Install the tailgate trim.
|
| 3. |
Connect the negative (-) battery terminal.
|
| Inspection |
Inspection of the Power Tailgate Latch
Refer to Power Tailgate System - "Troubleshooting"
Anti-Pinch Strip. Repair procedures
| Removal |
| 1. |
Disconnect the negative (-) battery terminal.
|
| 2. |
Remove the tailgate trim.
(Refer to Body - "Tailgate Trim")
|
| 3. |
Remove the anti-pinch strip sensor connector (A).
|
| 4. |
Remove the anti-pinch strip (A) after removing the clips.
|
| Installation |
| 1. |
Install the tailgate anti-pinch strip.
|
| 2. |
Install the tailgate side trim.
|
| 3. |
Connect the negative (-) battery terminal.
|
 Rear Glass Defogger
Components and components location Component Location 1. Rear glass defogger relay (Buil-in engine room relay box) 2. Rear glass defogger switch (Dual type) 3. Rear glass defogger switch (Manual type) ...
 Windshield Wiper/Washer
Components and components location Component Location 1. Windshield wiper arm & blade 2. Wiper & washer switch 3. Windshield washer hose 4. Windshield wiper motor & linkage 5. Washer motor ...
See also:
Rear Axle Assembly
Components and components location Components 1. Rear brake disc 2. Rear hub assembly 3. Dust cover 4. Rear carrier assembly Repair procedures Removal • Be careful not to damage the parts ...
Air Ventilation Seat. Components
and Components Location
Components 1. Seat back blower 2. Seat cushion blower 3. Air ventilation seat control unit ...
Rear Seat Frame Assembly. Repair procedures
Replacement [Second row seat assembly] (LH) • Put on gloves to protect your hands. • When prying with a flat-tip screwdriver, wrap it with protective tape, and apply protective tape around the related ...
