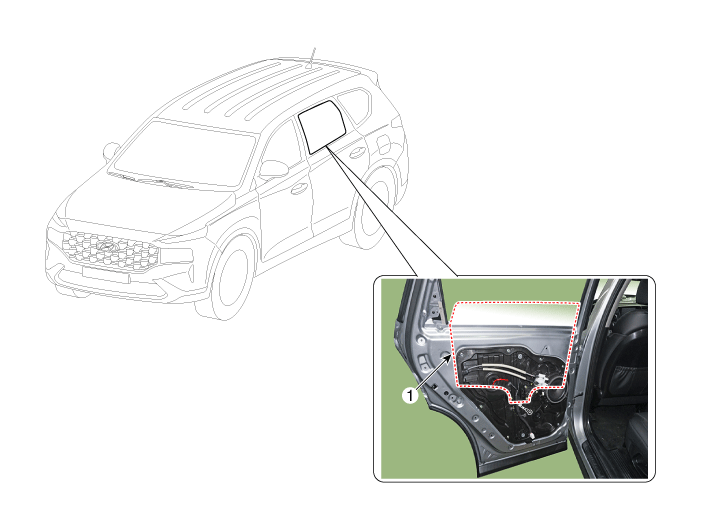
Components and components location
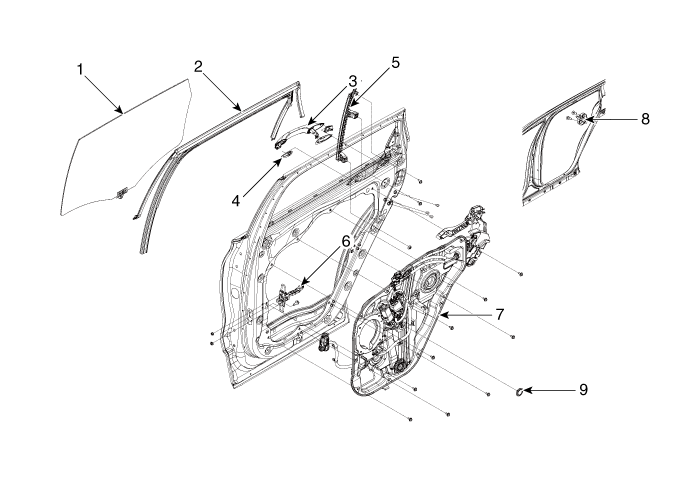
1. Rear door
window glass
2. Rear door window glass run assembly
3. Rear door outside handle
4. Rear door outside handle pad
5. Rear door channel
|
6. Rear door
checker assembly
7. Rear door module assembly
8. Rear door striker
9. Rear door module plug hole
|
Repair procedures
Glass Adjustment
| •
|
Check the glass run channel for damage or deterioration, and
replace them if necessary.
|
|
|
1. |
Remove the rear door trim.
(Refer to Rear Door - "Rear Door Trim")
|
|
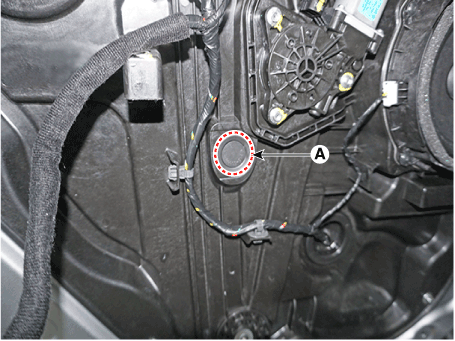
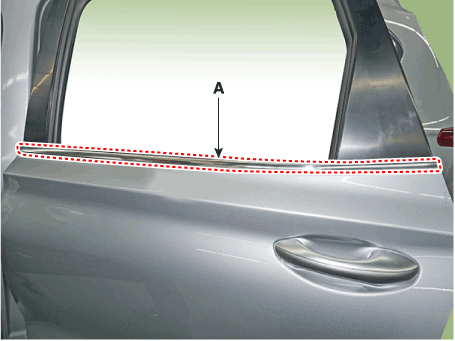
2. |
Remove the plug hole (A).
|
|
3. |
After loosening the glass mounting bolts, adjust the spacing of the
glass (A) by moving the glass from side to side and then tighten the
bolts.

|
|
4. |
Check the glass for normal operation.
|
Door Striker Adjustment
| •
|
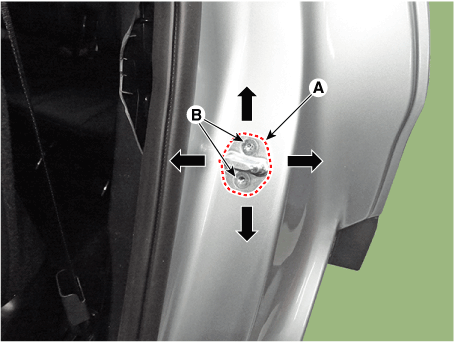
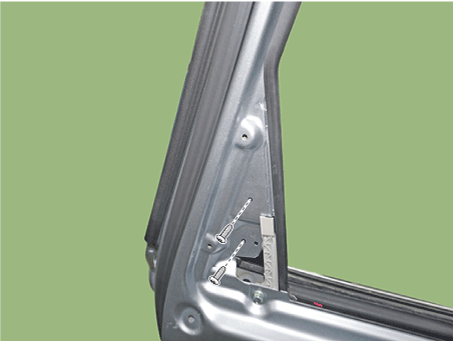
Make sure the door latches securely without slamming it. If
necessary adjust the striker (A). The striker nuts are fixed.
The striker can be fine adjusted up or down, and in or out.
|
|
|
1. |
After loosening the mounting screw, adjust the striker (A) by moving
it forward and backward or from side to side and then tighten the bolts
(B).
|
Tightening torque
21.6 - 32.4 N.m (2.2 - 3.3 kgf.m, 15.9 - 23.9 lb-ft)
|
|
|
2. |
Check that door opening and closing works properly.
|
Door Position Adjustment
| •
|
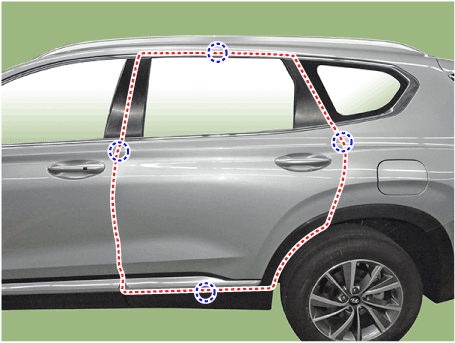
After installing the rear door, check that the body fits flush
with/parallel to all the edges of front door. Check that the
door and body edges are parallel. Before adjusting, replace
the mounting bolts.
|
|
|
1. |
Check that the door and body edges are parallel.
|
|
2. |
Place the vehicle on a firm, level surface when adjusting the doors.
|
|
3. |
Adjust the hinges (A) :
| •
|
Loosen the door mounting bolts slightly, and move the door in
or out until it aligns flush with the body.
|
| •
|
Loosen the hinge mounting bolts slightly, and move the door
backward or forward, up or down as necessary to make the gaps
equal.
|
| •
|
Place a shop towel on the jack to prevent damage to the door
when adjusting the door.
|
|
Tightening torque
(B) : 21.6 - 26.5 N.m (2.2 - 2.7 kgf.m, 15.9 - 19.5 lb-ft)
(C) : 23.5 - 31.4 N.m (2.4 - 3.2 kgf.m, 17.4 - 23.1 lb-ft)
|
|
|
4. |
Grease the pivot portions of the hinges indicated by the arrows.
|
|
5. |
Check for water leaks.
|
Rear Door Trim. Components and components location
Rear Door Trim. Repair procedures
| •
|
Put on gloves to prevent hand injuries.
|
|
| •
|
When removing with a flat-tip screwdriver or remover, wrap protective
tape around the tools to prevent damage to components.
|
| •
|
Be careful not to scratch the door trim and other parts.
|
|
|
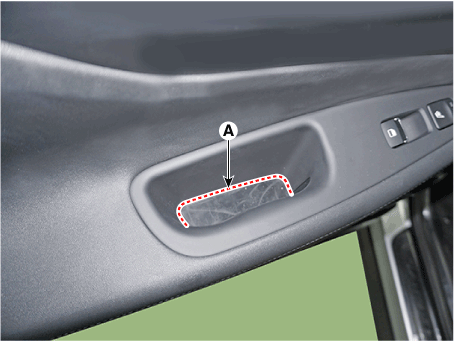
1. |
Using a flat-tip or remover, remove the rear door pull handle mounting
cap (A).
|
|
2. |
Using a screwdriver or remover, remove the rear door delta inner cover
(A).
|
|
3. |
After loosening the mounting screws, remove the rear door trim (A).
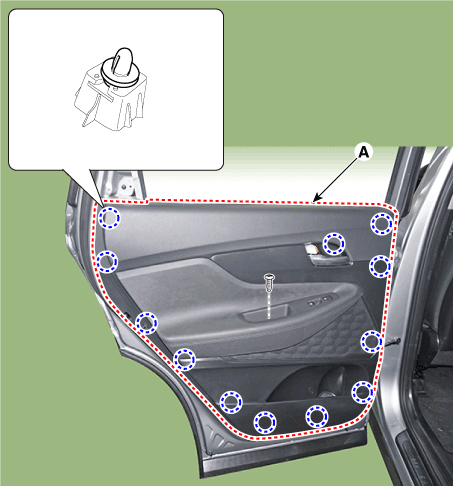
|
|
4. |
Remove the rear door inside handle cage (A).
|
|
5. |
Disconnect the power window switch connector (A).
|
|
6. |
To install, reverse removal procedure.
|
• |
Make sure the connector is connected properly.
|
|
• |
Make sure the door locks / unlocks and opens / closes
properly.
|
|
• |
Replace any damaged clips (or pin-type retainers).
|
|
• |
Make sure the glass moves properly.
|
|
|
Rear Door Inside Handle. Repair procedures
|
1. |
Remove the rear door trim.
(Refer to Rear Door - "Rear Door Trim")
|
|
2. |
After loosening the mounting screws, remove the rear door inside handle
(A).
|
|
3. |
To install, reverse removal procedure.
|
• |
Make sure the door locks / unlocks and opens / closes
properly.
|
|
• |
Replace any damaged clips (or pin-type retainers).
|
|
|
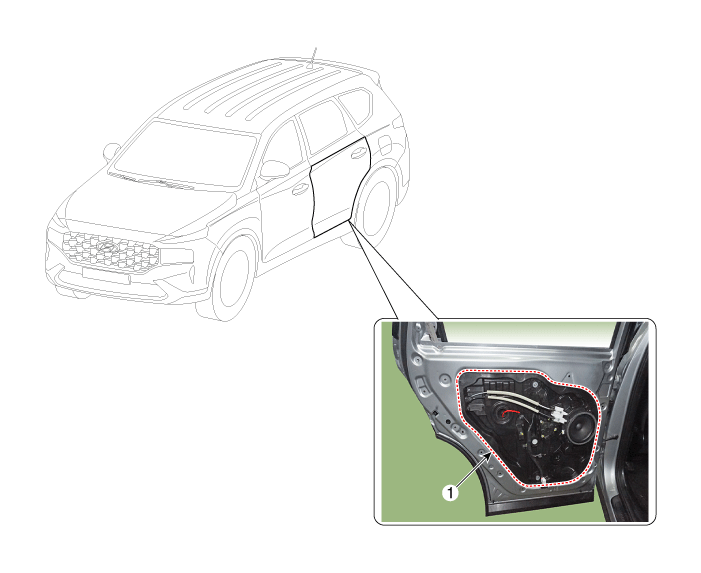
Rear Door Window Glass. Components and components location
1. Rear Door
Window Glass
|
|
Rear Door Window Glass. Repair procedures
|
1. |
Remove the rear door trim.
(Refer to Rear door - " Rear door trim")
|
|
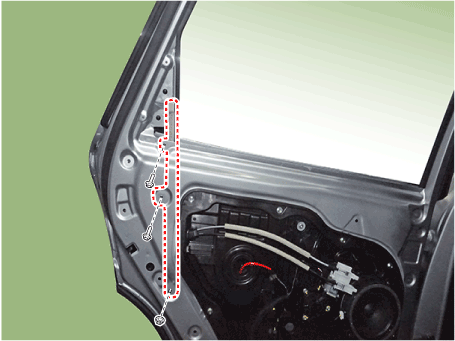
2. |
Using a remover and separate the rear door belt outside weatherstrip
(A).
|
|
3. |
Loosen the rear door delta molding screws.
|
|
4. |
Unscrew the rear door channel mounting nut and bolt loosely.
|
Tightening torque
Nut : 7.8 - 11.8 N.m (0.8 - 1.2 kgf.m, 5.8 - 8.7 lb-ft)
Bolt : 7.8 - 12.7 N.m (0.8 - 1.3Kgf.m, 5.8 - 9.4 lb-ft)
|
|
|
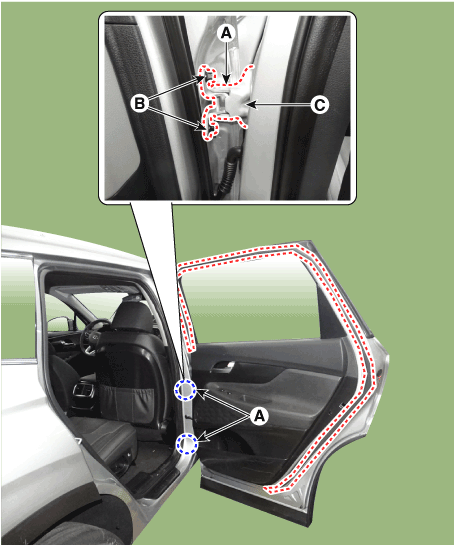
5. |
Remove the rear door belt inside weatherstrip (A).
|
|
6. |
Remove the plug hole (A).
|
|
7. |
By operating the power window switch, pull down until the glass mounting
bolt on plug hole is visible.
|
• |
Be careful not to damage the glass surface.
|
|
|
|
8. |
Loosen the mounting bolt and then pull out the rear door window glass
(A) by tilting it sideways.
|
Tightening torque :
7.8 - 11.8 N.m (0.8 - 1.2 kgf.m, 5.8 - 8.7 lb-ft)
|
|
|
9. |
To install, reverse removal procedure.
|
• |
Make sure that the glass rolls up and down smoothly.
|
|
• |
Adjust glass position as needed.
|
|
• |
Make sure the door locks and opens properly.
|
|
• |
Replace any damaged clips (or pin-type retainers).
|
|
|
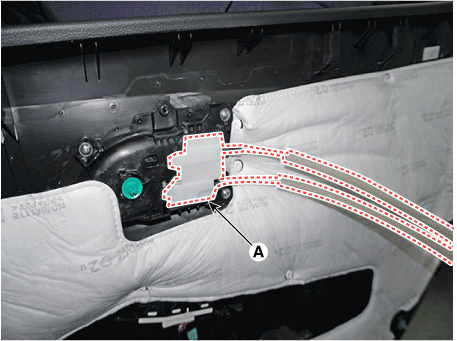
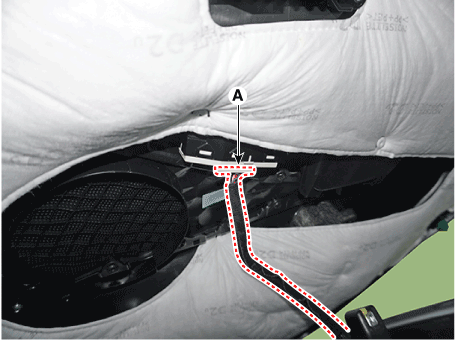
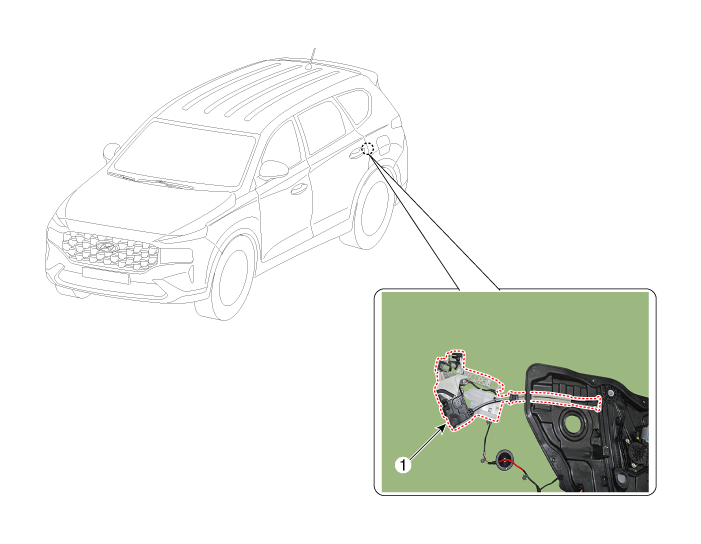
Rear Door Module. Components and components location
Rear Door Module. Repair procedures
|
1. |
Remove the rear door window glass.
(Refer to Rear Door - "Rear Door Window Glass")
|
|
2. |
Remove the rear door outside handle.
(Refer to Rear Door - "Rear Door Outside Handle")
|
|
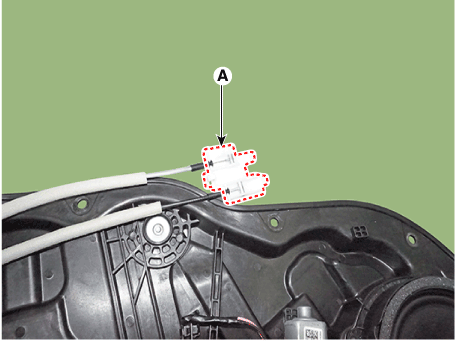
3. |
Press the lock pin and separate the rear door main connector (A).
|
|
4. |
Loosen the rear door out side handle base mounting screw (A).

|
|
5. |
Loosen the rear door latch mounting screw (A).
|
Tightening torque :
7.8 - 10.8 N.m (0.8 - 1.1 kgf.m, 5.8 - 8.0 lb-ft)
|
|
|
6. |
Remove the rear door channel (A).
|
|
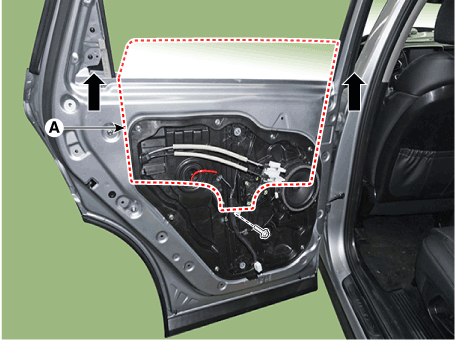
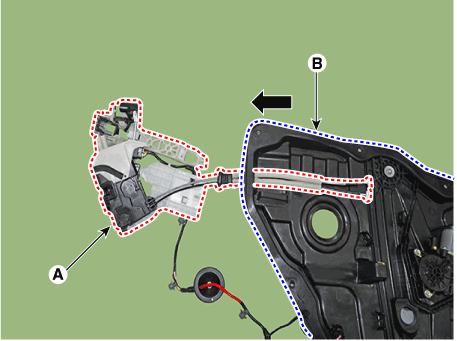
7. |
Loosen mounting bolts and remove the rear door module (A).
|
Tightening torque :
8.8 - 13.7 N.m (0.9 - 1.4 kgf.m, 6.5 - 10.1 lb-ft)
|
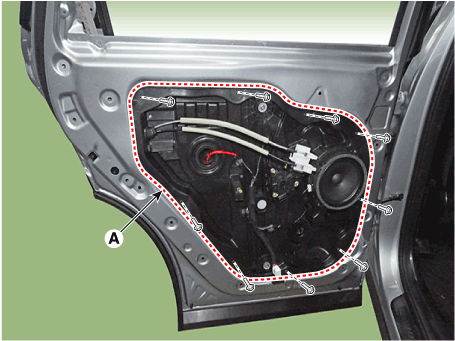
|
|
8. |
Remove the rear door main wiring (A).
|
|
9. |
To install, reverse removal procedure.
|
• |
Make sure connectors are connected properly and each
rod is connected securely.
|
|
• |
Make sure the door locks / unlocks and opens / closes
properly.
|
|
|
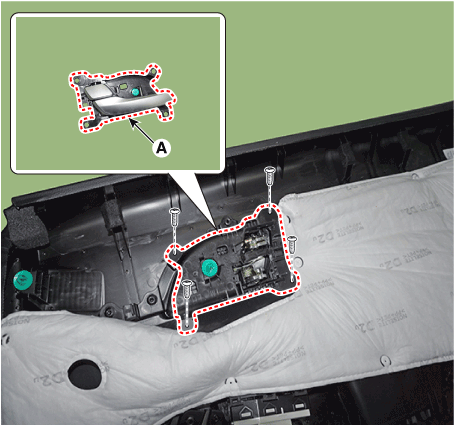
Rear Door Outside Handle. Components and components location
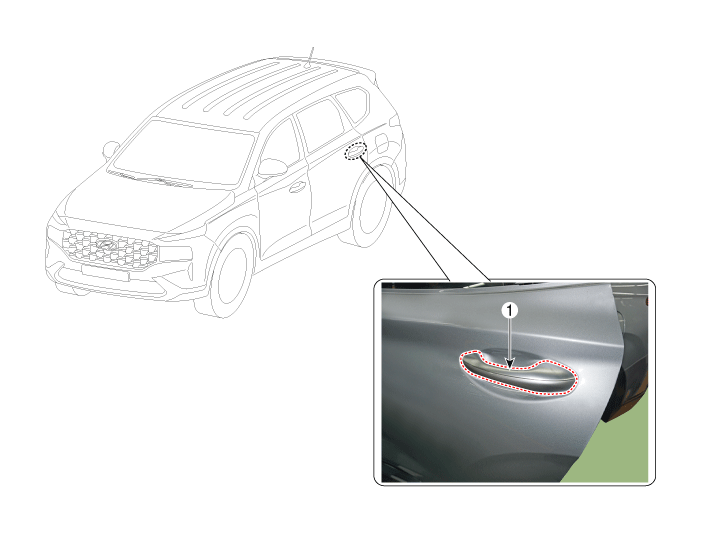
1. Rear Door
Outside Handle
|
|
Rear Door Outside Handle. Repair procedures
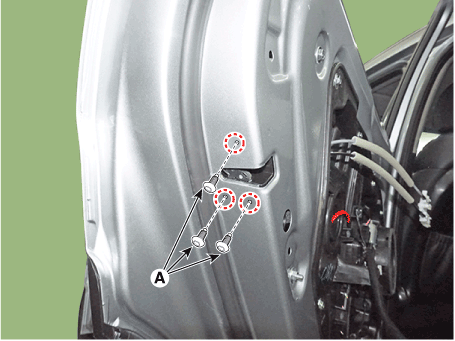
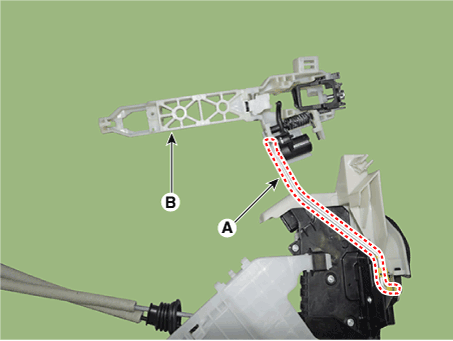
|
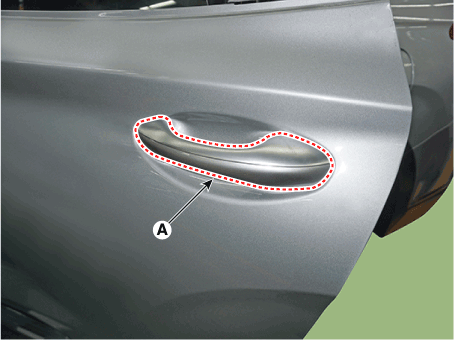
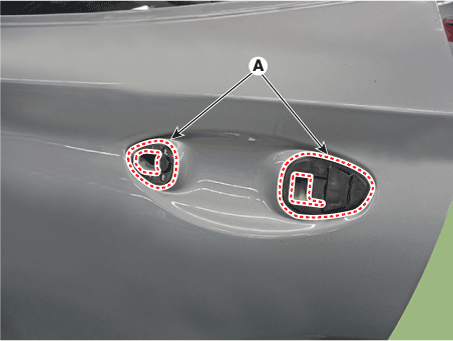
1. |
Remove the plug hole and loosen the mounting bolt, remove the rear door
outside handle (A).
|
Tightening torque :
7.8 - 10.8 N.m (0.8 - 1.1 kgf.m, 5.8 - 8.0 lb-ft)
|
|
|
2. |
To install, reverse removal procedure.
|
• |
Make sure the door locks / unlocks and opens / closes
properly.
|
|
• |
Be sure to install the outside handle pad (A) between
the outside handle and the door panel.
|
|
|
Rear Door Latch. Components and components location
Rear Door Latch. Repair procedures
|
1. |
Remove the rear door module.
(Refer to Rear Door - "Rear door module")
|
|
2. |
Remove the rear door insade handle case (A)
|
|
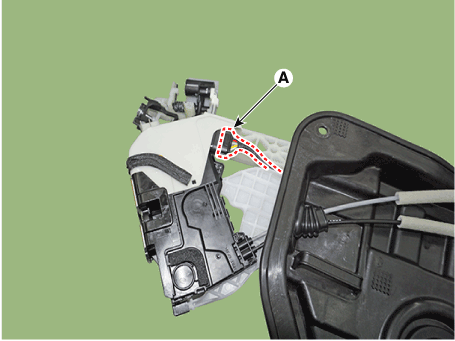
3. |
Press the lock pin and separate the connector (A).
|
|
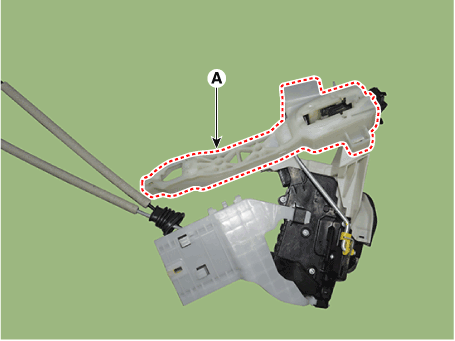
4. |
Separate the rear door latch (A) from the module (B).
|
|
5. |
Remove the rear door outside handle base (A).
|
|
6. |
Separate the rear door outside handle rod (A) and remove the rear door
outside handle base (B).
|
|
7. |
To install, reverse removal procedure.
|
• |
Make sure the connector is connected properly.
|
|
• |
Make sure the door locks / unlocks and opens / closes
properly.
|
|
• |
Replace any damaged clips (or pin-type retainers).
|
|
|
Rear Door Belt Outside Weatherstrip. Repair procedures
|
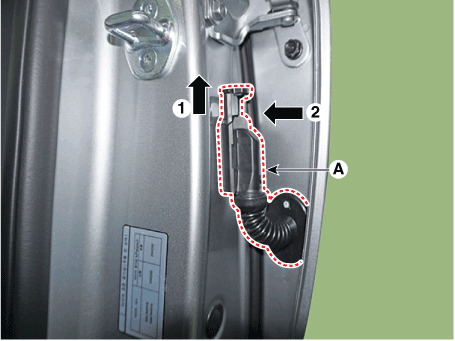
1. |
Pull down the rear door window glass to the lowest level by pressing
the power window glass switch.
|
|
2. |
After loosening the mounting screws, remove the rear door belt outside
weartherstrip (A) by pulling it upward.
|
|
3. |
To install, reverse removal procedure.
|
• |
Replace any damaged clips.
|
|
|
Rear Door Belt Inside Weatherstrip. Repair procedures
|
1. |
Remove the rear door trim.
(Refer to Rear Door - "Rear Door Trim")
|
|
2. |
Remove the rear door belt inside weatherstrip (A).
|
|
3. |
To install, reverse removal procedure.
|
• |
When installing, install it by first contacting the
inside part (basis point of assembly) of arrow to door
frame.
|
|
• |
Replace any damaged clips.
|
|
|
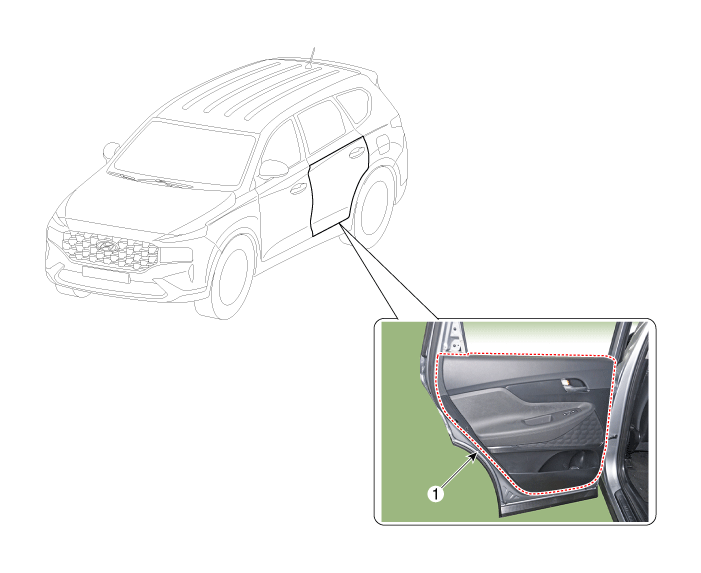
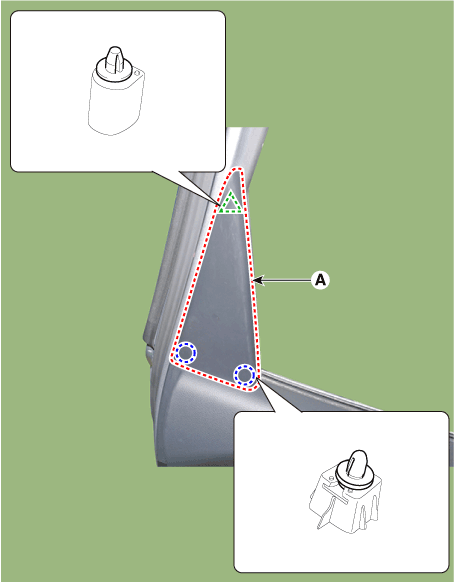
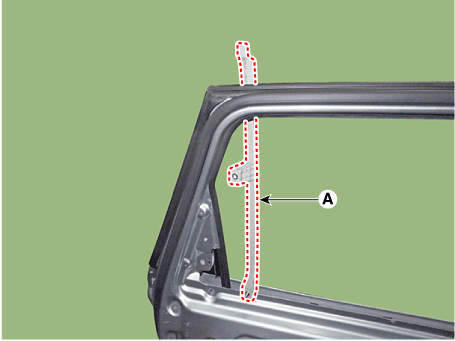
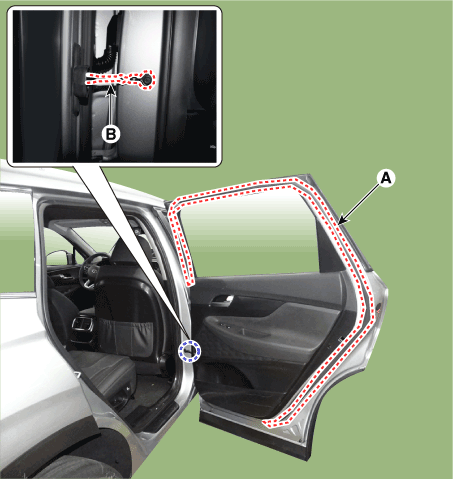
Rear Door Side Weatherstrip. Repair procedures
| [Rear door side weatherstrip] |
|
1. |
Loosen the rear door checker (B) mounting bolt.
|
Tightening torque :
21.6 - 32.4 N.m (2.2 - 3.3 kgf.m,15.9 - 23.9 lb-ft)
|
|
|
2. |
Detach the clips, remove the rear door side weatherstrip (A).
|
|
3. |
To install, reverse removal procedure.
|
• |
Replace any damaged clips.
|
|
|
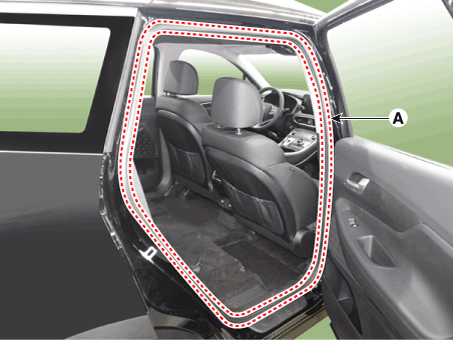
| [Rear door body side weatherstrip] |
|
1. |
Detach the clips, then remove the rear door body side weatherstrip (A).
[LH]
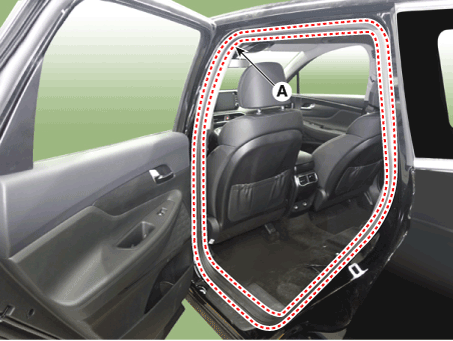
[RH]
|
|
2. |
To install, reverse the removal procedure.
|
Rear Door Frame Garnish. Repair procedures
| •
|
Put on gloves to prevent hand injuries.
|
|
| •
|
When removing with a flat-tip screwdriver or remover, wrap protective
tape around the tools to prevent damage to components.
|
| •
|
Be careful not to scratch the door trim and other parts.
|
|
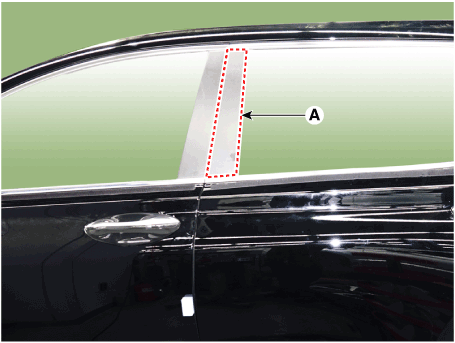
[Rear door B pillar frame garnish]
|
1. |
Remove the rear door belt outside weatherstrip.
(Refer to Rear Door - "Rear Door Outside Weatherstrip")
|
|
2. |
Using a remover and remove the rear door B pillar garnish (A).
|
|
3. |
To install, reverse removal procedure.
|
• |
Replace any damaged clips (or pin-type retainers).
|
|
• |
If any parts are damaged after removing the door frame
garnish, replace it with a new one.
|
|
|
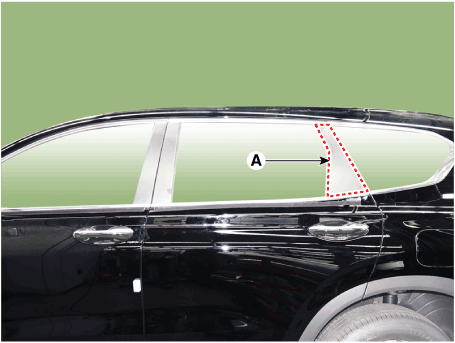
[Rear door C pillar frame garnish]
|
1. |
Remove the rear door belt outside weatherstrip.
(Refer to Rear Door - "Rear Door Outside Weatherstrip")
|
|
2. |
Using a screwdriver or remover, remove the rear door delta inner cover
(A).
|
|
3. |
Using a remover and remove the rear door C pillar garnish (A).
|
|
4. |
To install, reverse removal procedure.
|
• |
Replace any damaged clips (or pin-type retainers).
|
|
• |
If any parts are damaged after removing the door frame
garnish, replace it with a new one.
|
|
|
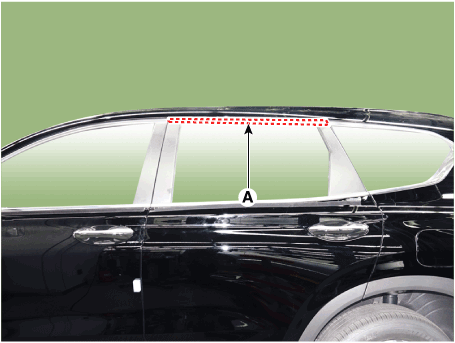
Rear Door Frame Molding. Repair procedures
| •
|
Put on gloves to prevent hand injuries.
|
|
| •
|
When removing with a flat-tip screwdriver or remover, wrap protective
tape around the tools to prevent damage to components.
|
| •
|
Be careful not to scratch the door trim and other parts.
|
|
|
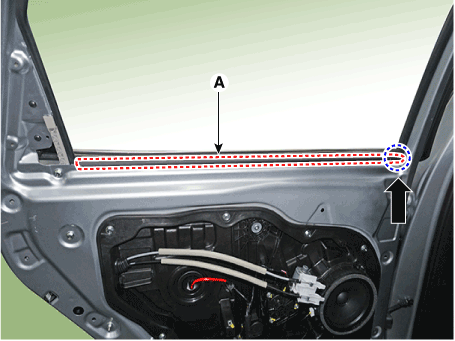
1. |
Using a remover and remove the rear door frame molding (A).
|
|
2. |
To install, reverse removal procedure.
|
• |
Replace any damaged clips (or pin-type retainers).
|
|
• |
If any parts are damaged after removing the door frame
molding, replace it with a new one.
|
|
|
Components and components location Components 1. Front door window glass 2. Front door window glass run assembly 3. Front door outside handle 4. Front door lock assembly 5. Front door outside handle pad ...
Rear Spoiler. Components and components location Component Location 1. Rear Spoiler Rear Spoiler. Repair procedures Replacement • Put on gloves to prevent hand injuries. • ...
 Hyundai Santa Fe (TM): Rear Door


 Front Door
 Body Side Molding