Components and components location
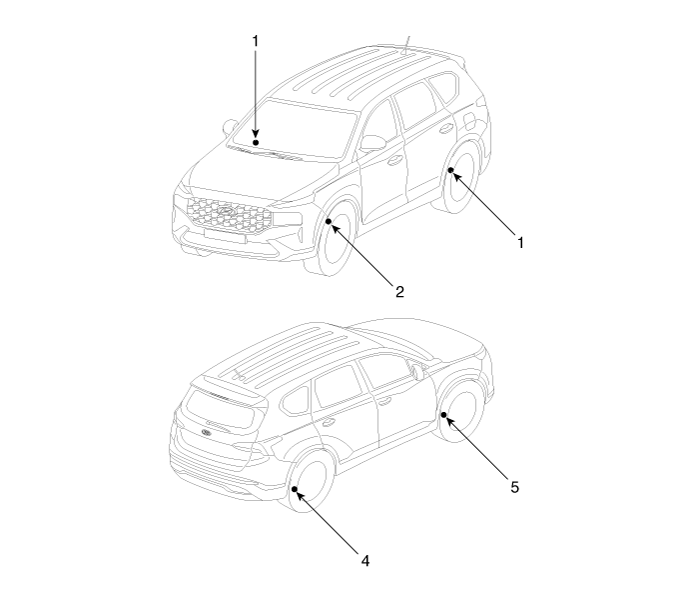
1. Receiver
2. TPMS Sensor (FL)
3. TPMS Sensor (RL)
|
4. TPMS Sensor
(RR)
5. TPMS Sensor (FR)
|
Description and operation
TREAD Lamp
| – |
Tire Under Inflation / Leak Warning.

|
|
1. |
Turn on condition
| –
|
When tire pressure is below allowed threshold
|
| –
|
When rapid leak is detected by the sensor.
|
| –
|
Indicates that tire needs to be re-inflated to placard pressure
/ repaired.
|
|
|
2. |
Turn off condition
| –
|
Under-inflation ; When tire pressure is above (warning threshold
+ hysteresis).
|
| –
|
Rapid Leak ; When tire pressure is above (leak warning threshold).
|
|
DTC Warning
|
1. |
Turn on condition
| –
|
When the system detects a fault that is external to the receiver/
sensor.
|
| –
|
When the system detects a receiver fault.
|
| –
|
When the system detects a sensor fault.
|
|
|
2. |
Turn off condition
| –
|
If the fault is considered as 'critical', then the lamp is held
on throughout the current Ignition cycle (even if the DTC has
been demoted). This is because it is important to bring the
problem to the drivers attention. On the following Ignition
cycle, the demotion conditions will be re-checked. If the demotion
conditions occur, the lamp will be turned off. It will be held
on until DTC demotion checking is completed.
|
| –
|
'Non critical' faults are those that can occur temporarily e.g.
vehicle battery under voltage. The lamp is therefore turned
off when the DTC demotion condition occurs.
|
|
If the vehicle starts within 19 minutes after the replacement
of the wheel of the stopped vehicle, the TPMS Malfunction Indicator
on the instrument cluster illuminates.
|
– |
The above symptom is due to communication failure between
the BCM and the replaced TPMS ID.
|
|
– |
This communication failure indicator turns off in 19
minutes after the vehicle stops through the BCM’s automatic
learning process of TPMS ID.
(When driving the vehicle after stopping for over 19
minutes, the indicator turns off automatically.)
|
|
|
System Fault
|
1. |
General Function
| –
|
The system monitors a number of inputs across time in order
to determine that a fault exists.
|
| –
|
Faults are prioritized according to which has the most likely
cause.
|
| –
|
Maximum fault store is equal to 15.
|
| –
|
Certain faults are not covered through DTC. The main ones are
:
|
|
a. |
Sensor thermal shutdown (over 257°F / 125°C).
|
|
b. |
Ignition Line stuck ; requires observation of lamps
at Ignition ON to diagnose.
|
|
|
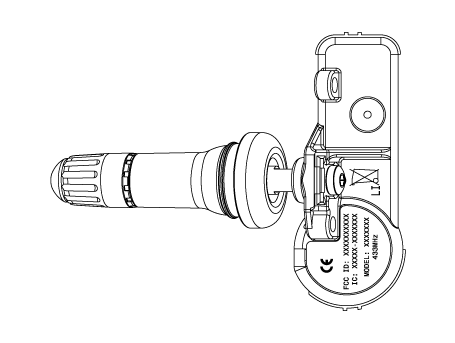
TPMS Sensor. Description and operation
|
1. |
Driving state
Sensor transmissions occur every 1 minutes and pressure is measured
every 15 seconds.
|
|
2. |
Stationary state
Sensor transmissions does not occur and pressure is measured every 60
seconds.
|
|
3. |
Auto learning status
When driving after stopping more than 15 minutes , sensor transmissions
occur every 33 seconds and pressure is measured every 10.8 seconds.
|
|
4. |
Off status
The TPMS sensor is not operated.
Due to stock status, does not measured pressure, temperature, battery
status.
|
|
5. |
Alert State :
When a 2 psi change in pressure from the last transmission occurs, transmit
tire information immediately.
The pressure is measured every 2 seconds.
|
TPMS Sensor. Repair procedures
|
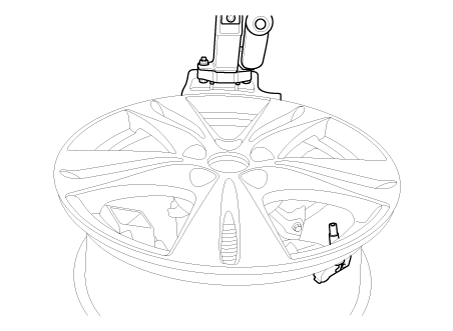
1. |
Remove the tire.
(Refer to Tires/Wheels - "Tire")
|
|
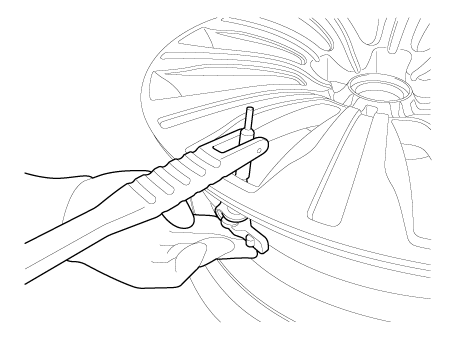
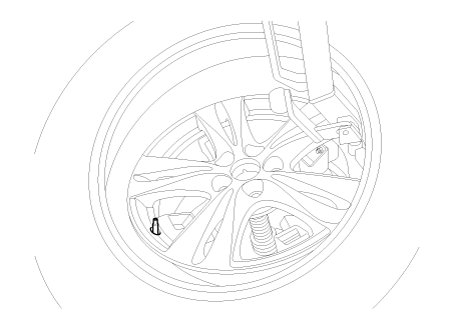
2. |
Remove the screw with torx driver (A).
|
• |
When installing the bead brake, make sure that it does
not come in contact with the TPMS sensor.
|
|
• |
Be careful not to damage the TPMS sensor when installing
the bead brake near the TPMS sensor.
|
|
|
|
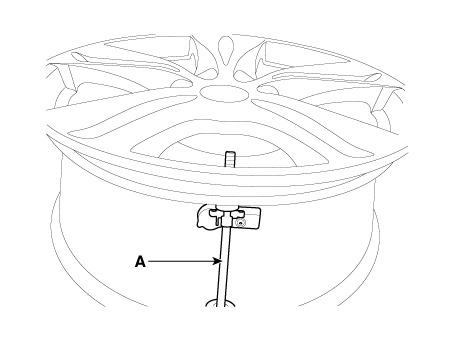
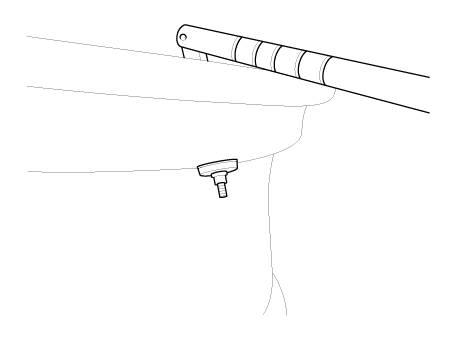
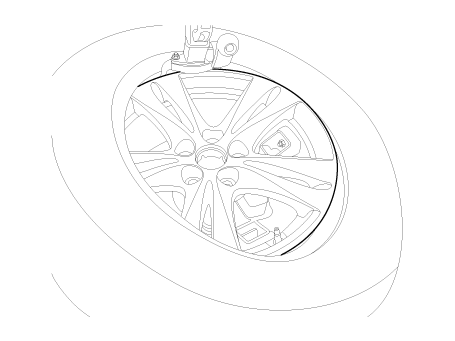
3. |
Remove the sensor body (A) from the valve (B) in the direction of the
arrow.
|
|
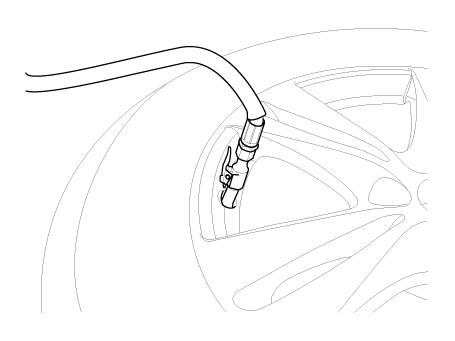
4. |
Remove the valve using the valve mounting tool.
|
• |
Do not reuse the snap-in type TPMS sensor.
|
|
|
(1) |
Cut the rubber at the bottom of valve with a knife.

|
|
(2) |
Use the valve mounting tool to pull out the valve until it is
entirely out of the lower hole.
|
|
|
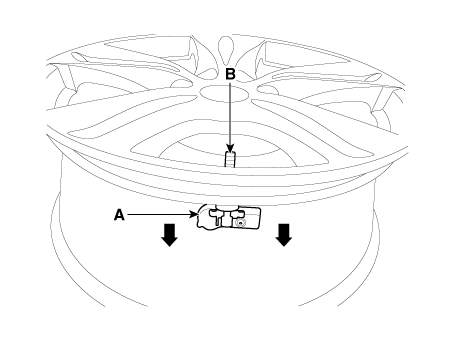
5. |
Apply lubricant to the surface of the valve, and then mount it through
the valve hole of the wheel.
|
We recommend using regular soapy water as lubricant.
|
|
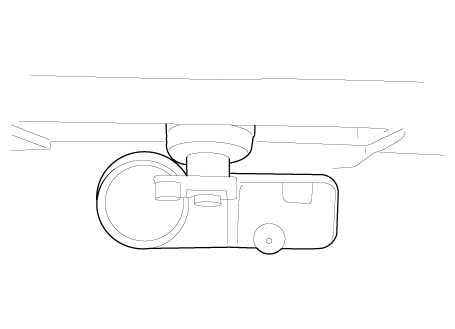
• |
The TPMS sensor valve bottom is not properly sealed
if it is not fully mounted on the wheel, as shown in
the following figure:
|
|
• |
Make sure that the valve body is pulled entirely through
the hole.
|
|
|
|
6. |
Apply soapy water or lubricant to the upper/lower bead section of the
tire.

|
|
7. |
In order to mount lower the beads, place the TPMS sensor at 5 o'clock,
starting from the head of the tire replacement equipment.
|
|
8. |
Rotate the rim clockwise and press tire towards 3 o'clock to mount the
lower beads.
|
• |
Mount the tire on the wheel. Make sure that the beads
touch the edge of the rim behind the sensor (towards
6 o'clock).
|
|
|
|
9. |
In order to mount the upper beads, press the tire towards 3 o'clock
and turn the rim clockwise.
|
|
10. |
Inject air into the tire until the beads are in the correct position.
|
|
11. |
Adjust the tire pressure according to the recommended tire pressure
for the vehicle.
|
|
12. |
If the TPMS sensor malfunctions, you must perform TPMS sensor learning.
Replace any faulty sensors and perform TPMS sensor learning.
|
| Diagnostic Procedure Using
a Diagnostic Instrument |
The following section describes how to diagnose faults using a diagnostic instrument.
|
1. |
Connect the diagnostic instrument to the self-diagnostic connector (16-pin)
beneath the crash pad on the side of driver's seat, and then turn on
the ignition to activate the diagnostic instrument.
|
|
2. |
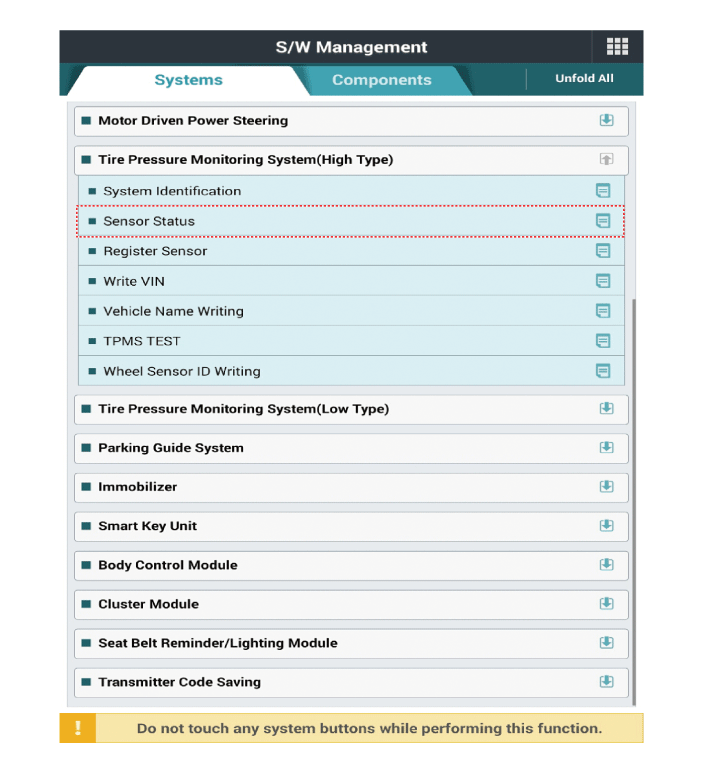
In the GDS Vehicle Type Selection menu, select "Vehicle Type" and "TPMS"
System, and then opt for "OK."
|
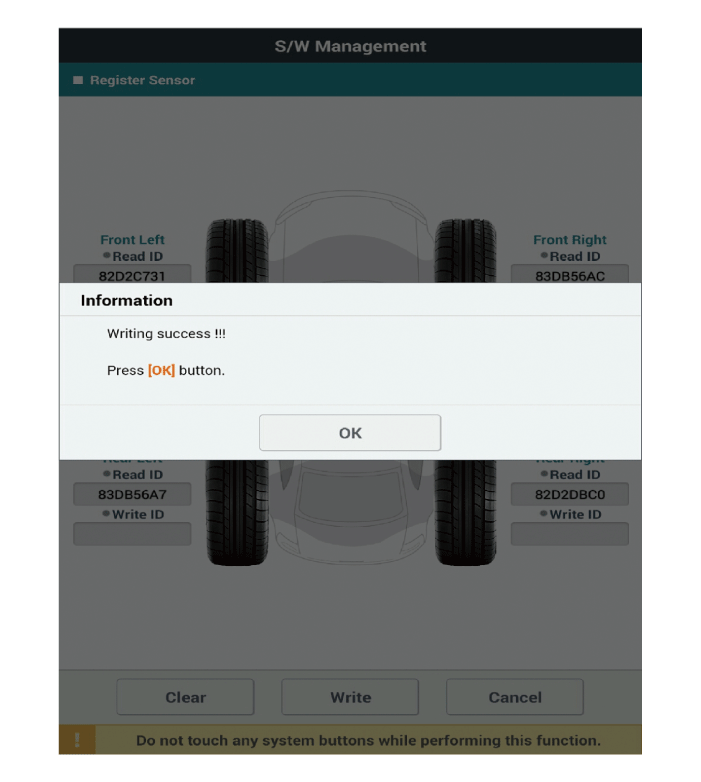
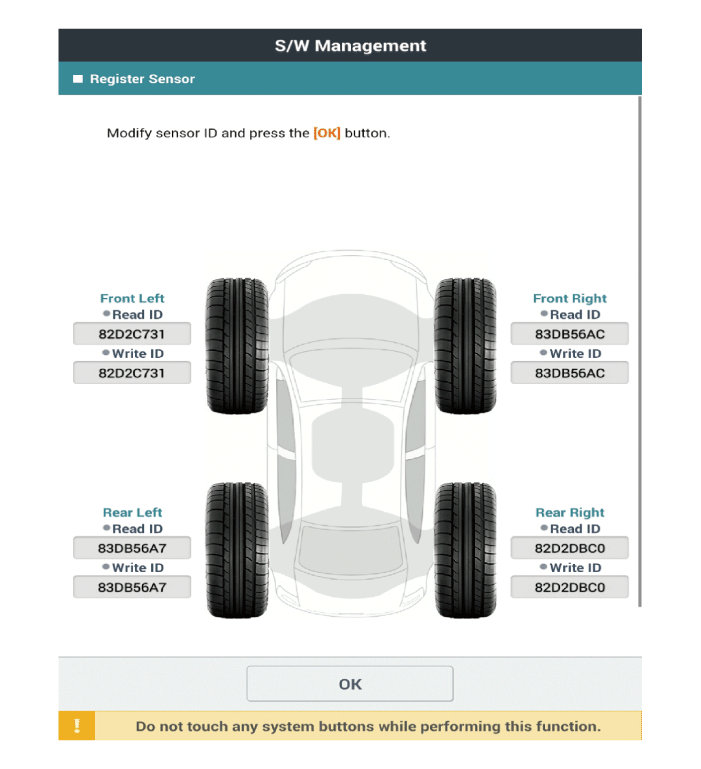
[Register Sensor Method]

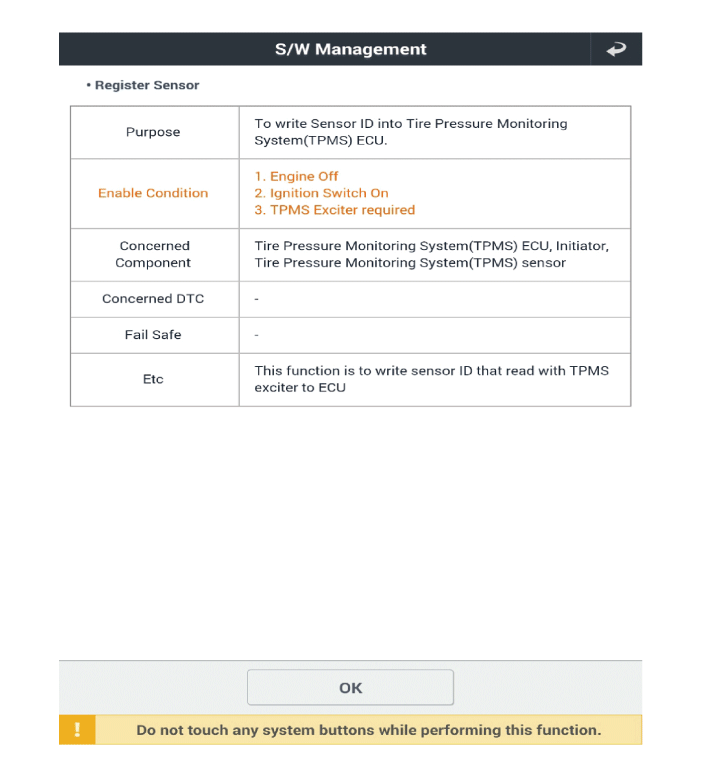
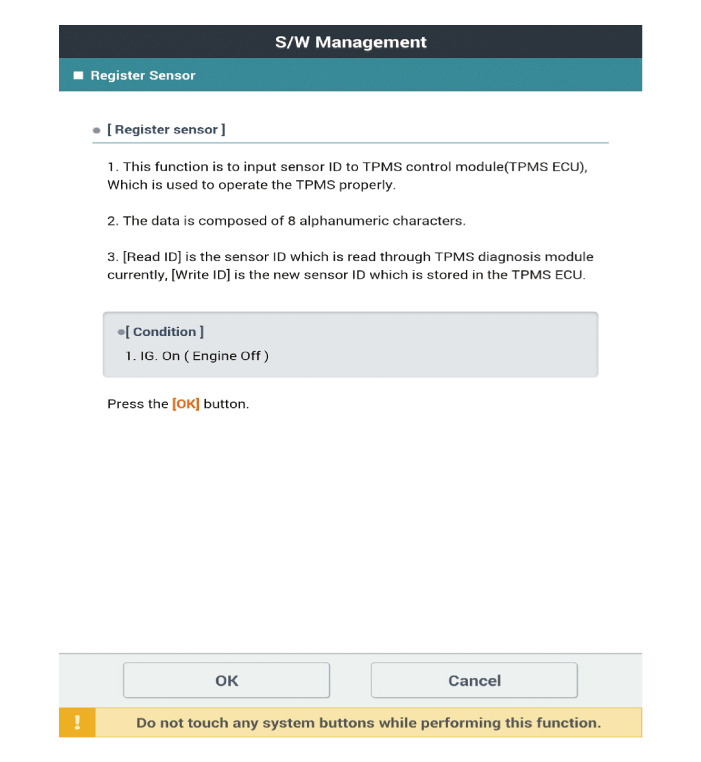
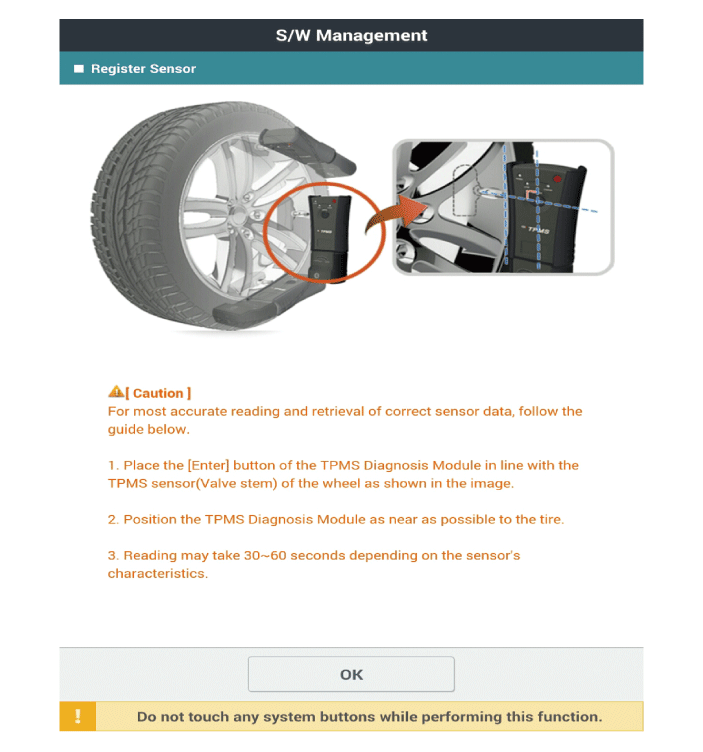
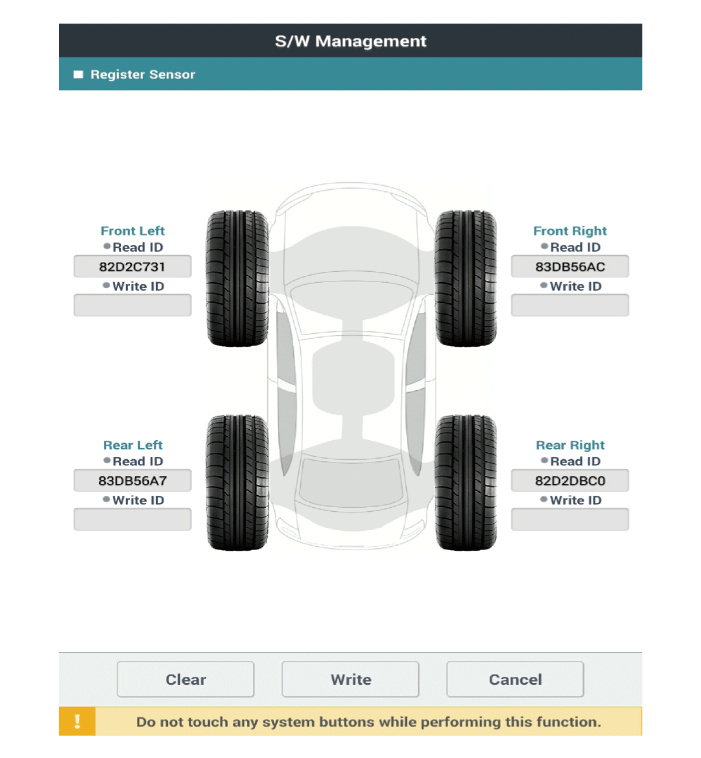
| •
|
Check that Write ID and Read ID are the match.
|
| •
|
After successfully registering the sensor, perform "Sensor Wireless
Information" to confirm that the sensor operates properly.
|
|
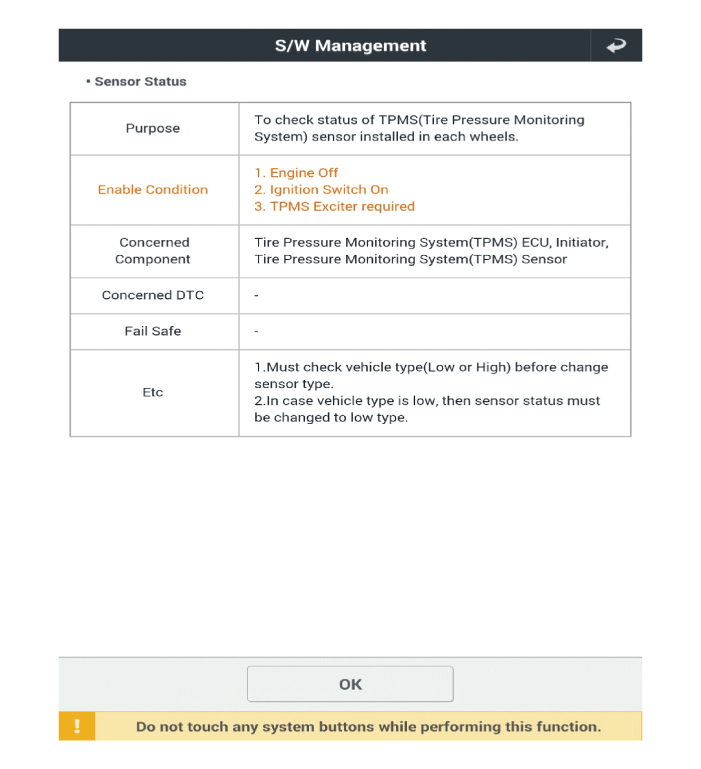
[Sensor Status Method]
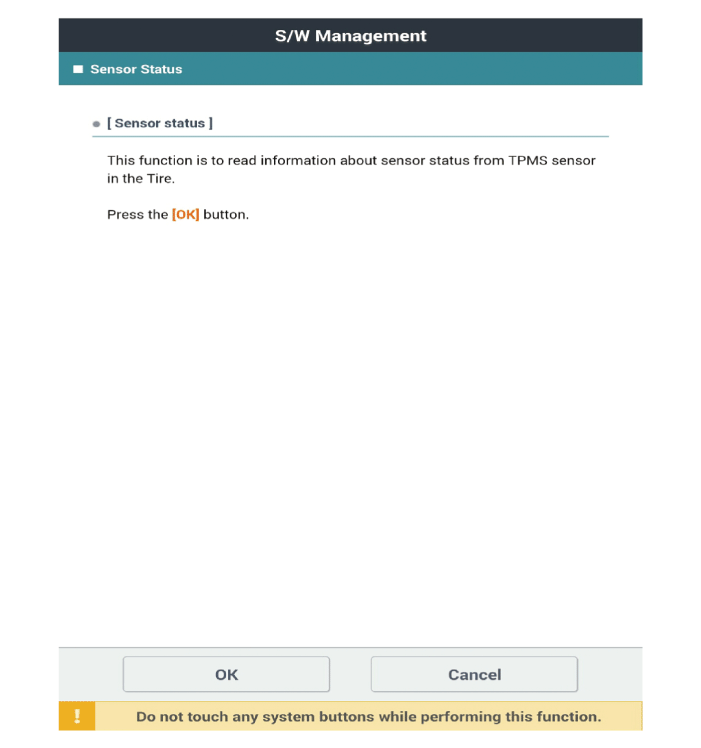
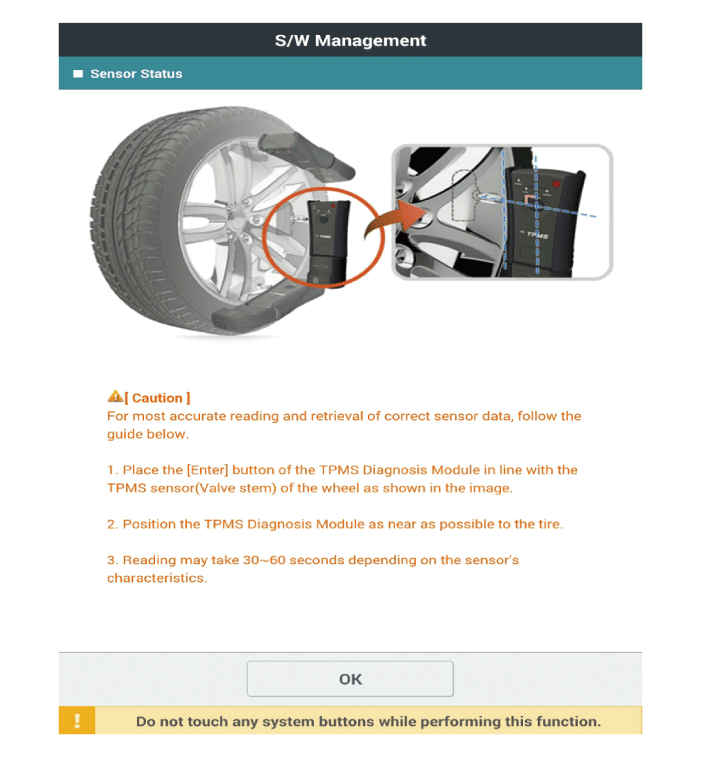
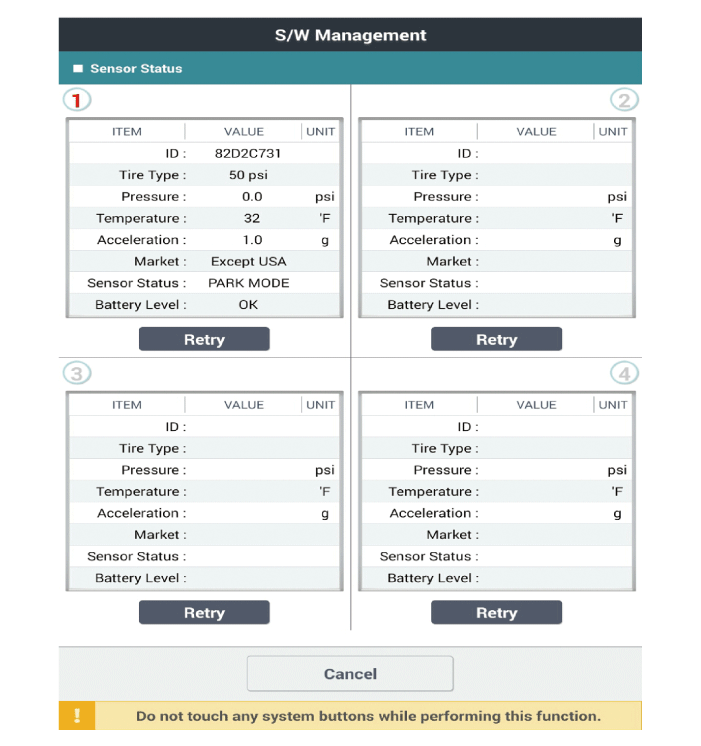
| •
|
Each entry must be checked for normal operation of each sensor.
|
| •
|
After replacing the tires or sensors, check for proper operation
of sensor after sensor registration process.
|
|
TPMS Receiver. Description and operation
TPMS Receiver : BCM(body control module) integrated management
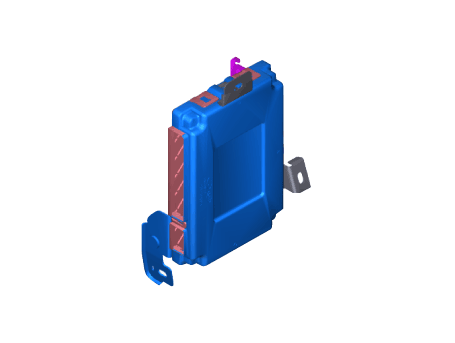
|
1. |
Mode
|
(1) |
Virgin State
|
• |
The receiver as a sole part is shipped in this state.
Replacement parts should therefore arrive in this state.
|
|
• |
In this state, there is no Auto-Location, no sensor
wake-up, no sensor monitoring and no DTC monitoring..
|
|
• |
The state indicates that platform specific parameters
must be written to the receiver and that sensors are
un-learned.
|
|
|
(2) |
Normal State
|
• |
In order for tire inflation state and DTC monitoring
to occur, the receiver must be in this state.
|
|
• |
In this state, automatic sensor location / learning
is enabled.
|
|
|
|
2. |
Overview
| •
|
Learn TPMS sensor for under inflation monitoring automatically.
|
| •
|
Uses sensor information, distance travelled, background noise
levels, Auto-learn status, short / open circuit output status,
vehicle battery level, internal receiver states to determine
if there is a system or a vehicle fault.
|
|
|
1. |
General Function
| •
|
Auto-learn takes place only once per Ignition cycle.
|
| •
|
On successful completion, 4 road wheel sensor ID's are latched
into memory for monitoring.
|
| •
|
Until Auto-learn completes, previously learned sensors are monitored
for under inflation / leak warnings.
|
|
|
2. |
General Conditions to Learn New Sensors:
| •
|
Receiver must determine that it is confident that sensor is
not temporary:
a. Uses vehicle speed.
b. Uses confidence reduction of previously learned sensors.
|
| •
|
Typical time at driving continuously over 15.5 mph(25 kph) to
learn a new sensor is up to 20 minutes.
|
|
|
3. |
General Conditions to Un-Learn a sensor that is removed :
| •
|
It takes less than 20 minutes at 15.5 mph(20-30 kph).
|
| •
|
Confidence reduction is dependent on time which vehicle is driven
at speed greater than or equal to 12.4 mph(20-30 kph).
|
|
TPMS Receiver. Repair procedures
[TPMS Receiver (integrated Body control Unit (IBU))]
|
1. |
Turn the ignition switch OFF and disconnect the battery negative (-)
cable.
|
|
2. |
Remove the glove box.
(Refer to Body - "Glove Box")
|
|
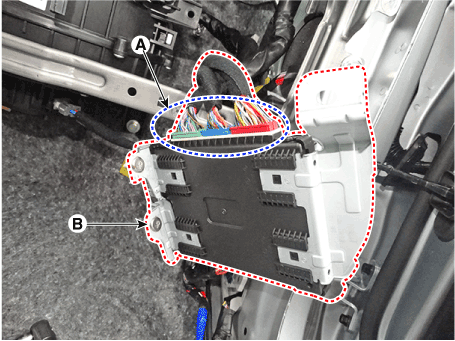
3. |
Disconnect the body control module connectors (A) and then remove the
integrated body control unit (B).
|
|
4. |
Install in the reverse order of removal.
|
|
5. |
After replacing the receiver, learn by using self-diagnostic device
GDS.
|
| Diagnosis procedure by using
diagnostic device |
The main contents of diagnostic method using diagnostic device are as follows:
|
1. |
Connect self-diagnosis connector (16 pins) located in the lower driver
side crash pad to self-diagnosis device, and then turn on the self-diagnosis
device after key is ON.
|
|
2. |
Select the "vehicle model" and "TPMS" on GDS vehicle selection screen,
then select OK.
|
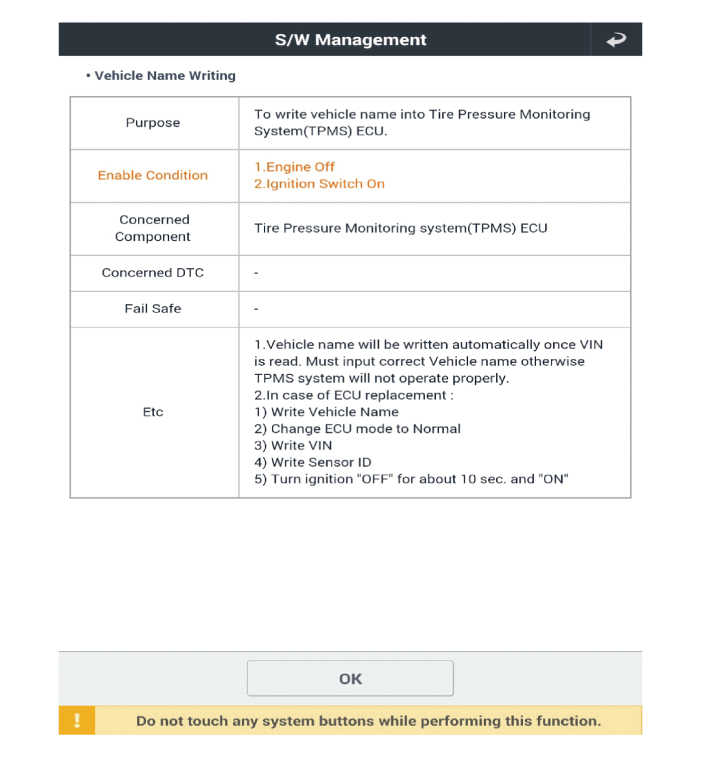
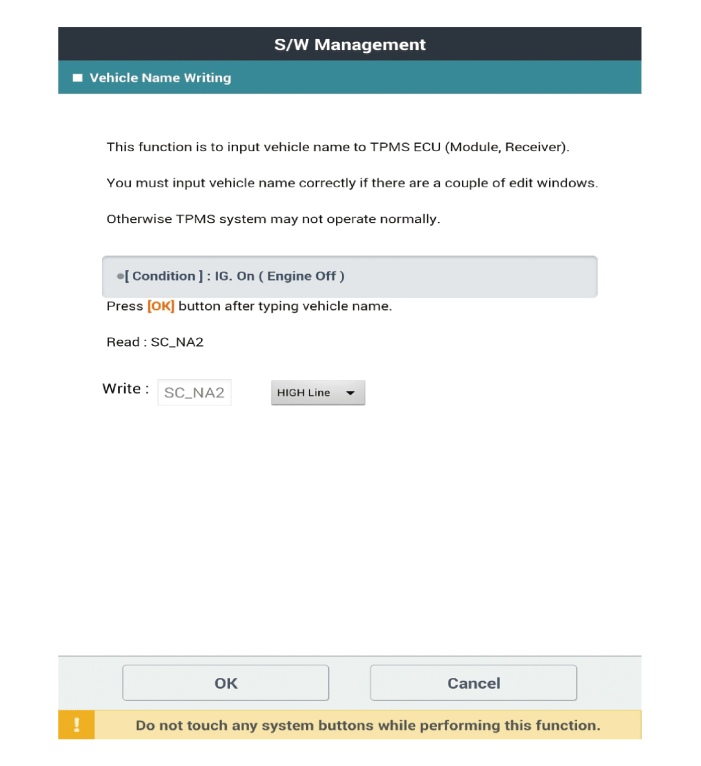
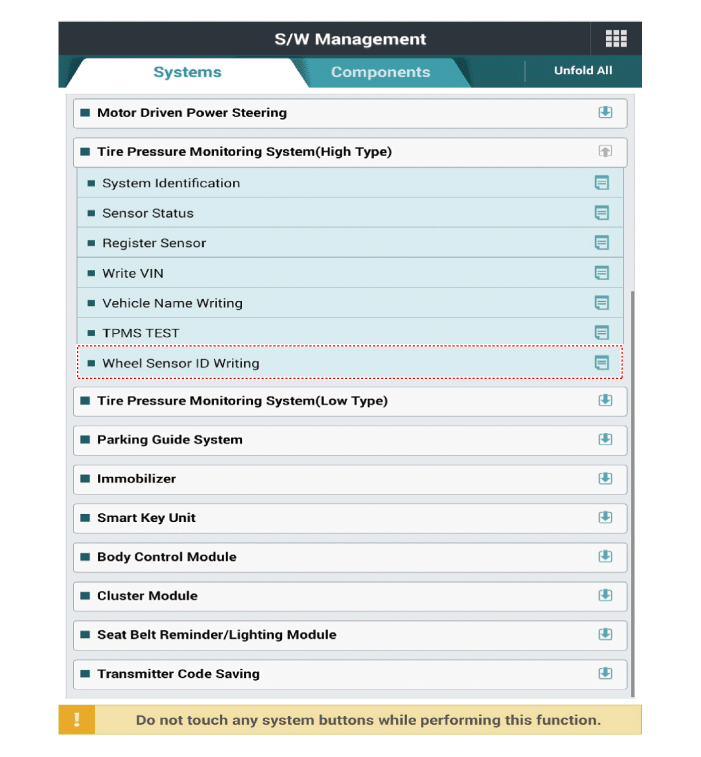
[Vehicle Name Writing Method]
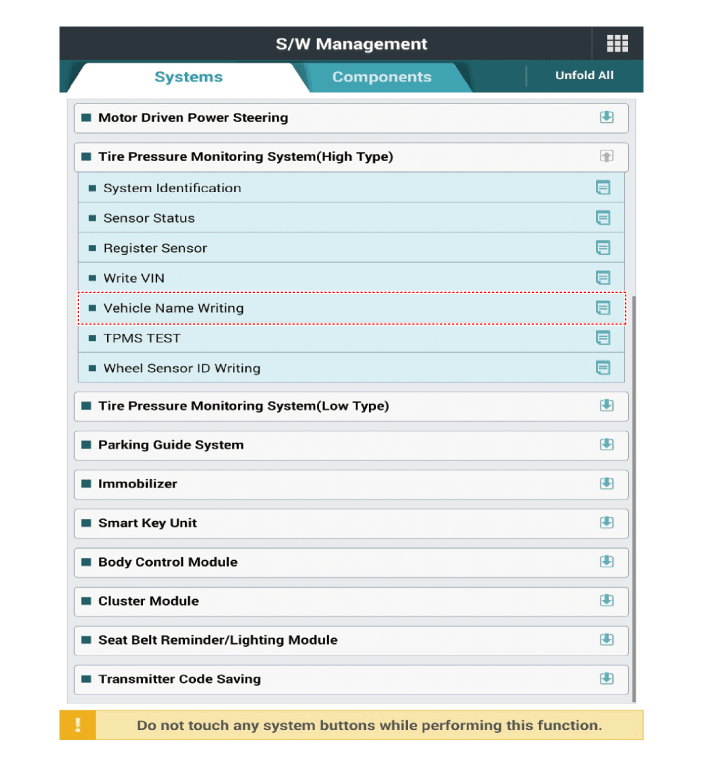

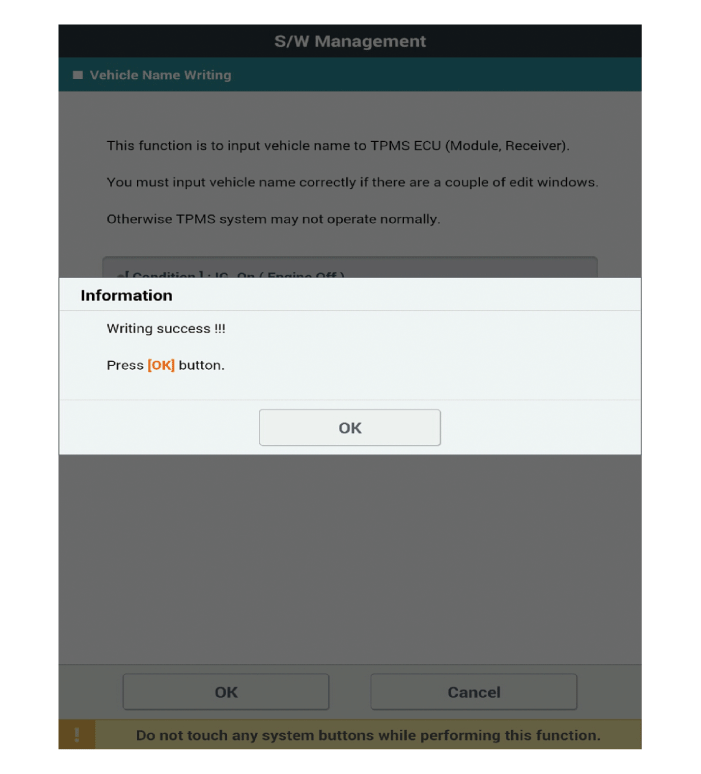
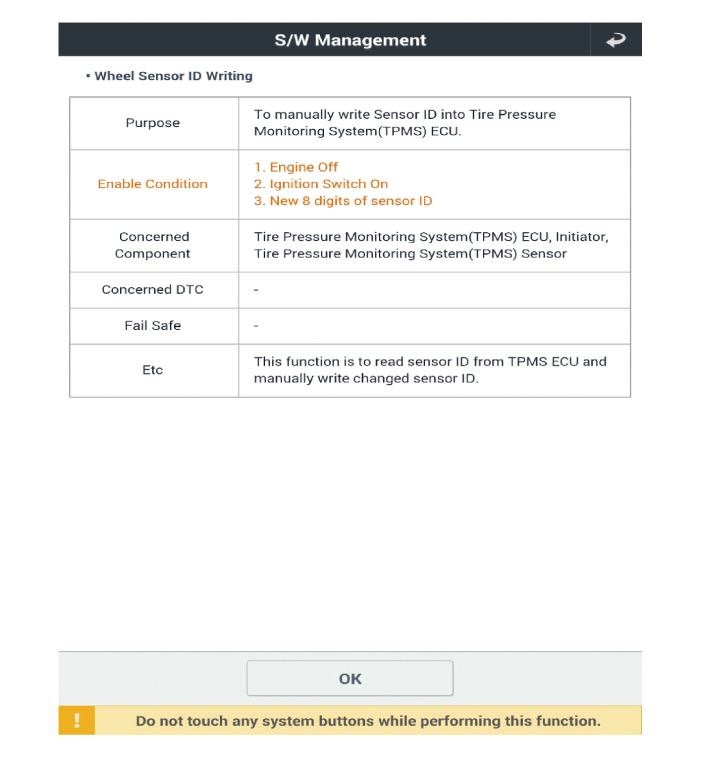
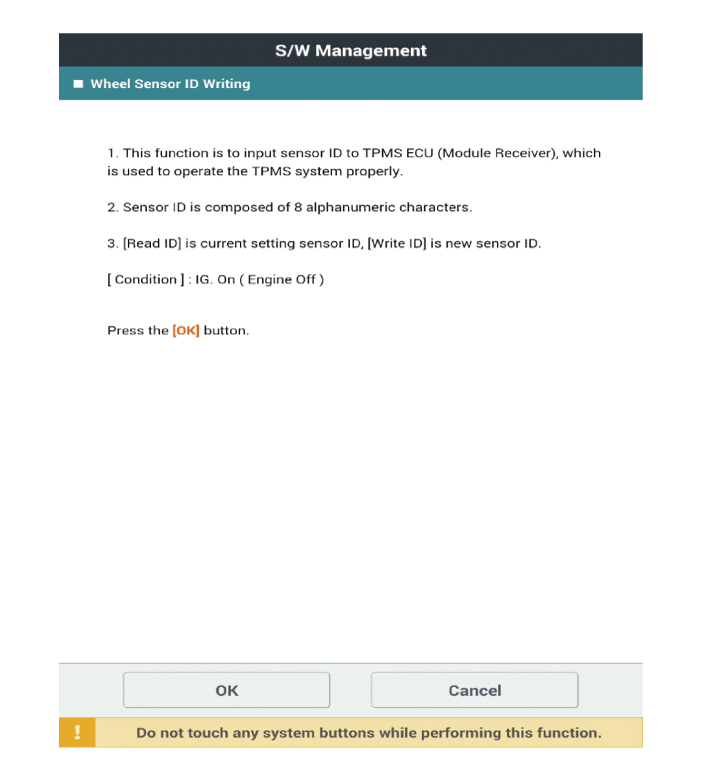
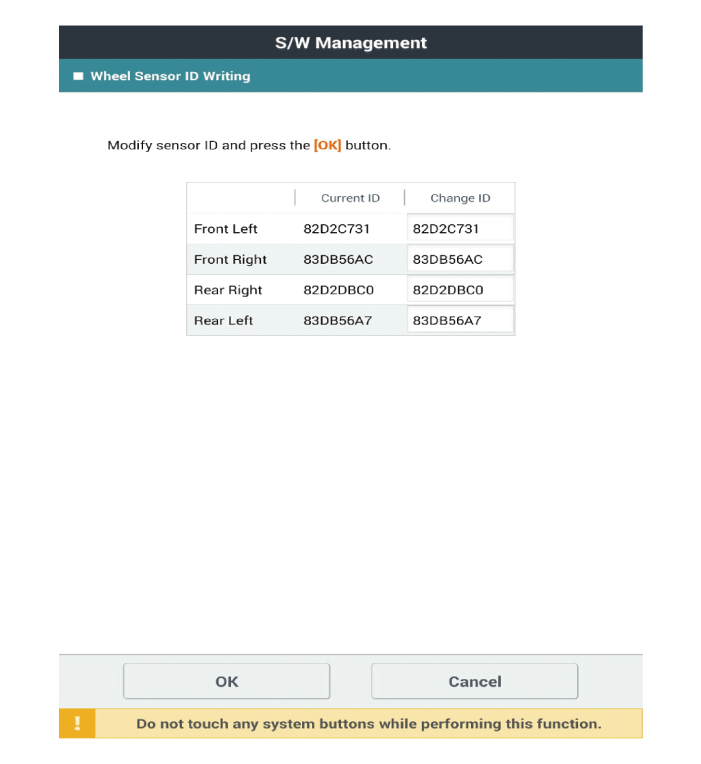
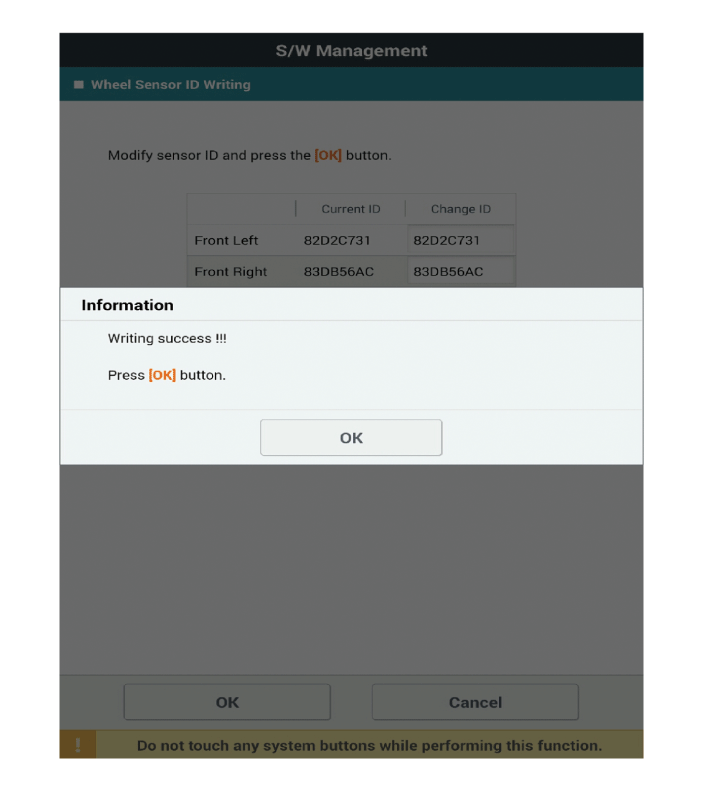
[Wheel Sensor ID Writing Method]
Tire. Repair procedures Tire Wear • Using tires and wheel other than the recommended sizes could cause unusual handling characteristics and poor vehicle control, resulting in a serious accident. ...
See also:
Jack and tools
The jack, jack handle, and wheel lug nut wrench are stored in the luggage compartment. Pull up the luggage box cover to find these equipment. (1) Jack handle (2) Jack (3) Wheel lug nut wrench (4) Socket ...
Alternator. Repair procedures
Removal 1. Disconnect the battery negative terminal. 2. Disconnect the air compressor connector (A) and the alternator connector (B), and remove the cable from alternator "B" terminal (C). 3. ...
Crankshaft. Repair procedures
Disassembly • Use fender covers to avoid damaging painted surfaces. • To avoid damage, unplug the wiring connectors carefully while holding the connector portion. • Mark all wiring and hoses to avoid ...
 Hyundai Santa Fe (TM): Tire Pressure Monitoring System

 Tires/Wheels
 Steering System